Kitchen / Garden / Sanctuary - Urban Homesteading to Nourish Body + Spirit

Category: How-To / DIY (Page 11 of 14)

Classic Caesar Salad Dressing

Since we’re on the topic of salads, and it’s peak season for garden lettuce, I wanted to share a yummy Caesar dressing recipe with you. I love Caesar salads. In fact just today I plowed through an entire head of my garden Romaine just by adding this Caesar dressing and eating taco-style. OH. YUM.

A recipe for homemade Caesar dressing that actually tastes right has eluded me for years, and I would buy bottled Caesar as a very occasional treat. No more. I have found my recipe. I’ve adapted it from the original recipe in Alice Waters’s book, The Art of Simple Food. I can’t get enough of this dressing, and to me it tastes just like a true Caesar should.

In my recipe, I’ve left the raw egg yolk out. Not that I’m opposed to adding good quality raw eggs to food, but I find that the dressing didn’t need it, and more importantly, I’ve found that salad dressing with raw egg doesn’t store very well — it just doesn’t taste that great much past the day it was made. I rarely finish a batch of salad dressing in one sitting, so it’s important to me that the dressing will store well and still taste good.

Here’s my adapted recipe:

Caesar Salad Dressing

1 Tbsp red wine vinegar

1 Tbsp freshly-squeezed lemon juice (definitely use fresh lemon juice here, because bottled just won’t taste right in this application)

1-2 garlic cloves, finely chopped (I use two medium-small cloves so it won’t overpower)

1 – 1 1/2 tsp anchovy paste or finely chopped anchovy fillets (2-3 fillets) (anchovy adds great depth of flavor to your dressing without making it taste fishy)

freshly ground pepper, generous amount

salt to taste

1/4 cup olive oil

3 Tbsp parmesan cheese

[1 raw egg yolk] – Optional.

Combine red wine vinegar, lemon juice, chopped garlic, anchovy paste, and a generous amount of freshly-ground pepper. Whisk together or just shake vigorously in a jar with a lid (my preferred method).

Then add the olive oil and parmesan cheese and shake or whisk again to combine. Taste for salt and add as needed.

If you’re using the raw egg yolk, mix it in right before serving.

Serve the salad with an extra sprinkle of parmesan cheese, and croutons if you want to really do it right!

Store any extra dressing in the fridge.

How To Make Traditional Kefir

Kefir is a fermented milk drink from the Caucasus region of Eurasia, similar to yogurt, but with an enhanced probiotic profile. Traditionally, kefir is made by dropping “kefir grains” into milk (raw milk or pasteurized, but not ultra-pasteurized). The kefir grains ferment the milk, causing it to thicken and take on a yogurt-like tartness, although the consistency is thinner than yogurt. Kefir can be purchased in bottles at the store, however commercial kefir is produced using powdered kefir starter rather than the actual “grains,” and therefore doesn’t possess nearly the probiotic diversity of traditional kefir. The only way to obtain traditional kefir is to make it yourself with kefir grains. The good news is, it couldn’t be easier! I used to make yogurt a lot, which required heating milk to the scalding point, then cooling it to 110 degrees, stirring in the “starter” (plain yogurt), wrapping the jar in towels and placing it on a “reptile heat rock” where it would sit for 4-6 hours. While the process itself was very easy, it was labor intensive. Kefir is SO much easier, and again, has more probiotic benefits than yogurt.

For those reasons, I probably won’t go back to regularly making yogurt; I’m definitely a kefir convert! 🙂
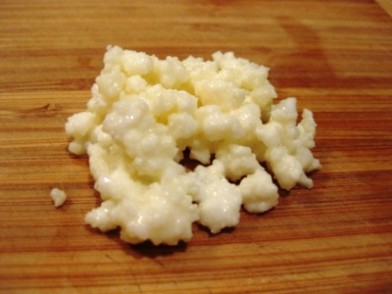
Kefir grains

To make kefir, you’ll first need to obtain kefir grains. This was the hardest step for me, for some reason. Silly, I know, since they’re widely available on the internet & through kefir grain exchanges. I think I must have been wary of these mysterious grains — they were a big unknown at first. I didn’t know how to use them, nobody I knew had even heard of them, and I thought surely I would either kill them or accidentally culture some kind of rogue bacteria that would kill me, and the whole thing would be a waste of money. Well, I’m here to tell you that they’re very easy to use, very hard to kill, and it’s highly unlikely you’ll culture something abominable (and if you did, you’d know it).

So now that we’ve gotten the fear out of the way, where do you get these grains? There are many websites out on the ‘net where people with too many grains will give them away for free — usually all you pay is postage. Kefir grains multiply, you see, so the more often you make kefir, the more grains you will have. I chose to buy my grains from an online company (Cultures For Health), wanting to be sure I was getting them from a good, reputable source. Now that I have confidence and experience with making kefir, though, I’d feel just fine getting mine from someone who was giving them away for free.

Some places to get kefir grains (there are many others, too!):

Cultures For Health – online company, for purchasing grains

Kefir Lady – online company, for purchasing grains

Project Kefir – worldwide sources for (sometimes) free kefir grains

Toronto Advisors – worldwide sources for (sometimes) free kefir grains

HOW TO MAKE KEFIR:
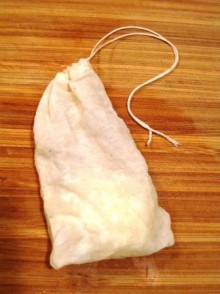
Kefir grains in muslin bag

Begin with 1 to 2 teaspoons of kefir grains per quart (4 cups) of milk (not ultra-pasteurized). You can either drop the grains into the milk and then strain them out later, but I find it easier to just put the grains into a clean muslin bag and drop the bag into the milk. I screw a lid onto the jar, because the lid will trap the CO2 that’s released, lending a slight effervescence to the kefir. If you don’t want the effervescence, just cover the kefir jar with a cloth & rubber band to keep out dust and bugs.

Leave the kefir at room temperature until it tastes the way you like it. I like to tilt the jar or stir the kefir now and then, though it’s not necessary. My kefir usually takes about 36 hours to thicken and get tart and effervescent, which is the way I like it. If your kefir separates into curds and whey, it’s definitely done! (More about this in the next section.) Strain out the kefir grains and enjoy! I love drinking kefir plain as well as using it in my smoothies.

To make another batch of kefir, simply transfer the grains into new milk. No need to rinse them first; in fact, rinsing slows their growth (Steinkraus, Keith, ed. Handbook of Indigenous Fermented Foods. 2nd ed. Pp. 306). Since I use a muslin bag to contain my grains, I just plop the bag into a new jar of milk without rinsing. No muss, no fuss.
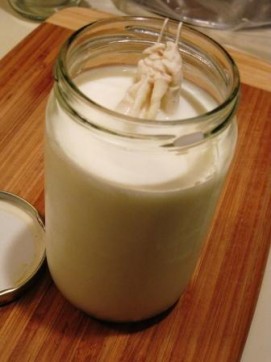
I like to put my kefir grains into a muslin bag, which I transfer from one batch to another.
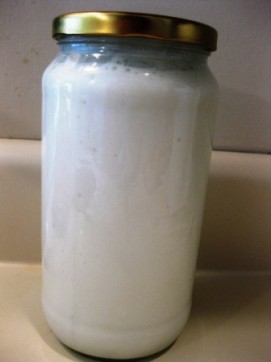
Perfect kefir - thickened, creamy, & effervescent. NOW is the time to take the grains out!
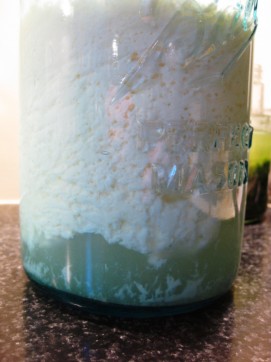
This kefir is "overdone" because it has separated into curds & whey. It's still usable (especially in smoothies!), but won't have the luscious, creamy texture.

Things I’ve learned about making kefir:

Using your new kefir grains – Making kefir is very easy, though there may be an adjustment period while you learn how your grains work & while the grains get acquainted with the kind of milk you use. Your first couple batches of kefir might not come out how you like…the kefir may be too thin, too sour, too yeasty, too whatever. This is normal, so don’t worry; some grains need time to adjust, others don’t.

What kind of milk to use? – You may use raw milk or pasteurized, but NOT ultra-pasteurized. (Ultra-pasteurized milk doesn’t culture! I learned this the hard way. Scary, yeah…) I try to get high-quality grassfed whole milk if possible because that’s what I like to drink, but any milk will work (again, just not ultra-pasteurized). Also, using cold milk straight out of the fridge is fine.

It’s hard to kill kefir grains! – Kefir grains are resilient. In fact, I’ve left grains in the same milk in the back of the fridge for 7 months, and they survived. Many websites tell you not to let the grains touch metal. However, I’ve observed how resilient these things are, and therefore I highly doubt that touching metal will suddenly kill them. In fact, mine have touched metal and they’re not dead yet.

What’s the secret to making good kefir? – Making good kefir is all about getting the right milk-to-grains ratio relative to the ambient temperature. It’ll require some experimentation, and you may not get consistent results every time unless you get scientific about it and measure out the same amount of kefir grains each time (necessary, since they multiply), put them into the same amount of milk, and culture at the same temperature. Temperature is the tricky part, because kefir will culture more quickly in warmer temperatures. (So, right about the time you’ve nailed down wintertime kefir-making, the season changes and you have to reinvent the wheel! :)) One way to control the temperature is to culture your kefir in a cooler with some ice. The easiest way, though, is just to decrease the amount of kefir grains you use in warmer temperatures (or increase the amount of milk) so that your kefir will culture more slowly.

Help! My kefir is separating too quickly – My biggest frustration was when my kefir would separate too quickly into curds and whey. It would be fine, and then two hours later it would be completely separated. What’s happening in this situation is that there are too many kefir grains for the amount of milk you’re using. Either decrease the amount of grains, or increase the amount of milk.

(The science: The more kefir grains you have in your milk, the faster they’ll use up their food source (lactose, or milk sugar). When they consume lactose, they produce lactic acid, and too much lactic acid will cause the kefir to separate into curds and whey…because that’s just what acids do, so congratulations, you’ve made cheese!)

Is separated kefir still good? – When kefir separates into curds and whey, it’s definitely still usable! It won’t have the creamy texture, so it’s not as lovely to drink. Instead, just use it in your smoothies, or else drain off/reserve the whey and eat the curds like a thick yogurt or let them drain further to make a thick, tangy “kefir cheese” spread. Yum!

Storage of kefir grains – If you’re not ready to make more kefir right away, put your grains in the fridge, either in a bit of fresh milk or in some kefir. Often, I just store my grains in the jar of kefir I’ve just made, in the fridge. Ideally, though, store them in a cup of fresh milk and change it every week or two; this way, you’re giving them plenty of food (lactose) which will keep them happy and multiplying. For long-term storage, I’ve heard that you can also freeze them, or dry them out completely and store them, and then re-hydrate in milk when you’re ready to use them again. I haven’t tried this yet, but it’s on my list!

Getting your grains to multiply – The best way to get your grains to multiply quickly is to make kefir every day, and to not store your grains in the fridge. We don’t go through enough kefir to make it every day, so my grains are often kept in the fridge. If kept in the fridge a lot, they will multiply much more slowly. If you have too many grains, give some away to friends, freeze some for “insurance”, or just eat them for a super probiotic boost!

What ARE kefir grains, really? – Kefir grains are conglomerates of lactic acid bacteria and yeasts held together by a polysaccharide gum called kefiran produced by the predominating bacterial species. (Steinkraus, Keith, ed. Handbook of Indigenous Fermented Foods. 2nd ed. Pp. 306) The bacteria and yeasts have a symbiotic relationship, as the predominant bacteria is unable to grow in milk without the yeast’s presence. This conglomerate that makes up the kefir grain behaves as a single organism; efforts to produce new grains by growing the component organisms separately and then recombining them have not been successful.

– My kefir looks/smells/tastes bad – Kefir can occasionally taste yeasty, particularly if it’s “overdone” and separated into curds & whey. Yeasty is OK, but just use common sense and don’t drink it if it otherwise looks, smells, and/or tastes bad. However, culturing something rogue is not really a huge concern; both the acidity of the kefir and the culturing organisms do a good job of keeping away any little nasties.

From the Handbook of Indigenous Fermented Foods:

“Some inhibition of pathogens in fermented milks is due to acid production. Recent work has shown that the effect of acidity is relatively small compared to specific substances of antibiotic nature formed by the fermenting organisms (Lucca, 1975). In addition to lactic acid, metabolites such as lactocidin, nisin, and acidophiline produced by starter organisms during fermentation also exhibit antibacterial properties. Singh and Laxminarayan (1973) reported that many lactobacilli exhibited antibacterial action against pathogenic strains of staphylococci and E. coli. They also observed that antibacterial action was a function of pH; the culture filtrate lost antibacterial activity when pH was raised to 5.0 or above.”

Spring Soil Preparation for the Organic Vegetable Garden

Amending the garden soil

Wanna know the best piece of garden advice I’ve ever gotten? “Feed the soil, not the plants.” Yeah! It took me a while to actually appreciate the truth in that statement, but through first-hand experience, I now know that if you concentrate on building rich & delicious soil, you will most certainly get rewarded with much better vegetable harvests — and I do mean MUCH better!!

I amend my soil once a year, in the spring, and like to use 3 different amendments:

– Leaves that have been mulching the garden since autumn

– 1/2″ layer (or more) of composted cow (or other) manure or finished compost

– Dry, organic fertilizer mix (recipes below)

Let me explain…

– Leaves:

As I mentioned last fall, I don’t like to dig or amend my soil in the fall…but rather wait until the spring time. So over the past few weeks, I’ve been gradually pulling away the thick layer of leaves that I had put on the garden in October. The reason I say “gradually” is because once you pull away the dry top layer, there’s a moist layer underneath. You could of course just dig these moist leaves in right away, but my soil was still quite wet, and I wanted it to dry out a bit before digging (digging wet soil is not good for the garden since it destroys the structure of the soil, causing it to compact and dry into brick-like clods). Also, you’ll notice that when you expose the wet leaves, there will probably be lots of worms in that layer. I like to give the worms a chance to burrow back into the soil before I pull off that layer of wet leaves…otherwise you’d be pulling off precious worms that you want to keep in your garden.

Anyway, I dig a thin layer of leaves into the soil, and will use the rest to mulch around my plants as they get bigger.

– Manure or Compost:

If you use manure, it should be composted, not fresh (so as not to burn your plants with nitrogen, and also to prevent the spread of pathogens). I buy mine from the garden center. Important side note: there’s a growing problem with herbicide-contaminated compost (both animal- and plant-based) being sold; this is bad news for gardeners since it has a very negative impact on the growth of crops, and it persists in the soil for years. Read the full story here, and an update here. So in light of all that, if you make your own compost, definitely use it!

– Organic Fertilizer Mix:

First, the recipes!

Here are a couple of dry, organic fertilizer recipes from my favorite vegetable gardening book, Rodale’s Garden Answers – Vegetables, Fruits, and Herbs:

For every 100 square feet of garden space, mix together:

6 lbs alfalfa meal

3 lbs bone meal

4 lbs greensand

1 lb kelp meal

OR, Mix and Match (choose ONE from each category):

Nitrogen (N):

2 parts blood meal – OR – 3 parts fish meal

Phosphorus (P):

3 parts bone meal – OR – 6 parts rock phosphate or colloidal phosphate

Potassium (K):

1 part kelp meal – OR – 6 parts greensand

Unfortunately, the book doesn’t specify how many quarts or pounds to apply for the Mix-n-Match recipe, but I’d guess it would be about 4-6 quarts per 100 sq ft. Or, based on the first recipe, you could figure that 1 part probably equals 1 pound, and measure it out that way.

I used the first Rodale recipe last year with good success; this year, I’m trying the recipe outlined in this Mother Earth News article called “A Better Way to Fertilize Your Garden.” This is probably the best, most helpful organic fertilizer article I’ve seen. It’s worth reading!

As for sourcing ingredients, I was sorely disappointed in the organic fertilizer selection at my local garden centers (do that many people still use all those chemicals?! :-(). I went to four different places before I got what I wanted, and no doubt paid a premium. Next time I’ll go ahead and buy online. Even though the shipping rate might be high because of the weight of the ingredients, it will probably be worth it. Peaceful Valley Farm Supply is a good source, but I’d also do a google search for organic garden suppliers to see who else is out there.

Anyway, in that article, it’s suggested that you initially use 4-6 quarts of fertilizer per 100 square feet (depending on what you’re growing…and possibly adding more throughout the season; more details in the article). I mixed up 7 quarts of fertilizer. The recipe is measured in ratios (“parts”) instead of in cups or pounds, which is annoying if you’re trying to end up with a certain number of quarts. So I did some math to come up with the number of CUPS needed of each ingredient, so that the end result was 7 quarts of fertilizer mix. Measure your ingredients on the generous side, and mix thoroughly before applying to the garden.

7 quarts (28 cups) of fertilizer:

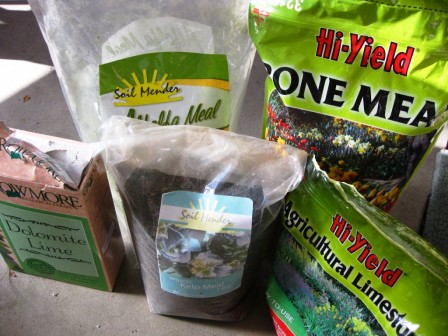
16 cups (4 quarts) alfalfa meal (which is roughly 2.5 – 3 lbs)

2 cups (1 pint) agricultural lime

2 cups (1 pint) dolomite lime

4 cups (1 quart) bone meal

4 cups (1 quart) kelp meal

Ingredients for making organic fertilizer

I dig all 3 amendments into my garden soil in the spring, to a depth of about 4 inches. Once the veggies really get going, I like to supplement my blooming/fruiting veggies with some liquid Neptune’s Harvest Fish/Seaweed emulsion (NPK: 2-3-1), and my leafy greens with Alaska brand Fish Emulsion — though you could certainly use the Fish/Seaweed on all of it. I just happen to have a gallon of the Alaska fish emulsion, so I feed it to the greens since it’s NPK nutrient profile is 5-1-1 (lots of nitrogen!). Instead of the fish emulsion, you could also just dig more dry fertilizer into the soil at regular intervals, as detailed in the fertilizer article, which was linked above.

I hope this was at least kind of helpful…fertilizing the veggie garden had always been a big mystery for me, and within the past couple years, I feel like I’m finally finding my rhythm with it.

Do you have any special organic fertilizer tricks or advice to share??

Planning Your Vegetable Garden

It’s that time of year! Spring garden planning and planting time. Usually I get around to planning & planting sooner, but this year it’s been cold right up till now, and plus my surgery has delayed things a bit. But happily, I got the entire garden tilled, amended, fertilized, and planted on Tuesday! All with crutches and a bum foot! It was exhausting, but fun to work in the yard again…and very satisfying when I got it all done.

Today I’m going to give you a little tutorial on how to plan your vegetable garden. Over the years I’ve developed a planning method that works well for me. Admittedly, I don’t really like garden planning very much. I do love looking through all my seed packets and deciding what to grow for the year, but the process of actually planning what to put where is a task that takes literally hours of mental work (for me at least). It’s a lot of thinking, decision-making, & considering all different garden plan configurations in my head before I even put pencil to paper.

That said, though, there comes a feeling of satisfaction and excitement when I’ve completed the plan and am thoroughly happy with it. Each year’s plan is different, depending on what I want to grow and also considering what grew there last year.

I have three 4’x8′ raised beds, a 2’x8′ raised “lasagna” bed (a story for another day!), another 4’x8′ raised bed against the south side of the house, plus various pots here and there for extra tomato growing space.

Here’s my basic planning process:

1. Decide what you want to grow. Look through seed catalogs or go to a garden center to get seeds, or if you’re like me and already have wayyy too many seeds to choose from, go through all your seed packets and set aside what you think you want to grow. (I like to start all my veggies from seed, but you could just as easily decide what you want to grow, and then buy plants from the nursery.)

Once you’ve narrowed down which veggies you want to grow, write them all down on a piece of paper.

2. Determine which vegetables will be in the Spring plan, the Summer plan, or both plans. If you’re planning both a spring and summer garden (which I do), you’ll have 3 categories of vegetables:

– Early-spring-planted veggies that you’ll harvest before summer (like spinach, peas, lettuce, etc.)

– Early-spring-planted veggies that you’ll leave in the garden through the summer — the “spring carry-over veggies” (like cabbage, onions, parsley, potatoes, cilantro, dill, chard, carrots, etc.)

– Summer-planted veggies (like tomatoes, squash, peppers, cucumbers, etc.)

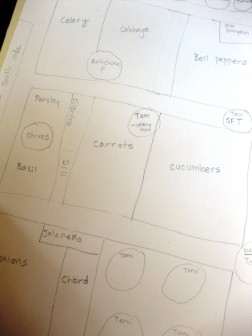
As you can see in the photo below, I mark my piece of paper with “Sp” (for “spring”) to the right of the spring-planted veggies, and “M” (for “main” summer) to the left of the summer-planted veggies. Vegetables with both “Sp” and “M” will be in both garden plans. As I place each vegetable into the plan, I put a check mark next to it.

3. Draw two outlines of your garden plots on paper — one for spring, one for summer. For my plans, I have one piece of thick paper; on one side I have Spring, on the other side I have Summer. Be sure to also note the year somewhere on your garden plan. On both plans, draw in any perennial vegetables that have overwintered.

Graph paper isn’t necessary, unless you like to use it. I draw my plans free-hand, and just eye the scale of things. The first year that I did a formal plan, I got mathematical about it and used graph paper, with “one square = 6 inches” and all that, but in the end, I found it unnecessary to be so precise, and I haven’t used graph paper since.

Also, always work in pencil! 🙂

Draw your garden plots, and draw in any overwintering perennial vegetables.

4. Plan your summer garden first. I find it easier to plan my summer garden first, and then my spring garden. To plan my summer garden, I decide on the location of both the spring-planted carry-over vegetables as well as the summer-planted vegetables.

I begin with deciding where I’ll put my tomatoes…though in doing this, you’ll be thinking about all your vegetables — not just the tomatoes. But I like to put the tomatoes down on paper first, as this makes it easier to place other things.

I also place the tallest vegetables (tomatoes, plus anything grown on a trellis) at the north end of each of the raised beds, so that they don’t block the sun from reaching shorter veggies.

I also consider the locations of last year’s vegetables, and try not to plant the same thing in the same place the next year. It doesn’t always work out that way (for instance, this year’s cabbage will be partially in the same spot as last year), but to me, that’s okay.

I like to plan the summer garden first.

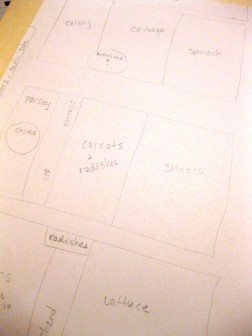
5. Plan your spring garden based on the summer garden. Now, on your spring garden plan, copy down the spring carry-over veggies that you placed in your summer plan. Then, fill in the empty spaces with all of your spring veggies that will be harvested before summer, like the lettuce, radishes, spinach, peas, etc.

I plan the spring garden based upon which veggies will be carrying over to summer.

6. Check your veggie list to be sure you’ve placed everything, and then you’re done! Now it’s time to plant your spring garden!

Click here to read about how I amend my soil each year to get ready for spring planting.

And as a side note…if you start your own seedlings inside (rather than buying from a nursery), that adds another step to the spring preparation process, but it’s not bad. I definitely prefer to grow my own seedlings! Mostly I start my summer stuff inside, like tomatoes, squash, cucumbers, and peppers, but this year I also started my cabbage inside and it’s germinating better than when I plant it directly into the garden. But other than cabbage, I plant all my spring stuff directly into the garden, without starting it inside. Anyway, I’ll share more about all that soon, too.

*UPDATE 3/5/11: The past couple years I’ve just planted cucumbers and squash seeds directly into the garden rather than starting them inside. I’m much happier with this method since it’s SO much easier and the difference in fruiting times is not appreciable enough to be worth the bother of starting them inside. So I’ll stick to starting tomatoes, peppers, and cabbage inside. I might also start my celery inside, too, since it never quite took hold when I direct-seeded last year.

Homemade Pumpkin Pie Fruit Leather

I think it’s time for another recipe! It’s been a while since I’ve posted one. I’m still off work for another few days as I continue to recover from my foot surgery, so I’ve got extra time at home which is wonderful! I can’t be in the kitchen all day since I need to continue to rest a lot and elevate my foot, but I could never completely stay away from my kitchen 🙂 — crutches or not — so I’ve been experimenting here and there with some simple recipes.

Today’s recipe for homemade fruit leather is definitely simple! I used to eat fruit leather all the time when I was younger, but I’d pretty much forgotten about it, even though it’s a yummy & very portable snack. Recently I came across the idea of homemade fruit leather, and decided to experiment using a can of pumpkin that’s been sitting in the back of the pantry for over a year (or maybe two…). Voila! Pumpkin Pie Fruit Leather. It’s so good that I had to restrain myself from eating the whole entire tray, and it’s incredibly easy to make!

If you don’t have, or don’t want to use, canned pumpkin, just substitute cooked pumpkin (or winter squash) puree.

Also…if you don’t have pumpkin, you could use this basic method to make fruit leather from cooked/pureed apples, pureed peaches (no need to cook them first), plums, berries, bananas, or a combination of fruits — and with these fruits, there’s no need to add any spices unless you want to! If I have an abundance of tomatoes this year, I think I’ll even try it with tomatoes. Anyway, here’s the recipe:

Pumpkin Pie Fruit Leather

2 cups (or one 15-oz can) cooked pumpkin or winter squash puree

1/4 cup honey

1/4 – 1/2 tsp cinnamon (depending on your taste…I used a 1/2 tsp because I like the bold taste of spices)

1/4 – 1/2 tsp ginger powder, optional

1/4 tsp powdered cloves

1/8 tsp nutmeg

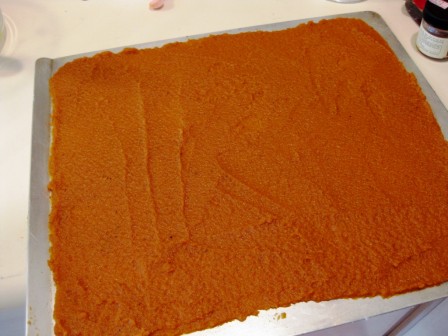
Preheat oven to 200* F. (If you have a dehydrator, you can use it for this recipe. Dehydrate at 140*.) Mix all ingredients well. Generously oil a cookie sheet (really slather the oil on…it’ll make it much easier to peel off the leather!), or use parchment paper. Using a spatula, spread your mixture on the cookie sheet, taking the extra time to spread as thinly and evenly as possible; this took me a few minutes to get it just right. Spreading it as evenly as possible is important because otherwise some parts will be over-done and other parts will be under-done (which will probably happen to some extent anyway, but at least you’ll be minimizing it).

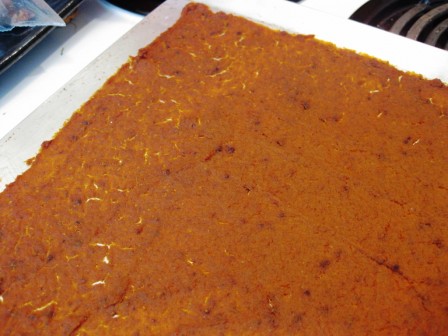
Spread the mixture as evenly and thinly as possible on the oiled cookie sheet.

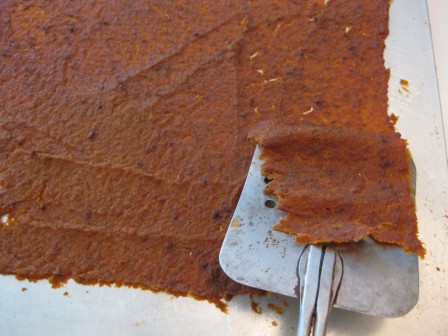
Put your cookie sheet into the oven and let it “dehydrate” in there until the fruit leather is pliable…not wet, but not hard & brittle either. Mine took about 2 1/2 hours to get done; you’ll want to check on yours every now and then. A little bit was over-done and I had to let the cookie sheet cool a little before I could pry it off, and another little patch was under-done, so I just put it back in the oven for a little while. But most of it was easily peeled off the cookie sheet with a flexible metal spatula; this whole process would probably be even easier if you use parchment paper.

The fruit leather is done.

Peel it off the cookie sheet with a flexible metal spatula. If it's not over-done, it should peel right off with no problem. If it's under-done, it will be too wet to peel off...so just pop that part back into the oven for a while.

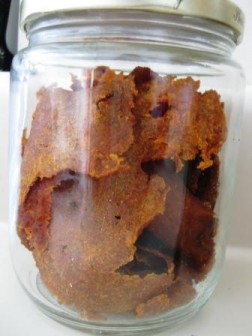
Store in a glass jar. I stored mine in the fridge, but you can also store it at room temperature.

« Older posts Newer posts »

© 2024 The Herbangardener

Theme by Anders NorenUp ↑