Kitchen / Garden / Sanctuary - Urban Homesteading to Nourish Body + Spirit

Category: Natural Homemaking (Page 14 of 15)

Gifts…It’s Either Time or Money!

Gifts...Time or Money - (c) The Herbangardener

I have to say, I’ve been a little stressed the past week. I don’t like the pressure of too much to do and too little time! Hubby and I both work 40 hours a week, plus occasional overtime. We’re grateful to have jobs (!) and we’re happily saving up our money, but working that much really, really eats your life. I have calculated that after working, commuting, and sleeping, a mere 17% of each weekday is actually available for my own pursuits.

And come Christmastime, there’s lots of fun holiday stuff I like to do in my free time (getting a tree, decorating the house, baking cookies, making cards, making gifts, visiting with family & friends), but it seems like the days go even faster at this time of the year, and I don’t have the time to squeeze in all the things I’d like to do. I really love making Christmas cards, gifts, and cookies myself, because homemade stuff is more special and meaningful. BUT, they require time to make. You either take the time to make them, or spend the money to buy them. As with mostly everything, it comes down to time or money!

So if you don’t have much extra time, hand-making every single thing can feel like a burden instead of a joy. It’s time, then, to prioritize what you really want to make with your own hands…and then go ahead and just spend the money to buy some of the other, less-important things, so that you actually have time for your “priority” projects.

So this year, I am foregoing some of my plans to make things myself. Though I really enjoy taking the time to make Christmas-y stuff, feeling stressed and out of balance is no way to spend the holiday season. So when I start feeling this way, I know it’s time to back off and just buy a nice gift instead of struggling to make it! Instant stress relief. The Christmas season should be joyful and fun, so as I go along, I’m adjusting my plans and expectations in order to keep it that way! 🙂

Do you also have too little time to enjoy the holiday season? What’s your solution?

UPDATED Kitchen Tip: Keeping Olive Oil Fresh with…Water?

Remember when I posted this in August? Maybe not? Just as well, because I’ve updated it. Scroll down to the “Update!” section to read how I got the water out of the bottle so I could use up the last bit of olive oil. 😉

Storing Olive Oil with Water

We’ve all heard that heat, light, and air cause oils to oxidize and go rancid. I used to keep my olive oil in the fridge, but it would solidify and I had to plan ahead if I wanted to use it. This was too inconvenient, so I stopped doing it. Recently, I “upgraded” and bought a more expensive Tuscan olive oil at Costco that came in a dark-colored bottle. The dark color prevents the oil from light exposure (especially at the store with all its bright lights). To lessen the oil’s exposure to air, I’ve started topping up my olive oil bottle with water!

After I use any oil, I pour more water into the bottle so that it’s always filled to the top (where there’s only a tiny bit of air between oil and cap). At first, it felt really weird to pour water into the bottle. But since they “mix like oil and water” :-), there’s no problem because the water just settles to the bottom. When using the oil, I just pour carefully so that no water comes up to the surface. I’m wondering what’ll happen when I get to the bottom of the bottle, when there’s only a bit of oil left. Maybe just saute something with it, and let the water boil off? If I ever do get to the bottom of this giant bottle, I’ll let you know what happens.

UPDATE! Okay, I did eventually get to the bottom of the bottle. Toward the end there, I had to pour much more carefully so that the water didn’t come out with the oil. Annoying. When I’d had enough of that, I thought of a clever little way to get the water out: put the bottle in the fridge…on its side…tilted downward, as seen below. Last night’s dinner, covered in foil, works great for supporting the bottle:

Separating oil from water in the fridge

Fridge-eye view. The oil has solidified and I can now just pour off the water.

That way, the oil solidifies from the cold and you can open the cap and pour out all the water! Smart huh. Be sure to set the bottle so that it’s tilted slightly downward; that way, the oil doesn’t solidify and block the opening of the bottle.

Okay, back to the original post:

I’ve read conflicting information (are you as tired of conflicting information as I am??) about storing olive oil in the fridge. Some say yes, some say no. Here’s one perspective, with some interesting FAQs about olive oil, “quality” standards (or lack thereof, it turns out), and storage:

http://www.longmeadowranch.com/Food/About-Olive-Oil

I think I’ll transfer my bottle to a cabinet under the countertop, but away from the stove. I figure I’ll be covering all the bases: keeping the olive oil cool (near the floor, away from the stove), in a dark place (in the cabinet), with minimal air exposure (if I keep topping it up with water).

Do you have a “best practices” method for storing your olive oil? I’d love to know what it is!

Healing From Surgery, Part 3: Topical Skin-Healing Remedies

Natural Skin-Healing Remedies

From left: Tea Tree Oil, Goldenseal extract, Homeopathic Bone Strengthener, Homeopathic Arnica Gel, Homemade Herbal Wound-Healing Oil, & Virgin Coconut Oil

Time for another installment in the series!

For an introduction to the series, and the pre-/post-surgery homeopathic regimen I created, visit Part 1: Homeopathy.

For instructions on how to make your own Antiseptic Herbal Wash and Herbal Wound-Healing Oil, visit Part 2: Herbal Wound Remedies.

Part 3: Topical Skin-Healing Remedies

After the bandage was removed, I didn’t really put anything onto the actual incision sites (except my Antiseptic Herbal Wash) until they were more healed (therefore, less risk of sealing in any infection).

I kept my incisions clean by washing them with gentle (castile) soap and water; the nurse I talked to urged me not to use either hydrogen peroxide or rubbing alcohol to clean or “sterilize” my wounds; they’re too caustic and harsh on the new tissue that’s forming.

If a wound looks like it’s getting infected (pain, heat, swelling, oozing/draining, and/or bright red color around incision), the essential oils of Tea Tree, Manuka, and/or Lavender can be used neat (full strength) right on the wound (or diluted, if you prefer). I used them a few times on my wounds just to help prevent infection. You can also use a thin layer of regular ol’ triple antibiotic ointment; in my experience, that stuff really does work. However, you don’t want to totally slather it on, because it might trap moisture inside the wound.

As a side note, I also exposed my wounds to direct sunshine when I could; MRSA (drug-resistant Staph) is killed by sunlight. You can read an article with similar implications here: CBS News: Blue Light Kills MRSA. (Though, the sunlight method isn’t totally foolproof since MRSA bacteria can cluster together and form a protective cover over itself called a biofilm, sheltering it from its environment.)

(Obviously, when in doubt, have your incision looked at by your doctor, since infections aren’t to be taken lightly.)

Goldenseal extract is another good topical remedy for infections. It has broad-spectrum antibacterial properties, but keep in mind that Goldenseal is not a systemic antibiotic. In other words, Goldenseal does not course its way through your blood, killing bacteria in its path. Rather, it acts as a contact disinfectant — killing bacteria, fungi, parasites, and protozoa that it comes into direct contact with in the mouth, GI tract, urinary tract, and on the skin.

Also, Goldenseal is one of the most over-harvested and endangered wild medicinal plants in North America. Even so, many (most!) of the Goldenseal that is sold is “wild harvested” or “wildcrafted.” While these terms sound enticing, do avoid them! Instead, only purchase Goldenseal that is “certified organic” or “cultivated.” Herb Pharm puts out a nice, certified organic Goldenseal extract that does not contribute to the demise of this precious healing plant.

Fortunately, Oregon Grape is a more abundant plant, with very similar properties. Oregon Grape root is a great replacement for Goldenseal root!

Anyway. Twice a day for a month or more after the bandage was removed, I put homeopathic arnica gel and virgin coconut oil (which is great for skin) all over my foot, avoiding the incision sites. The arnica gel definitely reduced the bruising discoloration, although my foot still felt bruised to the touch. The coconut oil was great for moisturizing. I noticed that since my foot was swollen, it would get very dry and itchy (like, scratch-it-with-a-steak-knife itchy) unless I was careful to keep it moisturized twice a day.

Once the incisions healed more, I began spraying my Homeopathic Bone Strengthener spray directly onto the skin over the bones that were healing. I also continued to take the spray under my tongue.

And lastly, I began using my homemade Herbal Wound-Healing Oil on the incision sites, and continue to use it daily. I also massage Vitamin E oil (from a punctured capsule) onto the scars.

All in all, my foot looks great! It’s not swelling too much, it’s not visibly bruised at all (though as I said above, it does still feel bruised to the touch…for me, arnica takes away the ugly color, but not the pain), and the scars are healing quite well. Of course, I’m not sure what my foot would have looked like without all these remedies. But since the incisions are healing so well, I definitely feel that they’ve helped.

Do you have a favorite natural skin-healing remedy? I’d love to know!

Halloween Treat: Caramel Corn

'Better For You' Caramel Corn

'Better For You' Caramel Corn

When Kimi at The Nourishing Gourmet posted her recipe for Old Fashioned Caramel Corn (using only unrefined sweeteners), I made it that very night. I almost never eat caramel corn, but it just looked like it would hit the spot. And Oh. My. Goodness. it was good! Actually I kind of messed up the recipe and only measured out 1/2 a cup of popcorn instead of 3/4 cup. So my popcorn was much more caramel-coated, but I decided I liked it that way. (I mean, hubby and I ate almost the entire pot in one sitting, so I’d say it was okay!) It’s a real treat!

Here’s my variation on Kimi’s awesome recipe…decreasing the amount of popcorn, adding salt, and eliminating the “oven step.”

Caramel Corn

10 cups popcorn (about 1/2 a cup unpopped)

1/2 cup butter

1 cup rapadura sugar

1/4 cup honey

1/4 tsp sea salt

1/2 tsp baking soda

1 tsp vanilla

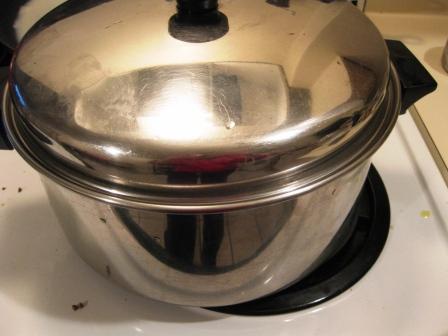
First, pop the popcorn. We don’t have either a popcorn maker or a microwave, so we pop ours the old fashioned way in a pot on the stove. It’s easy! Here’s how I do it:

1. Get a large pot with a lid that fits. Pour enough oil (I use coconut oil, or sometimes olive oil) into the pot to thinly coat the bottom. Turn the burner onto Medium-high heat (keep at Medium if using olive oil). Put some popcorn into the pot, and put the lid on. I usually use about 1 Tbsp oil for every 1/4 cup un-popped corn.

making popcorn without a popcorn maker

making popcorn without a popcorn maker

2. Now, just start sliding the pot back and forth over the burner, holding the lid on with both hands. You’ll want to keep it moving almost constantly. Stay with it, and soon you’ll hear the popcorn start to pop. Just as with microwave popcorn, take the pot off the heat once you hear the popping slow down — you don’t want to burn it. Voila! Easy!

Now, to make the caramel corn:

Melt the butter in a saucepan, and add rapadura, honey, and salt. Simmer for 5 minutes, stirring frequently.

caramel corn

Put the popcorn into a large bowl or pot, with plenty of room to stir.

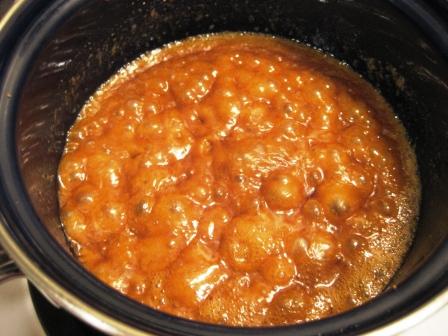
After simmering for 5 minutes, remove saucepan from heat and add the vanilla and baking soda. Stir until well mixed. The baking soda will make the mixture foam up, like this:

better-for-you caramel corn

Once the mixture foams up, pour it over the popcorn without delay and begin stirring the popcorn right away until it’s all coated. That’s all! You may want to give it a few more stirs as it cools to break up any large chunks…but other than that, you’re done! This may just be the best caramel corn you’ve ever had. You can also bag it up once it cools, and give to friends…but good luck making it last that long. 🙂

Healing From Surgery, Part 2: Herbal Wound Remedies

Calendula Petals for Herbal Wound-Healing Oil

Welcome back!

For an introduction to the series, and the pre-/post-surgery homeopathic regimen I created, visit Part 1: Homeopathy.

For Part 2 today, I’ll be showing you how to make Herbal Wound-Healing Oil and an Antiseptic Herbal Wash. You can make these and keep them on hand for cleansing and healing any type of wound.

One thing: Be careful when applying the Wound-Healing Oil to burns or infected areas, because they may heal over “too quickly,” sealing in heat and bacteria. For these situations, make sure the burn has completely cooled, or that the infection has first been treated with a good antimicrobial preparation.

For me…since the incisions were on my foot (where there’s a higher risk of post-surgical infection because of decreased circulation), I conservatively used only the Antiseptic Herbal Wash until the wounds had completely closed up and there was no sign of infection. At that point, I no longer needed to use the Antiseptic Herbal Wash…and began to then use the Wound-Healing Oil.

Herbal Wound-Healing Oil

Herbal Wound Healing Oil

Wound-Healing Oil infusing on a sunny windowsill

Making herbal oils is easy because you don’t really need any special ingredients or equipment. Herbal oils can be made by either hot infusion or cold infusion. For a hot infusion, equal amounts of herbs and oil (often olive oil) are simmered over low heat for a few hours.

Cold infusion is a much slower process whereby you pack a clear glass jar with herbs and oil and let it stand for several weeks, often in the sun. Sunlight encourages the herbs to release their active constituents into the oil. Cold infusion is the best method for fresh plant material, especially for more delicate parts such as flowers. Since my herbs were fresh, and I was using delicate calendula flower petals, I chose the cold infusion method. Olive oil is very good for cold infusion because of its resistance to turning rancid. The intensity of sunlight and the length of time the herbs are infused will affect the strength of the end product. For a stronger oil, strain out the first batch of herbs, add a new batch of fresh ones, and infuse again for another few weeks.

Cold Infusion Step 1: Gather your plant material — either dried or fresh, or a mix of both. I used all fresh plants this time (fresh is almost always better). Any medicinal plant will work, and you may use just one type, or a mix. For my Wound-Healing Oil, I chose a mix of antiseptic, skin-healing, and bone-healing plants:

Sage (leaves) – antiseptic

Yarrow (leaves) – antiseptic, heals wounds, anti-inflammatory

Thyme (leaves) – antiseptic (contains Thymol, a very potent germ killer)

Comfrey (leaves) – heals wounds, assists with bone fusion (it’s also known as “Knitbone”)

Calendula (flower petals) – antiseptic, heals wounds, anti-inflammatory

Step 2: Chop the herbs into little pieces. Stuff them into a clear glass jar that has a lid. Pour olive oil into the jar until it completely covers the herbs. You may need to poke around with a spoon to get the oil to seep down to the bottom of the jar. If there’s any plant material above the oil, it will probably mold, so try to pour enough oil in to cover everything. I had a little mold growing on the surface of the oil after a few weeks (probably on a plant piece that wasn’t submerged), but I just scooped it up and threw it away. No harm done.

Step 3: Screw on the lid, and place the jar in a spot where it’ll get plenty of sunshine, but where it won’t be disturbed. (Again, if any herb pieces are washed out of the oil and onto the side of the jar, they’ll get moldy. It’s not a big deal, but if they get moldy you should scoop them out.) Leave it there for at least 2 weeks, but preferably 4 weeks or longer.

Wound-Healing Oil. Twice infused, strained, and ready to use.

Wound-Healing Oil. Twice infused for a total of 6 weeks, strained, and ready to use.

Step 4: Set up a fine-mesh strainer over a bowl. Pour the contents of the jar into the strainer and squeeze the herbs tightly in your fist to get as much oil out as possible. It’s a messy job; don’t wear your Sunday best. Run the oil through the strainer again if any plant material accidentally got into the bowl. Discard the plant material.

Step 5: I like to puncture a Vitamin E capsule and squeeze it into the jar of finished oil. Vitamin E is a good preservative. Store the oil in the fridge for a longer shelf life.

Step 6 (optional): For an even stronger oil, chop up a new batch of fresh or dried plant material, and put it into the oil you’ve just strained. Place in the sunny spot for a second round of infusion. For my Wound-Healing Oil, I strained the oil after 3 weeks, and then added more fresh Calendula petals and Comfrey leaves (both fresh and dried), and left it to infuse for another 3 weeks.

Antiseptic Herbal Wash

Making the Antiseptic Herbal Wash

Making the Antiseptic Herbal Wash

Antiseptic Herbal Wash is what I applied to the surgical incisions until they were completely healed. After I made the Herbal Wash, I froze it into ice cube trays, and then stored the ice cubes in the freezer. Each night, I would take out a cube and let it thaw in the fridge. Then, both morning and evening the next day, I would pour the liquid over my foot, rubbing it into the wounds. It didn’t sting, but I tasted a little bit of it once, and it was very strong and very disgusting! Not something you want to drink, certainly! After the wounds had completely closed up and there was no sign of infection, I then stopped using the Wash and began using the Wound-Healing Oil.

Step 1: Gather your plant material — either dried or fresh, or a mix of both. I used all fresh plants this time (fresh is almost always better). For this Antiseptic Herbal Wash, I chose these medicinal plants:

Sage (leaves) – antiseptic

Yarrow (leaves) – antiseptic, heals wounds, anti-inflammatory

Thyme (leaves) – antiseptic (contains Thymol, a very potent germ killer)

Lavender (leaves) – antiseptic, soothing

Step 2: Chop up the plant material, and place into a large jar that has a lid. Pour enough boiling water over the plant material to cover it completely. Screw the lid on loosely. (If a lid is not used, the precious volatile oils will dissipate into the air.)

Step 3: Let the mixture steep until the water has cooled to room temperature…or longer. I let mine steep for the whole day. Pour the water through a strainer, squeezing the herbs tightly to get all the water out. Discard the herbs, and either refrigerate or freeze the herbal water. Again, I like to freeze mine into ice cubes that can be defrosted when needed.
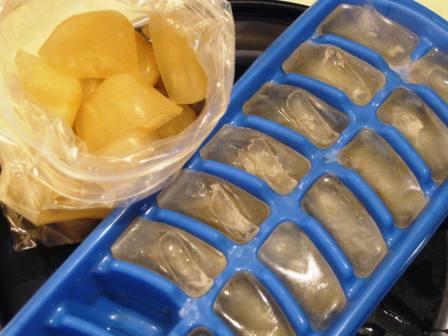
Antiseptic Herbal Wash frozen into ice cubes

Antiseptic Herbal Wash frozen into ice cubes

« Older posts Newer posts »

© 2025 The Herbangardener

Theme by Anders NorenUp ↑