Kitchen / Garden / Sanctuary - Urban Homesteading to Nourish Body + Spirit

Category: Organic Gardening (Page 12 of 15)

Bumblebee Advice Needed!

Straw bale beehive (hive entrance is the hole at the bottom right)

Have you had a nice week? I have! My sister has been visiting from out of town, and the past week has been all about having fun — like being on vacation while still being home!

Anyway, I have a question for those of you with beekeeping experience. In my parents’ yard (where my gardens are), there’s a bumblebee hive (not honeybees…but the big, fuzzy bumblebees) inside one of the straw bales that I was going to use for garden mulch. This is such a special thing, and I feel honored that these bumblebees have chosen a home near my gardens; it makes the yard feel like a nature preserve!

I’d like to do everything I can to encourage them to stick around. Unfortunately, the Wikipedia article about bumblebees states that they only use their hive for one summer, and don’t overwinter in it. Is that really true? Do you have any experience with bumblebees? Should I build anything around the straw bale for the winter to persuade them to stay?

Leave a comment if you have any insight!

Growing Fruit Trees From Seed: Peach, Plum, Nectarine, & Apricot

I’d always thought that growing fruit trees from seed was too much of a long-term proposition, and so I wouldn’t bother with it. And then three years down the road I’d still be thinking about fruit trees from seed — no closer to my dream orchard than I was three years prior.

Determined to put an end to this mental hangup, I began saving the pits from the most delicious local peaches and plums that I ate during the summer of 2008. I then followed the instructions in this great article, which takes you through the whole process:

Mother Earth News: “Growing Free Fruit Trees”

4-month-old Plum and Peach seedlings (in the foreground — plum on the left, peach on the right)

Now my baby fruit trees are about a year and a half old and I’m astounded at how big they are. These things are growing like weeds, and I need to seriously start considering where to plant them!

As a side note, I overwintered the baby trees in the black pots in the photos below, against the south side of the house, mounded up with dry autumn leaves. All survived the winter!

So if you’d like to embark on this fun little project, now is the time to begin saving your peach, plum, nectarine, and/or apricot pits. I let the pits dry on a shelf for several weeks (more like months, actually). To open the pit, use whatever tool you have the most success with (as outlined in the article), but the nutcracker I initially used broke clean in half before it cracked even one pit. So I got out the hammer and had no problem shattering pits out on the back sidewalk; surprisingly, none of the actual seeds got crushed in the process.

After a year and a half of growth, here’s what my trees look like:

1 1/2-year-old Plum trees

1 1/2-year-old Peach tree

***

Update 5/3/2012: The three-year-old peach trees have baby peaches on them! Click here for photos.

Update September 2016: Many of the trees died due to peach tree borer. The surviving trees are marauded by squirrels each year so that there are few peaches left. Here are some that survived this year! The peach I picked was picked too early I think, but otherwise the squirrels were going to get it. Its taste was ‘ok’ once it sorta ripened.

Peach tree from seed (c) The Herbangardener

Peach tree from seed (c) The Herbangardener

***


Update + Garden Pictures

Scene from my mini vacation

Well, long time no post!

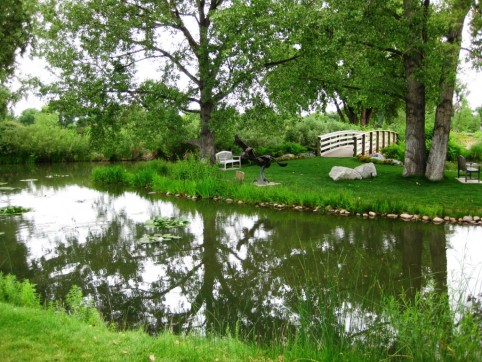
This past week was the death anniversary of my best friend Sonja – my soul sister – and it upset my emotional balance a little more than I would have liked. When that happens, in addition to surrendering to the sadness (rather than stuffing it), I know I need to devote extra time to good medicine, as well as make a point to get out of the house and do fun things. So on one of my days off, I rode my bike over to Hubby’s office and met him for lunch, which is something we both just totally love. On the way back I stopped at Whole Foods and wandered around, picking out some fun things while completely ignoring the exorbitant prices. On my other day off, my mom and I took a mini vacation day and drove to a botanic gardens area. We enjoyed the water gardens and natural woodlands amidst sprinkling rain, snarfed potato chips at the cafe, and relished how we had the place to ourselves. After that we went to Penzeys Spices (we get so inspired at that store!) and I bought some special peppercorns, expensive Ceylon cinnamon, smoked Spanish paprika, and Cajun seasoning (an all-time favorite). To top it off, we had drinks and a cookie at a little sidewalk cafe. Back at their house, I made a batch of homemade cat food, worked in the garden, and visited with mom and dad over wine and cheese. Lovely! Family, gardens, nature, mini vacations…those are all things that help lift the funk and get me re-energized for daily life.

In other news, it’s been pretty hot here. Though the sweltering 95-degree days are punctuated with not-as-hot days in the mid-80s. It’s been really nice actually.

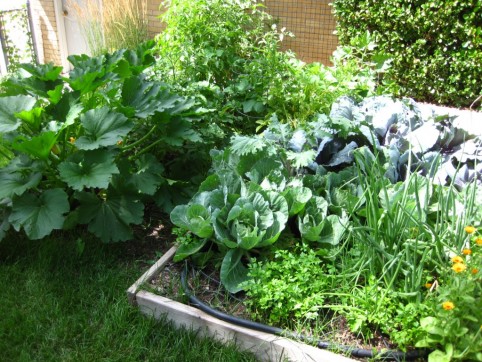
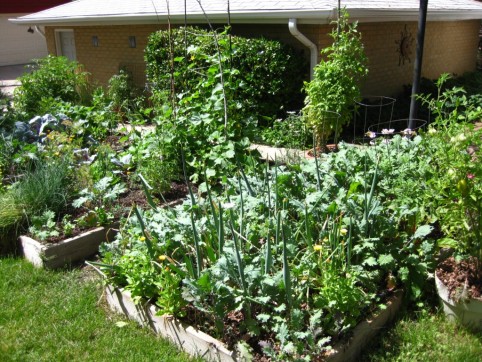
And the garden is progressing well! The bell peppers and a few of the tomatoes are still puny, but the zucchini, cucumbers, cabbage, potatoes, onions, and the tomatoes I started early in the Walls-O-Water are doing very well. I harvested the first ripe tomato today, and I think in a week’s time there should be many more, as well as the first of the cucumbers; I did harvest a nice zucchini today which I cannot wait to sautee in the Penzeys Cajun seasoning — such amazing flavor!! The garden seems a bit delayed compared to some other years; we had a long, wet, cold spring, plus I did plant a little late this year due to surgery interfering with my normal seed-starting schedule. But that’s okay! I just love watching the veggie garden grow and produce. Here are a couple pictures of it:

Knowing Exactly When To Harvest Garlic

In this post I described how to harvest and cure your garlic (and onions too). However, knowing exactly when to pull your garlic out of the ground isn’t always easy.

There’s a period of time — a “sweet spot” — when the garlic will be perfect. Harvest too soon and the head won’t yet have formed into distinct cloves…harvest too late and the protective papery skin that encases the head will have broken down, allowing dirt and worms into the crevices between the cloves. So I took some pictures for you that will hopefully help to identify the sweet spot.

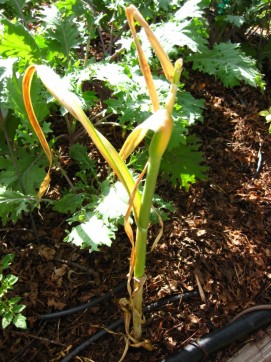
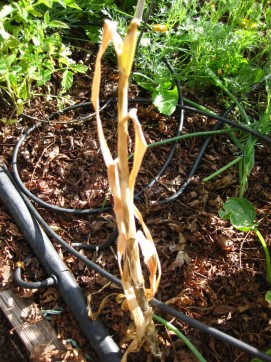
Harvest your garlic when the leaves have mostly turned yellow or brown, but the stem is still green. It’s okay if a few of the leaves are still green, too, though if all the leaves are still green, it’s too early to harvest.

Harvest your garlic when it looks like this. (Click for larger image.)

And if the leaves and stem are completely dry and brown, like in the photo below, you’ve missed the sweet spot, so definitely dig the garlic immediately.

Left in the ground a little too long...but do still dig it up ASAP! (Click for larger image.)

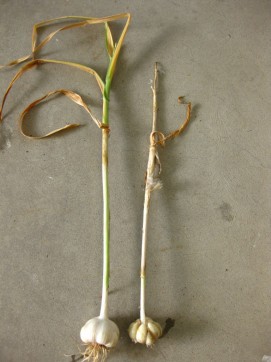
Left side: Harvested at the perfect time. Right side: Left in the ground a little too long. (Click for larger image.)

In the picture above, the garlic on the left was harvested at the perfect time: the stem is still green, the cloves are fully formed, and the outer papery skin is intact. The garlic on the right was left in the ground a little too long (notice how the stem is completely brown and the outer papery skin has mostly broken down).

If you miss that sweet spot and find that the outer papery skin of your garlic has disappeared and the dirt and worms have gotten in between the cloves, attach a spray nozzle to your garden hose and spray a forceful stream of water straight into the middle of the garlic head, which will blast out the dirt.

For further info on how to cure and store your garlic, pop on over to this post.

Left: Harvested at the perfect time. Right: Left in the ground a little too long. (Click for larger image.)

Spring Soil Preparation for the Organic Vegetable Garden

Amending the garden soil

Wanna know the best piece of garden advice I’ve ever gotten? “Feed the soil, not the plants.” Yeah! It took me a while to actually appreciate the truth in that statement, but through first-hand experience, I now know that if you concentrate on building rich & delicious soil, you will most certainly get rewarded with much better vegetable harvests — and I do mean MUCH better!!

I amend my soil once a year, in the spring, and like to use 3 different amendments:

– Leaves that have been mulching the garden since autumn

– 1/2″ layer (or more) of composted cow (or other) manure or finished compost

– Dry, organic fertilizer mix (recipes below)

Let me explain…

– Leaves:

As I mentioned last fall, I don’t like to dig or amend my soil in the fall…but rather wait until the spring time. So over the past few weeks, I’ve been gradually pulling away the thick layer of leaves that I had put on the garden in October. The reason I say “gradually” is because once you pull away the dry top layer, there’s a moist layer underneath. You could of course just dig these moist leaves in right away, but my soil was still quite wet, and I wanted it to dry out a bit before digging (digging wet soil is not good for the garden since it destroys the structure of the soil, causing it to compact and dry into brick-like clods). Also, you’ll notice that when you expose the wet leaves, there will probably be lots of worms in that layer. I like to give the worms a chance to burrow back into the soil before I pull off that layer of wet leaves…otherwise you’d be pulling off precious worms that you want to keep in your garden.

Anyway, I dig a thin layer of leaves into the soil, and will use the rest to mulch around my plants as they get bigger.

– Manure or Compost:

If you use manure, it should be composted, not fresh (so as not to burn your plants with nitrogen, and also to prevent the spread of pathogens). I buy mine from the garden center. Important side note: there’s a growing problem with herbicide-contaminated compost (both animal- and plant-based) being sold; this is bad news for gardeners since it has a very negative impact on the growth of crops, and it persists in the soil for years. Read the full story here, and an update here. So in light of all that, if you make your own compost, definitely use it!

– Organic Fertilizer Mix:

First, the recipes!

Here are a couple of dry, organic fertilizer recipes from my favorite vegetable gardening book, Rodale’s Garden Answers – Vegetables, Fruits, and Herbs:

For every 100 square feet of garden space, mix together:

6 lbs alfalfa meal

3 lbs bone meal

4 lbs greensand

1 lb kelp meal

OR, Mix and Match (choose ONE from each category):

Nitrogen (N):

2 parts blood meal – OR – 3 parts fish meal

Phosphorus (P):

3 parts bone meal – OR – 6 parts rock phosphate or colloidal phosphate

Potassium (K):

1 part kelp meal – OR – 6 parts greensand

Unfortunately, the book doesn’t specify how many quarts or pounds to apply for the Mix-n-Match recipe, but I’d guess it would be about 4-6 quarts per 100 sq ft. Or, based on the first recipe, you could figure that 1 part probably equals 1 pound, and measure it out that way.

I used the first Rodale recipe last year with good success; this year, I’m trying the recipe outlined in this Mother Earth News article called “A Better Way to Fertilize Your Garden.” This is probably the best, most helpful organic fertilizer article I’ve seen. It’s worth reading!

As for sourcing ingredients, I was sorely disappointed in the organic fertilizer selection at my local garden centers (do that many people still use all those chemicals?! :-(). I went to four different places before I got what I wanted, and no doubt paid a premium. Next time I’ll go ahead and buy online. Even though the shipping rate might be high because of the weight of the ingredients, it will probably be worth it. Peaceful Valley Farm Supply is a good source, but I’d also do a google search for organic garden suppliers to see who else is out there.

Anyway, in that article, it’s suggested that you initially use 4-6 quarts of fertilizer per 100 square feet (depending on what you’re growing…and possibly adding more throughout the season; more details in the article). I mixed up 7 quarts of fertilizer. The recipe is measured in ratios (“parts”) instead of in cups or pounds, which is annoying if you’re trying to end up with a certain number of quarts. So I did some math to come up with the number of CUPS needed of each ingredient, so that the end result was 7 quarts of fertilizer mix. Measure your ingredients on the generous side, and mix thoroughly before applying to the garden.

7 quarts (28 cups) of fertilizer:

16 cups (4 quarts) alfalfa meal (which is roughly 2.5 – 3 lbs)

2 cups (1 pint) agricultural lime

2 cups (1 pint) dolomite lime

4 cups (1 quart) bone meal

4 cups (1 quart) kelp meal
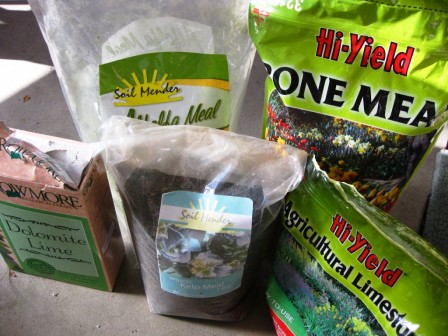
Ingredients for making organic fertilizer

I dig all 3 amendments into my garden soil in the spring, to a depth of about 4 inches. Once the veggies really get going, I like to supplement my blooming/fruiting veggies with some liquid Neptune’s Harvest Fish/Seaweed emulsion (NPK: 2-3-1), and my leafy greens with Alaska brand Fish Emulsion — though you could certainly use the Fish/Seaweed on all of it. I just happen to have a gallon of the Alaska fish emulsion, so I feed it to the greens since it’s NPK nutrient profile is 5-1-1 (lots of nitrogen!). Instead of the fish emulsion, you could also just dig more dry fertilizer into the soil at regular intervals, as detailed in the fertilizer article, which was linked above.

I hope this was at least kind of helpful…fertilizing the veggie garden had always been a big mystery for me, and within the past couple years, I feel like I’m finally finding my rhythm with it.

Do you have any special organic fertilizer tricks or advice to share??
« Older posts Newer posts »

© 2024 The Herbangardener

Theme by Anders NorenUp ↑