Kitchen / Garden / Sanctuary - Urban Homesteading to Nourish Body + Spirit

Tag: DIY (Page 10 of 14)

How to Build a Solar Oven

Baking a chocolate cake in the solar oven

I finally wrote up instructions on how to build a solar oven!

It’s the most magical toy! I love cooking things off the grid, using only the power of the sun. And solar ovens are fantastic for summer cooking when you want to cook (or bake!) without heating up your kitchen.

This design produces a powerful solar cooker — 350° or more. It can be made for only a few dollars, using ordinary household materials and tools, and is also a great project for older children.

Although my solar cooker is based on Joe Radabaugh’s original “Heaven’s Flame” (a.k.a. “SunStar”) design, I’ve simplified and made some modifications, which are reflected in my instructions below.

*********

Materials:

– Small Box. This is the inner part of the oven, where you put the food. Ideally square in shape, and measuring about 9-12” wide and deep. (Square makes a more powerful oven, but rectangular would work.)

– Large Box. This is the outer box, and needs to be 2-3” larger (or more) in all directions than the Small Box.

– Insulation cardboard. Gather lots of boxes of any size, since you’ll be cutting them up to stuff in between the Small Box and Large Box. Try the liquor store or grocery store for boxes.

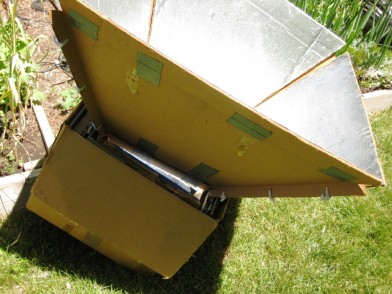
– Cardboard for Collectors (4 pieces). Find four large, flat pieces of regular (not double strength) cardboard. Each piece should measure about 2’ x 3’. Appliance stores or bike shops usually have big boxes you can cut up.

– White Elmer’s Glue. (1 part glue to 2 parts water so that it’s more easily spreadable)

– Aluminum Foil, one roll. Any type will work, but an extra-wide roll of heavy duty foil is ideal.

– Glass. About ½” larger than both the length & width of the Small Box. Double strength glass will insulate better than single strength. It’ll only cost a couple dollars at a hardware store, and they can cut to size. Be sure to sand down the sharp edges of the glass with sandpaper or a rock.

– Duct tape

– 5 Pipe cleaners, or some twine

Making the Oven:

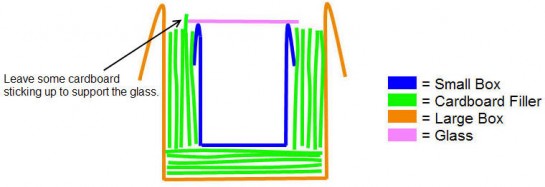
1. With a mat knife, begin cutting up your insulation boxes to fit into the bottom of the Large Box. Build up the cardboard layers so that when you place the Small Box inside, its top edge rests one inch below the top edge of the Large Box.

2. If your Large Box still has its flaps attached, leave two opposite flaps sticking out, and fold in the other two so that they’re inside the box. For the Small Box, bend all 4 flaps all the way back and tuck in between the Small and Large Box, or else just cut them off altogether. If you cut them off, take care to leave a smooth edge around the top rim.

3. Cut up the rest of the insulation boxes and stuff them into the space between the side walls of the Small Box and Large Box. Try not to leave big gaps in the insulation, and use enough insulation so that the Small Box is wedged tightly inside.

Solar Oven Cross Section

4. When your solar oven is in use, it’ll be tipped toward the sun. Therefore, you’ll need to leave a piece of insulation cardboard sticking up a bit to keep the glass in position. If you have a rectangular oven, it should be tipped on its wider side for stability. Therefore, the cardboard should stick up on one of the two wider sides.

Also, when you rest the glass on top of the Small Box, be sure there are no gaps between the box rim and the glass where hot air can escape.

5. Line the inside of the Small Box with aluminum foil, shiny side out. Glue it down if you want. (10/3/2012, Edited to add: Instructions for many solar ovens will tell you to paint the inside of your oven black. In fact, underneath the foil in my own oven is black paint! I use foil because I discovered that it makes for a hotter oven — hotter by about 25° to 50°. This is actually fairly significant especially if you’re baking things in your oven. Although that’s reason enough for me, another advantage to foil is that the black paint will off-gas when it’s heated in direct sun. Even after 8 years, when I took the foil off to re-test my conclusion, I could smell the black paint. And also, foil is more likely to be found in a typical household cupboard than black paint is.)

Making the Collectors:

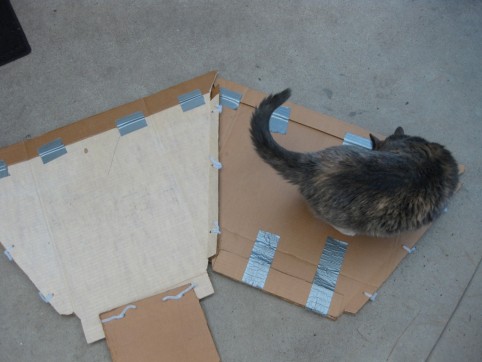
6. On your four flat pieces of cardboard, draw the collectors according to the pattern below. Note that if your Small Box is rectangular, your collectors will be two different sizes (based on the length & width of your glass), and if it’s square, the collectors will all be the same size. The 67 degree angle can be found by using a protractor, or by folding paper as shown in the second diagram (don’t worry about the 67.5 degrees — it’s close enough to 67 degrees, and pinpoint accuracy is not crucial here).
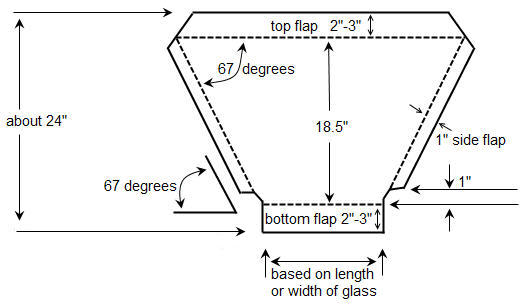
7. Cut out all four collectors with your mat knife. With a blunt-pointed tool, draw a crease along the dotted lines, and then fold the cardboard along the crease lines.

8. On three of the four collectors, bend the top and bottom flaps all the way over and tape them down with duct tape. On the fourth collector (which should be one of the wide collectors if your oven is rectangular), bend and tape the top flap, but don’t bend or tape the bottom flap because you’ll be attaching the Slip-In Piece to that bottom flap later.

9. Now, flip all four collectors over so that the taped flaps are underneath. You will now cover the smooth surface of your collectors with aluminum foil. With the shiny side up, roll the foil out over the collectors and cut so that it almost reaches the creased edges of the cardboard. (Don’t cover the side flaps with foil.) Thinly spread some of the Elmer’s Glue mixture onto the collectors and lay the foil in place (again, shiny side up), smoothing it outward with a clean cloth to minimize wrinkles.

Making the Slip-In Piece
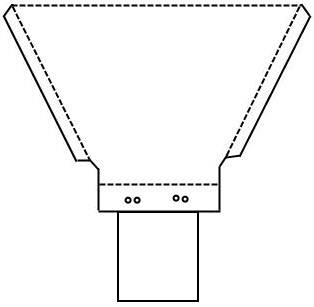
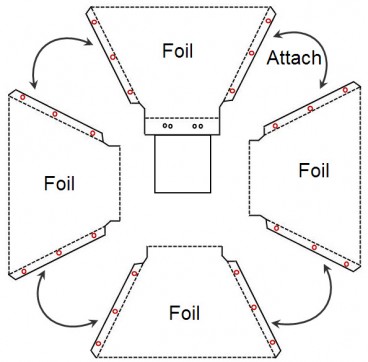
10. The Slip-In Piece is a piece of cardboard that attaches to the bottom flap from Step 8 that you didn’t tape down. It slips in amongst the pieces of insulation cardboard, allowing easy attachment of the collectors to the solar oven base. To make the Slip-In Piece, cut a piece of cardboard that’s roughly equal in dimension to (or a little smaller than) the height and width of your Small Box. Punch two sets of two small holes along the narrow end of the Slip-In Piece (as in the diagram on the right), and then punch corresponding holes into the bottom flap of your collector. Attach them with one of the pipe cleaners which has been cut in half (or, use twine).

Connecting the Collectors
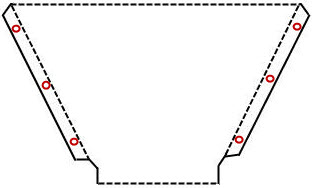
11. Punch three small, evenly-spaced holes into the side flaps of each collector, as in the diagram on the right. Place the holes in the exact same spot on all of the collectors’ side flaps so that they’ll line up when you’re ready to connect the collectors. And try to punch the holes as close to the crease in the cardboard as you can.

12. If you’re using pipe cleaners, cut four pipe cleaners into three pieces each. If you’re using twine, cut twelve 4-inch-length pieces. You’ll attach the collectors so that the foil-covered surfaces are facing each other, as in the diagram below. Thread the pipe cleaners or twine through the holes in the side flaps, and tie tightly.
If possible, get a cat to inspect your handiwork.

Setting Up & Cooking In Your Solar Oven

Tipped toward the sun, resting on the edge of the raised garden bed.

13. Take your solar oven to a spot in your yard that receives unobstructed sunshine. Attach the collectors to the oven by sliding the Slip-In Piece in between pieces of cardboard insulation at the top of the oven. Tilt your solar oven so that it’s pointed at the sun, and support it using bricks, rocks, overturned clay pots, or other sturdy things. Wearing sunglasses, fine-tune your oven’s position by observing the shadows inside the Small Box. Place your food inside the Small Box and set the glass into place. Again, there shouldn’t be any gaps between the glass and the top rim of the Small Box, and the glass should be supported by the piece of cardboard insulation that you left sticking up in Step 4.

– For best results, you’ll want to reposition your oven approx. every 30 minutes to keep it aligned with the sun. However, you can also cook while you’re away by pointing the oven toward where the sun will be at mid-day; you’ll then return home to hot food!

– My oven reaches a maximum of 350°. If I used double strength glass, it would probably be higher. For a lower temperature, keep the oven slightly misaligned with the sun.

– Your solar oven can be used to cook anything: rice, beans, grains, vegetables, meat, eggs, bread, cakes, cookies, pies, fruit cobbler, etc. I’ve noticed, though, that food doesn’t tend to brown in the same way that it would in a normal oven, so it may not look done when it actually is.

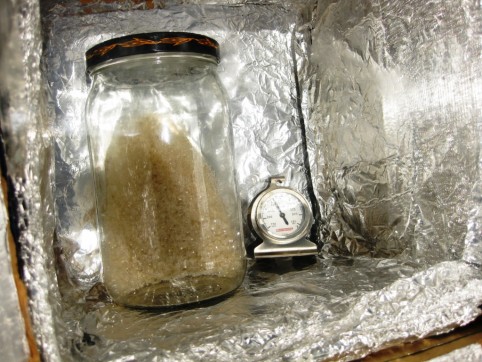
– I do most of my cooking in a large, wide-mouth glass jar with the lid screwed on very loosely. You can also cook (or bake!) in normal pans if you rig up a flat cooking rack.

– Don’t put anything into your solar oven that you wouldn’t put into your regular oven (plastics, etc.). Use an oven mitt or tea towel to lift off the glass — it gets very hot! Also, don’t forget to wear sunglasses when working around your solar oven (try without and you’ll see why!).

– It’s fun to keep an oven thermometer inside your solar oven to gauge the temperature.

– On a windy day, poke holes in both flaps that were left sticking out of the Large Box, and then poke some holes into the collectors. Tie the collectors to the Large Box flaps with twine.

– After using your oven a few times, the insulation cardboard might shrink a little. Add more cardboard so that it’s packed snugly.

– To keep your food warm after cooking, cover your oven with its collector panels.
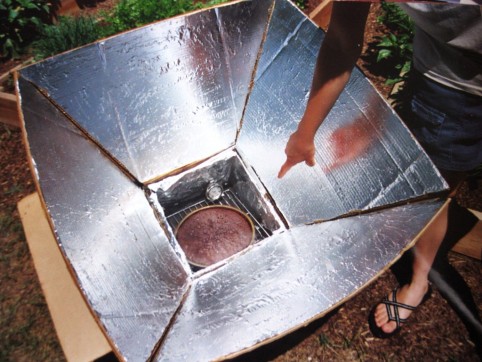
Cooking brown rice

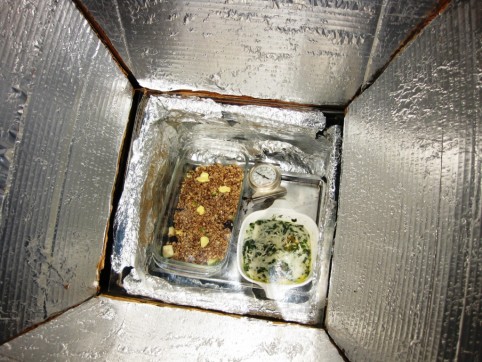
Solar Baking: Herbed Eggs & Apple-Blueberry Crisp

Knowing Exactly When To Harvest Garlic

In this post I described how to harvest and cure your garlic (and onions too). However, knowing exactly when to pull your garlic out of the ground isn’t always easy.

There’s a period of time — a “sweet spot” — when the garlic will be perfect. Harvest too soon and the head won’t yet have formed into distinct cloves…harvest too late and the protective papery skin that encases the head will have broken down, allowing dirt and worms into the crevices between the cloves. So I took some pictures for you that will hopefully help to identify the sweet spot.

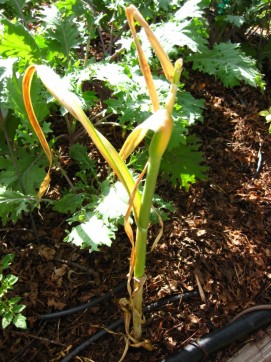
Harvest your garlic when the leaves have mostly turned yellow or brown, but the stem is still green. It’s okay if a few of the leaves are still green, too, though if all the leaves are still green, it’s too early to harvest.

Harvest your garlic when it looks like this. (Click for larger image.)

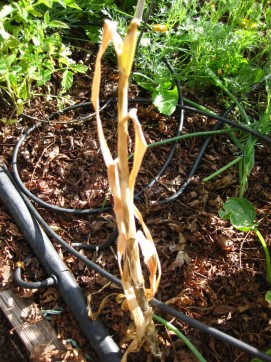
And if the leaves and stem are completely dry and brown, like in the photo below, you’ve missed the sweet spot, so definitely dig the garlic immediately.

Left in the ground a little too long...but do still dig it up ASAP! (Click for larger image.)

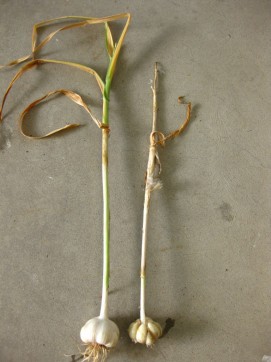
Left side: Harvested at the perfect time. Right side: Left in the ground a little too long. (Click for larger image.)

In the picture above, the garlic on the left was harvested at the perfect time: the stem is still green, the cloves are fully formed, and the outer papery skin is intact. The garlic on the right was left in the ground a little too long (notice how the stem is completely brown and the outer papery skin has mostly broken down).

If you miss that sweet spot and find that the outer papery skin of your garlic has disappeared and the dirt and worms have gotten in between the cloves, attach a spray nozzle to your garden hose and spray a forceful stream of water straight into the middle of the garlic head, which will blast out the dirt.

For further info on how to cure and store your garlic, pop on over to this post.

Left: Harvested at the perfect time. Right: Left in the ground a little too long. (Click for larger image.)

How to Make Sauerkraut

Today I’m going to show you how to make your own old-fashioned, raw, lacto-fermented sauerkraut. The first time I made sauerkraut, I was sure I was doing something wrong because it was so easy!

Ingredients:

Cabbage – red or green (or a combo), organic

Sea salt – See my salting chart below, plus you may need more to mix up extra brine. (Any non-iodized salt will do, but unrefined sea salt is better for your body.)

*****

Here’s my salting chart. These are just guidelines — if you want, you can add a little more salt in the summer and a little less in the winter.

10 tsp salt per 5 lbs vegetables

5 tsp salt per 2 ½ lbs vegetables

2 tsp salt per 1 lb vegetables

1 tsp salt per ½ lb vegetables

½ tsp salt per ¼ lb vegetables

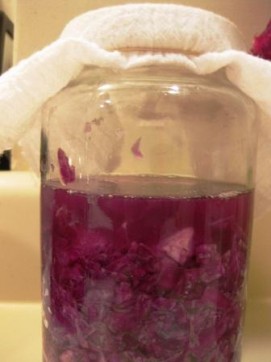
Cabbage becoming sauerkraut. (Little bits of cabbage clinging to the side of the jar --like in the picture-- should be scraped down into the brine, otherwise they'll get moldy.)

Chop, shred, or grate your cabbage — coarse or fine, however you like it. Sprinkle the salt onto the cabbage and mix it up. I let mine sit on the counter for several hours or overnight (this step is in place of pounding) so that the salt can begin to draw water out of the cabbage. The water contains nutrients, and these nutrients then become the substrate for the growth of the lactic acid bacteria which is what turns your cabbage into kraut. (Steinkraus, Handbook of Indigenous Fermented Foods, p.120.)

After the cabbage is wilted and some water has been drawn out, pack the cabbage WITH its water into a glass jar. You really want to pack it in there (use your fist or any kitchen tool), because this will help squeeze more water out. You can also use a specially-made ceramic sauerkraut crock, or a glass or ceramic bowl (anything except metal, since salt and acid can react with metal).

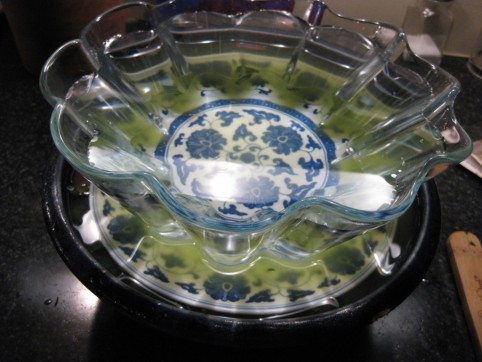
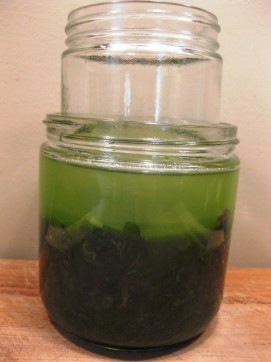
Keep your cabbage submerged under the brine by placing a smaller plate on top and weighing it down with something heavy (a jug of water, a boiled rock, etc.). Or, nest a smaller jar of water inside your larger glass jar. Or, wedge a whole cabbage leaf into the jar to keep everything submerged.

Sauerkraut fermenting in a ceramic bowl, weighed down with a plate & a water-filled bowl.

This is kale, not sauerkraut, but same idea. I particularly like this nesting-jars method for keeping everthing submerged in brine.

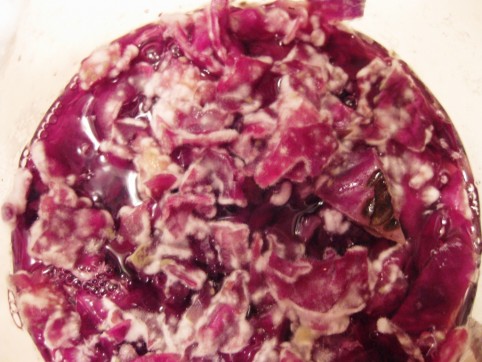
Whatever method you devise, just be sure that all traces of cabbage are completely submerged in the brine. Little bits sticking up above the water line will quickly lead to a moldy situation like the photo below (and if you do end up with mold like this, scrape off the entire top layer of cabbage, but the rest underneath should be fine! The kraut below the mold in this picture turned out great.)  So if you need to mix up some more brine (which is just a fancy name for salt water), use the ratio of 1 tsp salt to 1 cup of water.

This is what happens if your cabbage doesn't stay submerged in brine.

Cover the jar with either a lid (leave it loose to prevent pressure buildup) or a towel to keep bugs out.* Leave it to ferment at room temperature until you like the taste of your kraut. Let your tongue be your guide to done-ness. Taste it every few days, and transfer into the fridge when it tastes the way you like it. I like mine pretty sour, so I usually leave it out for 1-2 weeks or more, depending on how warm it is in the kitchen.

Once in the fridge, your sauerkraut will keep for many months. Don’t throw out the sauerkraut juice; it’s full of beneficial Lactobacillus (lactic acid bacteria) and is said to be a very good digestive tonic. And if you like, add a little of the juice to your next batch of sauerkraut as a starter.

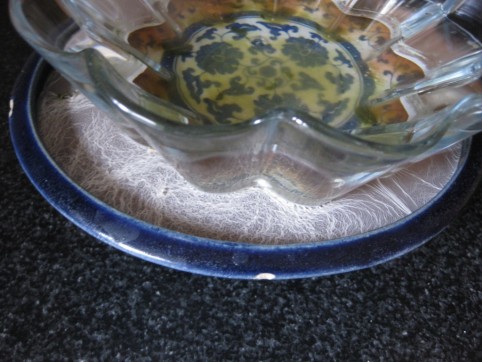
*If you see a white film (“kahm yeast”) develop on the surface of the brine, scrape off what you can each day until the kraut is done. Sometimes I don’t get any film. Sometimes I get a fair amount. There doesn’t seem to be any rhyme or reason. The kahm yeast won’t harm anything, but if you keep getting a lot of it day after day, it can sometimes (not always) impart an off taste to the brine. If that happens, I will actually dump out the brine and replace with new brine. How salty to make the replacement brine? Good question. I’m still experimenting with this. When I did this I used 1 tsp salt to 1 cup water, but then my kraut was almost done fermenting and ready to go into the fridge. In the summer — or if your kraut still has a ways to go — I might increase the ratio to 1 Tbsp salt per 1 cup water. Use your judgment and go for it; fermentation is an imprecise art!

Here you can see the white film (kahm yeast) that sometimes develops on the brine's surface (between the blue bowl and glass bowl).

Classic Caesar Salad Dressing

Since we’re on the topic of salads, and it’s peak season for garden lettuce, I wanted to share a yummy Caesar dressing recipe with you. I love Caesar salads. In fact just today I plowed through an entire head of my garden Romaine just by adding this Caesar dressing and eating taco-style. OH. YUM.

A recipe for homemade Caesar dressing that actually tastes right has eluded me for years, and I would buy bottled Caesar as a very occasional treat. No more. I have found my recipe. I’ve adapted it from the original recipe in Alice Waters’s book, The Art of Simple Food. I can’t get enough of this dressing, and to me it tastes just like a true Caesar should.

In my recipe, I’ve left the raw egg yolk out. Not that I’m opposed to adding good quality raw eggs to food, but I find that the dressing didn’t need it, and more importantly, I’ve found that salad dressing with raw egg doesn’t store very well — it just doesn’t taste that great much past the day it was made. I rarely finish a batch of salad dressing in one sitting, so it’s important to me that the dressing will store well and still taste good.

Here’s my adapted recipe:

Caesar Salad Dressing

1 Tbsp red wine vinegar

1 Tbsp freshly-squeezed lemon juice (definitely use fresh lemon juice here, because bottled just won’t taste right in this application)

1-2 garlic cloves, finely chopped (I use two medium-small cloves so it won’t overpower)

1 – 1 1/2 tsp anchovy paste or finely chopped anchovy fillets (2-3 fillets) (anchovy adds great depth of flavor to your dressing without making it taste fishy)

freshly ground pepper, generous amount

salt to taste

1/4 cup olive oil

3 Tbsp parmesan cheese

[1 raw egg yolk] – Optional.

Combine red wine vinegar, lemon juice, chopped garlic, anchovy paste, and a generous amount of freshly-ground pepper. Whisk together or just shake vigorously in a jar with a lid (my preferred method).

Then add the olive oil and parmesan cheese and shake or whisk again to combine. Taste for salt and add as needed.

If you’re using the raw egg yolk, mix it in right before serving.

Serve the salad with an extra sprinkle of parmesan cheese, and croutons if you want to really do it right!

Store any extra dressing in the fridge.

How To Make Traditional Kefir

Kefir is a fermented milk drink from the Caucasus region of Eurasia, similar to yogurt, but with an enhanced probiotic profile. Traditionally, kefir is made by dropping “kefir grains” into milk (raw milk or pasteurized, but not ultra-pasteurized). The kefir grains ferment the milk, causing it to thicken and take on a yogurt-like tartness, although the consistency is thinner than yogurt. Kefir can be purchased in bottles at the store, however commercial kefir is produced using powdered kefir starter rather than the actual “grains,” and therefore doesn’t possess nearly the probiotic diversity of traditional kefir. The only way to obtain traditional kefir is to make it yourself with kefir grains. The good news is, it couldn’t be easier! I used to make yogurt a lot, which required heating milk to the scalding point, then cooling it to 110 degrees, stirring in the “starter” (plain yogurt), wrapping the jar in towels and placing it on a “reptile heat rock” where it would sit for 4-6 hours. While the process itself was very easy, it was labor intensive. Kefir is SO much easier, and again, has more probiotic benefits than yogurt.

For those reasons, I probably won’t go back to regularly making yogurt; I’m definitely a kefir convert! 🙂

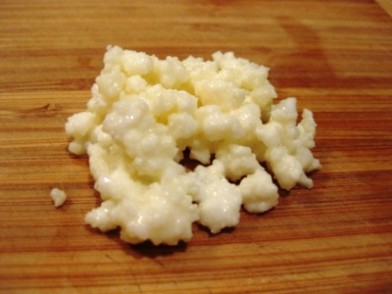
Kefir grains

To make kefir, you’ll first need to obtain kefir grains. This was the hardest step for me, for some reason. Silly, I know, since they’re widely available on the internet & through kefir grain exchanges. I think I must have been wary of these mysterious grains — they were a big unknown at first. I didn’t know how to use them, nobody I knew had even heard of them, and I thought surely I would either kill them or accidentally culture some kind of rogue bacteria that would kill me, and the whole thing would be a waste of money. Well, I’m here to tell you that they’re very easy to use, very hard to kill, and it’s highly unlikely you’ll culture something abominable (and if you did, you’d know it).

So now that we’ve gotten the fear out of the way, where do you get these grains? There are many websites out on the ‘net where people with too many grains will give them away for free — usually all you pay is postage. Kefir grains multiply, you see, so the more often you make kefir, the more grains you will have. I chose to buy my grains from an online company (Cultures For Health), wanting to be sure I was getting them from a good, reputable source. Now that I have confidence and experience with making kefir, though, I’d feel just fine getting mine from someone who was giving them away for free.

Some places to get kefir grains (there are many others, too!):

Cultures For Health – online company, for purchasing grains

Kefir Lady – online company, for purchasing grains

Project Kefir – worldwide sources for (sometimes) free kefir grains

Toronto Advisors – worldwide sources for (sometimes) free kefir grains

HOW TO MAKE KEFIR:

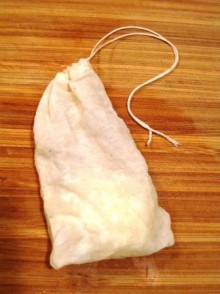
Kefir grains in muslin bag

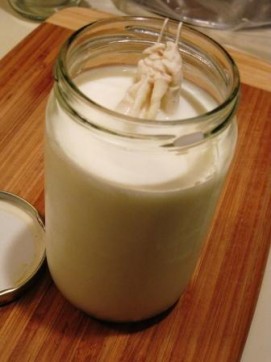
Begin with 1 to 2 teaspoons of kefir grains per quart (4 cups) of milk (not ultra-pasteurized). You can either drop the grains into the milk and then strain them out later, but I find it easier to just put the grains into a clean muslin bag and drop the bag into the milk. I screw a lid onto the jar, because the lid will trap the CO2 that’s released, lending a slight effervescence to the kefir. If you don’t want the effervescence, just cover the kefir jar with a cloth & rubber band to keep out dust and bugs.

Leave the kefir at room temperature until it tastes the way you like it. I like to tilt the jar or stir the kefir now and then, though it’s not necessary. My kefir usually takes about 36 hours to thicken and get tart and effervescent, which is the way I like it. If your kefir separates into curds and whey, it’s definitely done! (More about this in the next section.) Strain out the kefir grains and enjoy! I love drinking kefir plain as well as using it in my smoothies.

To make another batch of kefir, simply transfer the grains into new milk. No need to rinse them first; in fact, rinsing slows their growth (Steinkraus, Keith, ed. Handbook of Indigenous Fermented Foods. 2nd ed. Pp. 306). Since I use a muslin bag to contain my grains, I just plop the bag into a new jar of milk without rinsing. No muss, no fuss.

I like to put my kefir grains into a muslin bag, which I transfer from one batch to another.

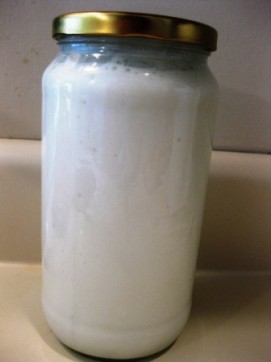
Perfect kefir - thickened, creamy, & effervescent. NOW is the time to take the grains out!

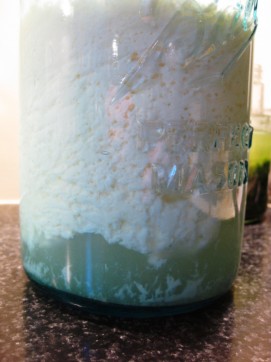
This kefir is "overdone" because it has separated into curds & whey. It's still usable (especially in smoothies!), but won't have the luscious, creamy texture.

Things I’ve learned about making kefir:

Using your new kefir grains – Making kefir is very easy, though there may be an adjustment period while you learn how your grains work & while the grains get acquainted with the kind of milk you use. Your first couple batches of kefir might not come out how you like…the kefir may be too thin, too sour, too yeasty, too whatever. This is normal, so don’t worry; some grains need time to adjust, others don’t.

What kind of milk to use? – You may use raw milk or pasteurized, but NOT ultra-pasteurized. (Ultra-pasteurized milk doesn’t culture! I learned this the hard way. Scary, yeah…) I try to get high-quality grassfed whole milk if possible because that’s what I like to drink, but any milk will work (again, just not ultra-pasteurized). Also, using cold milk straight out of the fridge is fine.

It’s hard to kill kefir grains! – Kefir grains are resilient. In fact, I’ve left grains in the same milk in the back of the fridge for 7 months, and they survived. Many websites tell you not to let the grains touch metal. However, I’ve observed how resilient these things are, and therefore I highly doubt that touching metal will suddenly kill them. In fact, mine have touched metal and they’re not dead yet.

What’s the secret to making good kefir? – Making good kefir is all about getting the right milk-to-grains ratio relative to the ambient temperature. It’ll require some experimentation, and you may not get consistent results every time unless you get scientific about it and measure out the same amount of kefir grains each time (necessary, since they multiply), put them into the same amount of milk, and culture at the same temperature. Temperature is the tricky part, because kefir will culture more quickly in warmer temperatures. (So, right about the time you’ve nailed down wintertime kefir-making, the season changes and you have to reinvent the wheel! :)) One way to control the temperature is to culture your kefir in a cooler with some ice. The easiest way, though, is just to decrease the amount of kefir grains you use in warmer temperatures (or increase the amount of milk) so that your kefir will culture more slowly.

Help! My kefir is separating too quickly – My biggest frustration was when my kefir would separate too quickly into curds and whey. It would be fine, and then two hours later it would be completely separated. What’s happening in this situation is that there are too many kefir grains for the amount of milk you’re using. Either decrease the amount of grains, or increase the amount of milk.

(The science: The more kefir grains you have in your milk, the faster they’ll use up their food source (lactose, or milk sugar). When they consume lactose, they produce lactic acid, and too much lactic acid will cause the kefir to separate into curds and whey…because that’s just what acids do, so congratulations, you’ve made cheese!)

Is separated kefir still good? – When kefir separates into curds and whey, it’s definitely still usable! It won’t have the creamy texture, so it’s not as lovely to drink. Instead, just use it in your smoothies, or else drain off/reserve the whey and eat the curds like a thick yogurt or let them drain further to make a thick, tangy “kefir cheese” spread. Yum!

Storage of kefir grains – If you’re not ready to make more kefir right away, put your grains in the fridge, either in a bit of fresh milk or in some kefir. Often, I just store my grains in the jar of kefir I’ve just made, in the fridge. Ideally, though, store them in a cup of fresh milk and change it every week or two; this way, you’re giving them plenty of food (lactose) which will keep them happy and multiplying. For long-term storage, I’ve heard that you can also freeze them, or dry them out completely and store them, and then re-hydrate in milk when you’re ready to use them again. I haven’t tried this yet, but it’s on my list!

Getting your grains to multiply – The best way to get your grains to multiply quickly is to make kefir every day, and to not store your grains in the fridge. We don’t go through enough kefir to make it every day, so my grains are often kept in the fridge. If kept in the fridge a lot, they will multiply much more slowly. If you have too many grains, give some away to friends, freeze some for “insurance”, or just eat them for a super probiotic boost!

What ARE kefir grains, really? – Kefir grains are conglomerates of lactic acid bacteria and yeasts held together by a polysaccharide gum called kefiran produced by the predominating bacterial species. (Steinkraus, Keith, ed. Handbook of Indigenous Fermented Foods. 2nd ed. Pp. 306) The bacteria and yeasts have a symbiotic relationship, as the predominant bacteria is unable to grow in milk without the yeast’s presence. This conglomerate that makes up the kefir grain behaves as a single organism; efforts to produce new grains by growing the component organisms separately and then recombining them have not been successful.

– My kefir looks/smells/tastes bad – Kefir can occasionally taste yeasty, particularly if it’s “overdone” and separated into curds & whey. Yeasty is OK, but just use common sense and don’t drink it if it otherwise looks, smells, and/or tastes bad. However, culturing something rogue is not really a huge concern; both the acidity of the kefir and the culturing organisms do a good job of keeping away any little nasties.

From the Handbook of Indigenous Fermented Foods:

“Some inhibition of pathogens in fermented milks is due to acid production. Recent work has shown that the effect of acidity is relatively small compared to specific substances of antibiotic nature formed by the fermenting organisms (Lucca, 1975). In addition to lactic acid, metabolites such as lactocidin, nisin, and acidophiline produced by starter organisms during fermentation also exhibit antibacterial properties. Singh and Laxminarayan (1973) reported that many lactobacilli exhibited antibacterial action against pathogenic strains of staphylococci and E. coli. They also observed that antibacterial action was a function of pH; the culture filtrate lost antibacterial activity when pH was raised to 5.0 or above.”

« Older posts Newer posts »

© 2024 The Herbangardener

Theme by Anders NorenUp ↑