Kitchen / Garden / Sanctuary - Urban Homesteading to Nourish Body + Spirit

Tag: experiments (Page 1 of 3)

Cooking with Borage Leaves — Borage Burritos and Green Smoothies

Borage Burrito Bowl

This year in my garden, borage is coming up everywhere!

It’s a prolific self-seeder and I could always use it as green manure in my compost pile — but the bees love its flowers, which is reason enough to leave it alone.

I’ve had some bad luck with cabbage and cauliflower this year, and other crops have been inexplicably stunted while others have been growing normally. There’s always an element of mystery to the garden from year to year…I’ve noticed for years that there’s always a crop that fails and it’s just a question of which one it’ll be.

Borage is certainly not one of my failing crops this year. So in the spirit of eating what’s being effortlessly provided to me, I’ve gotten brave, picked those prickly leaves, and done some experimentation.

Now borage flowers are also edible, and they’re nice to nibble on while out in the garden, but I have mountains of borage leaves and I wanted to see if they could be a real, true, edible crop for me. And my conclusion is Yes.

I’ve been using the leaves in two ways — raw, in green smoothies, and steamed, added to other dishes.

***

Raw leaves:

I start each day with a green smoothie, heavy on the greens. I have always used cilantro, parsley, or a combo of the two, but I’ve been loving the borage as my green. Cilantro and parsley are strong flavors, but the borage is wonderfully mild, and I love its fresh cucumber taste. And even better than cucumbers, there’s no hint of bitterness whatsoever. The prickles on the leaves get pulverized, and there is no hint of mouth or throat irritation, which I had wondered about.

The raw borage leaves also freeze well and can be added to the smoothie directly from the freezer.

I use a good handful of borage each morning, and sometimes also some cilantro:

***

Steamed leaves:

Borage leaves of any size can be steamed, but I like the small and medium size rather than the giant ones with larger prickles. The prickles do cook down into pretty much nothing (and they don’t irritate your mouth or throat when eaten), but even still I like the smaller leaves a little better.

I chop my borage leaves, and since I have Gastroparesis, I steam them for over an hour so they’re very, very tender.

If you don’t have a compromised stomach, feel free to steam them for a more normal length of time.

The color and taste of the steamed borage reminds me of steamed nettles. Dark color… mild taste… nothing exciting, but perfect for stirring into another dish that already has its own bold flavors, like minestrone soup, a vegetable stew, chili, maybe a lentil salad, or…Borage Burritos!

***

Borage Burritos (or Burrito Bowl)

Borage leaves, chopped and steamed

Brown rice or Millet, cooked

Your favorite jarred green chile sauce

Your favorite jarred salsa

Mexican-style seasoning, like Penzey’s Southwest, Fajita Seasoning, Arizona Dreaming, etc

Shredded cheese (or avocado bits)

Fresh cilantro

Corn or flour tortilla (optional)

***

Combine the steamed borage leaves with an equal amount of cooked brown rice or millet.

(I like brown rice cooked very soft, so I use 1 cup rice to 3 cups water, cooked for 2 hours. I cook millet with that same 1:3 ratio, cooked for 1 hour.)

Stir in the green chile sauce, salsa, and Mexican seasoning to taste.

Heat up until nice and hot.

Stir in shredded cheese, sprinkle on cilantro.

Serve in a bowl, or wrapped in a warm corn or flour tortilla (which you can smother with more green chile sauce and cheese if you like).

***

*****

Morning Hoar Frost

It’s almost springtime already — how are you?!

Before winter is over, I must show you the frosty fairyland we woke up to one foggy morning in November, one of my favorite months. February is another one of my favorite months, and I’ll be sorry to see it go.

This morning I began thinking about my upcoming garden year, deciding about the steps I’ll take to wake up the garden this year, jotting down the order I’ll do them in so I don’t forget. I do things differently each year, hopefully evolving toward more efficiency and less input from me, meaning less of a drain on my energy, while maintaining a reasonable level of vegetable productivity.

Among my thoughts for this year… mowing the weeds in between the garden rows instead of pulling them; doubling the distance between tomato plants; interspersing my high-pest crops (cabbage, squash) throughout the garden instead of planting them in blocks as I have in the past; more flowers; planting a slew of dill everywhere since my observation has been that dill is a tip-top favorite of many(!!) types of beneficial insects; and no forking to loosen the soil in the rows as I have in the past — I’d like to eliminate this energy-intensive step, and instead just score a couple-inch-deep line in the soil for the rows of seeds.

It’s always an experiment!

Anyway, look at how beautiful this particular morning was! We don’t often get treated to this kind of thing; it was a special morning.

*****

Catching up with photos!

IMG_0545

Happy late-Autumn to you all! We only recently stepped into real Autumn actually, after the longest and most luxurious Indian Summer here, which topped off a perfect Summer season and glorious Springtime. The garden looked beautiful this year, it was a satisfying harvest for most items, everything was lush, we received rain at regularly spaced intervals, and it never got uncomfortably hot. On the health front, I’ve certainly made progress after referral to a more responsive, take-the-reins style doctor and some quality time on a couple of antibiotics. Another pneumonia came on in the Spring, as well as various other ups and downs, several viruses, and the identification of an immune deficiency. That pretty well glazes over it. It’s been a hard, embittering year. I’ve fought tooth and nail to even be this far. Obamacare itself has been my saving grace, and yet our alleged “world-class” healthcare system is a giant obstacle course, broken in many places. When you’re feeling awful, you don’t have the strength or stamina to run through a marathon obstacle course, yet that’s what a patient often must do if they’re unfortunate enough to be a patient. As I said though, I’ve been feeling far better overall than I have in quite a while, and by hook or by crook, that trend must continue.

Let’s move on though; there’s a lot of good stuff that balances out the infuriating crud, so let’s go on and have a tour through that, okay?

Oh right — and the downtime and move to a new web hosting provider did happen a couple months ago. I was shamelessly puffed-up for weeks afterward, because I blindly googled my way through the manual migration of this wordpress blog and database, augmented by my minimal technical “expertise,” and without benefit of handy-dandy migration plugins or other sanity-saving tools (learned about those too late, after the old hosting was already turned off). I certainly “learned a lot” — which is the euphemism that you use, instead of telling people that you nearly murdered your laptop trying to rebuild your wordpress file structure.

Anyway, get ready — we’ve got a lot of catching up to do with the photos! Starting with the succulent, late Spring garden bounty, through Summertime, and into the late Autumn now…

(c) The Herbangardener

IMG_4783

IMG_4836

IMG_4860

IMG_4863

IMG_4870

IMG_4876

IMG_4962

IMG_5003

IMG_5063

IMG_5067

IMG_5109

IMG_5192

IMG_5195

IMG_5207

IMG_5292

IMG_5294

IMG_5303

IMG_5368

IMG_5427

IMG_5472

IMG_5561

IMG_5589

IMG_5594

IMG_5610

IMG_5637

IMG_5686

IMG_5692

IMG_5733

IMG_5828

IMG_5912

IMG_5924

IMG_0022

IMG_0023

IMG_0025

IMG_0027

IMG_0105

IMG_0162

IMG_0177

IMG_0228

IMG_0249

IMG_0345

IMG_0360

IMG_0391

IMG_0400

IMG_0432

IMG_0532

IMG_0556

IMG_0608

IMG_0615

IMG_0620

IMG_0623

IMG_0625

IMG_0661

(c) The Herbangardener

IMG_0663

IMG_0669

IMG_0672

IMG_0679

IMG_0680

IMG_0685

IMG_0689

IMG_0692

IMG_0696

IMG_0713

IMG_0719

IMG_0722

IMG_0747

IMG_0757

(c) The Herbangardener

IMG_0783

IMG_0785

IMG_0789

IMG_0794

IMG_0801

IMG_0804

IMG_0807

IMG_0808

IMG_0810

IMG_0812

IMG_0814

IMG_0825

IMG_0829

 *****

Make Your Own “Green Smoothie Frozen Concentrate”

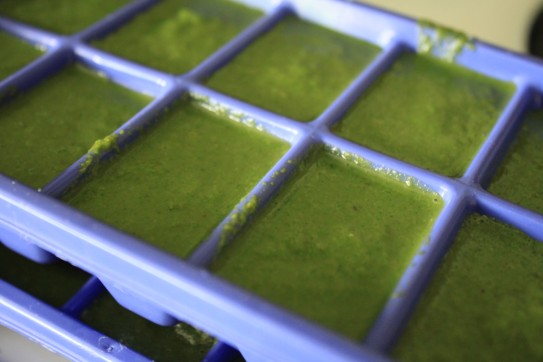
Green smoothie frozen concentrate made with lettuce, spinach, and lambsquarters.

So I peeked into my remaining three bags of lettuce from the garden this year, and discovered that they were starting to go south and needed to be used right away. I separated out the slimy leaves, washed the rest, and had an idea! I’ll make green smoothie frozen concentrate cubes!

To make the concentrate:

1. Pour some kefir, water, juice, or watered-down yogurt into a blender. You won’t need too much — just enough to get everything to blend together smoothly.

2. Add lots of greens. Ideas are: lettuce, spinach, beet greens, chard, lambsquarters, purslane, mint, parsley, cilantro, edible flowers, etc. (Kale is the only one I don’t like in a shake, but if you do, go for it!)

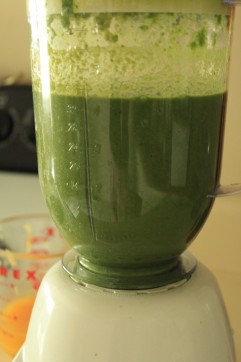
3. Start the blender and let it run until you have a uniform slurry.

4. Pour into ice cube trays and freeze.

To use:

When you’re ready to make a green smoothie, thaw out some cubes; I usually use 2 cubes when I make a shake for myself. Add the green liquid to your blender containing the rest of your smoothie ingredients — I like to use fruit and kefir with some ground flax seed and vanilla extract. Blend & enjoy. Yum!!

*****

If you’re curious about green smoothies, you might check out the book Green for Life by Victoria Boutenko, or the related website. My friend Sasha recommended this book to me, and I loved it! While I don’t agree with absolutely everything in the book, I’m glad I read it.

*****

Homemade Pumpkin Pie Fruit Leather

I think it’s time for another recipe! It’s been a while since I’ve posted one. I’m still off work for another few days as I continue to recover from my foot surgery, so I’ve got extra time at home which is wonderful! I can’t be in the kitchen all day since I need to continue to rest a lot and elevate my foot, but I could never completely stay away from my kitchen 🙂 — crutches or not — so I’ve been experimenting here and there with some simple recipes.

Today’s recipe for homemade fruit leather is definitely simple! I used to eat fruit leather all the time when I was younger, but I’d pretty much forgotten about it, even though it’s a yummy & very portable snack. Recently I came across the idea of homemade fruit leather, and decided to experiment using a can of pumpkin that’s been sitting in the back of the pantry for over a year (or maybe two…). Voila! Pumpkin Pie Fruit Leather. It’s so good that I had to restrain myself from eating the whole entire tray, and it’s incredibly easy to make!

If you don’t have, or don’t want to use, canned pumpkin, just substitute cooked pumpkin (or winter squash) puree.

Also…if you don’t have pumpkin, you could use this basic method to make fruit leather from cooked/pureed apples, pureed peaches (no need to cook them first), plums, berries, bananas, or a combination of fruits — and with these fruits, there’s no need to add any spices unless you want to! If I have an abundance of tomatoes this year, I think I’ll even try it with tomatoes. Anyway, here’s the recipe:

Pumpkin Pie Fruit Leather

2 cups (or one 15-oz can) cooked pumpkin or winter squash puree

1/4 cup honey

1/4 – 1/2 tsp cinnamon (depending on your taste…I used a 1/2 tsp because I like the bold taste of spices)

1/4 – 1/2 tsp ginger powder, optional

1/4 tsp powdered cloves

1/8 tsp nutmeg

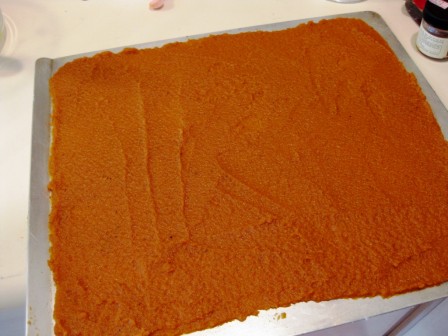
Preheat oven to 200* F. (If you have a dehydrator, you can use it for this recipe. Dehydrate at 140*.) Mix all ingredients well. Generously oil a cookie sheet (really slather the oil on…it’ll make it much easier to peel off the leather!), or use parchment paper. Using a spatula, spread your mixture on the cookie sheet, taking the extra time to spread as thinly and evenly as possible; this took me a few minutes to get it just right. Spreading it as evenly as possible is important because otherwise some parts will be over-done and other parts will be under-done (which will probably happen to some extent anyway, but at least you’ll be minimizing it).

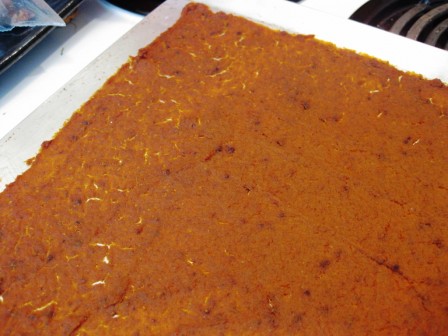
Spread the mixture as evenly and thinly as possible on the oiled cookie sheet.

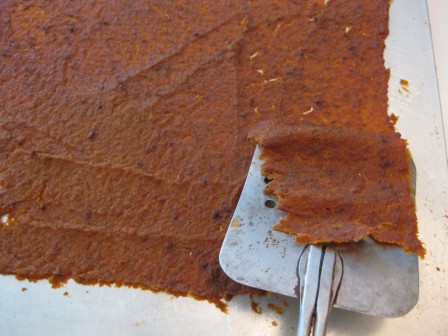
Put your cookie sheet into the oven and let it “dehydrate” in there until the fruit leather is pliable…not wet, but not hard & brittle either. Mine took about 2 1/2 hours to get done; you’ll want to check on yours every now and then. A little bit was over-done and I had to let the cookie sheet cool a little before I could pry it off, and another little patch was under-done, so I just put it back in the oven for a little while. But most of it was easily peeled off the cookie sheet with a flexible metal spatula; this whole process would probably be even easier if you use parchment paper.

The fruit leather is done.

Peel it off the cookie sheet with a flexible metal spatula. If it's not over-done, it should peel right off with no problem. If it's under-done, it will be too wet to peel off...so just pop that part back into the oven for a while.

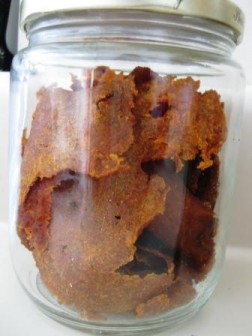
Store in a glass jar. I stored mine in the fridge, but you can also store it at room temperature.

« Older posts

© 2025 The Herbangardener

Theme by Anders NorenUp ↑