Kitchen / Garden / Sanctuary - Urban Homesteading to Nourish Body + Spirit

Tag: foraging (Page 1 of 3)

Cooking with Borage Leaves — Borage Burritos and Green Smoothies

Borage Burrito Bowl

This year in my garden, borage is coming up everywhere!

It’s a prolific self-seeder and I could always use it as green manure in my compost pile — but the bees love its flowers, which is reason enough to leave it alone.

I’ve had some bad luck with cabbage and cauliflower this year, and other crops have been inexplicably stunted while others have been growing normally. There’s always an element of mystery to the garden from year to year…I’ve noticed for years that there’s always a crop that fails and it’s just a question of which one it’ll be.

Borage is certainly not one of my failing crops this year. So in the spirit of eating what’s being effortlessly provided to me, I’ve gotten brave, picked those prickly leaves, and done some experimentation.

Now borage flowers are also edible, and they’re nice to nibble on while out in the garden, but I have mountains of borage leaves and I wanted to see if they could be a real, true, edible crop for me. And my conclusion is Yes.

I’ve been using the leaves in two ways — raw, in green smoothies, and steamed, added to other dishes.

***

Raw leaves:

I start each day with a green smoothie, heavy on the greens. I have always used cilantro, parsley, or a combo of the two, but I’ve been loving the borage as my green. Cilantro and parsley are strong flavors, but the borage is wonderfully mild, and I love its fresh cucumber taste. And even better than cucumbers, there’s no hint of bitterness whatsoever. The prickles on the leaves get pulverized, and there is no hint of mouth or throat irritation, which I had wondered about.

The raw borage leaves also freeze well and can be added to the smoothie directly from the freezer.

I use a good handful of borage each morning, and sometimes also some cilantro:

***

Steamed leaves:

Borage leaves of any size can be steamed, but I like the small and medium size rather than the giant ones with larger prickles. The prickles do cook down into pretty much nothing (and they don’t irritate your mouth or throat when eaten), but even still I like the smaller leaves a little better.

I chop my borage leaves, and since I have Gastroparesis, I steam them for over an hour so they’re very, very tender.

If you don’t have a compromised stomach, feel free to steam them for a more normal length of time.

The color and taste of the steamed borage reminds me of steamed nettles. Dark color… mild taste… nothing exciting, but perfect for stirring into another dish that already has its own bold flavors, like minestrone soup, a vegetable stew, chili, maybe a lentil salad, or…Borage Burritos!

***

Borage Burritos (or Burrito Bowl)

Borage leaves, chopped and steamed

Brown rice or Millet, cooked

Your favorite jarred green chile sauce

Your favorite jarred salsa

Mexican-style seasoning, like Penzey’s Southwest, Fajita Seasoning, Arizona Dreaming, etc

Shredded cheese (or avocado bits)

Fresh cilantro

Corn or flour tortilla (optional)

***

Combine the steamed borage leaves with an equal amount of cooked brown rice or millet.

(I like brown rice cooked very soft, so I use 1 cup rice to 3 cups water, cooked for 2 hours. I cook millet with that same 1:3 ratio, cooked for 1 hour.)

Stir in the green chile sauce, salsa, and Mexican seasoning to taste.

Heat up until nice and hot.

Stir in shredded cheese, sprinkle on cilantro.

Serve in a bowl, or wrapped in a warm corn or flour tortilla (which you can smother with more green chile sauce and cheese if you like).

***

*****

How to Make Lavender Glycerite

***

In the evening time before bed, after I take all my nasty-tasting pills and potions, I squeeze a dropperfull or two of my homemade lavender glycerite onto my tongue and savor the delightful sweet floral lavender taste.

It’s a wonderful way to wash a bad taste out of your mouth and reward yourself for getting all that stuff down the hatch. It will often physically bring a smile to my face, it tastes so wonderful!

It’s very simple to make, and lavender season is upon us.

***

(This really is an easy project, but if you don’t have access to fresh lavender, may I suggest the absolutely heavenly Rose Petal Elixir made by Avena Botanicals with roses from their own biodynamic gardens. They also sell a Lavender Glycerite which I haven’t tried.)

***

***

Lavender Glycerite

Ingredients:

Fresh lavender flowers and flower buds

Pure food-grade vegetable glycerin (widely available online or at health food stores — vitacost.com is where I usually get stuff like this)

Supplies:

Glass jar with lid

Mesh sieve or funnel

Coffee filter

Clean dropper bottle (1, 2, or 4 oz size)


What to do:

1. Remove most of the stems from your lavender, and chop up the flowers and flower buds with a knife.

2. Place the chopped lavender into your glass jar. (In the pictures above, I’m using an 8-oz wide mouth Mason jar.)

3. Pour vegetable glycerin into the jar until it completely covers the lavender. Stir a few times to release any big air bubbles and top it up with glycerin if needed. Be sure all the lavender is submerged.

4. Screw the lid onto your jar, then label and date it with masking tape and a sharpie.

5. Place the jar into a dark cupboard where you will see it often…

6. Shake the jar once a day, or every couple days.

7. Let it sit in the cupboard at least 2 weeks (I leave mine 4-8 weeks).

8. When you’re ready to strain, place a coffee filter inside a mesh sieve (or funnel). Place the sieve over a bowl, a measuring cup, or another glass jar. Pour the lavender glycerite into the coffee filter and when it has all been filtered, wash your hands and gather the filter around the remaining lavender and gently squeeze to extract the rest of the glycerin. The finished lavender glycerite will look like honey — a light amber color.

9. Pour an ounce or two of your strained glycerite into a dropper bottle to keep in your bathroom. If needed, transfer the rest into another glass jar (or the same one that’s been rinsed and dried), cap it, label it, and date it.

10. Transfer the jar into the refrigerator to store it. It will keep at least a year, and probably significantly longer.

*****

Nettles!!

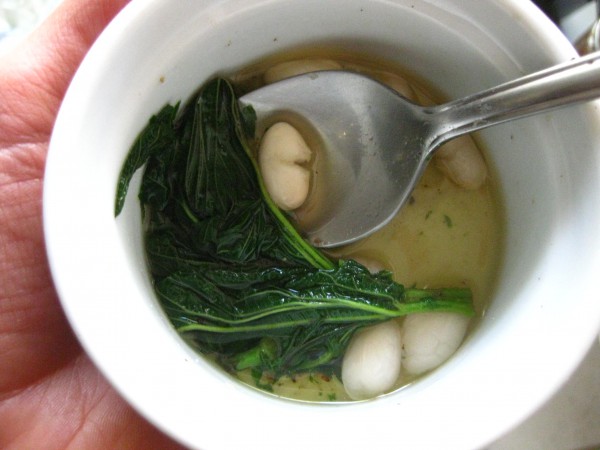
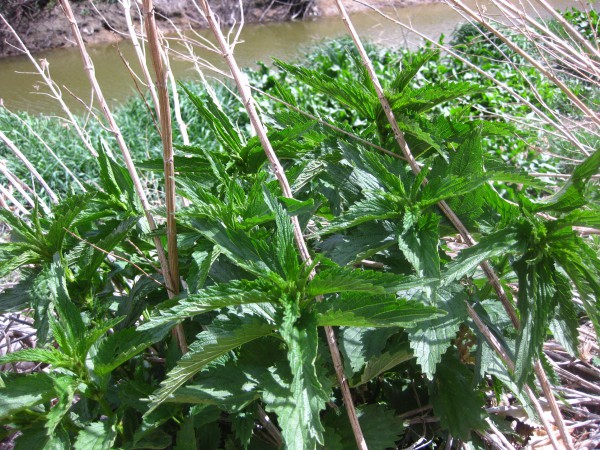
As I mentioned in this post, I found nettles! This was really very exciting because now I can collect my own instead of continuing to purchase my usual dried nettles for tea. And for the very first time, I had freshly cooked nettles and they’re amazing! A mild and pleasing taste. I cooked them in some salted water, and ended up drinking every last drop of the broth too — it was thick and delicious — almost meaty. They’re so good for you, too. High in protein, vitamins, and minerals.

Cooked nettles

Nettles & white beans

And I love nettles tea because it works better than an antihistamine pill for me. This was an accidental discovery; I’m allergic to bee stings, and I get honeybee and ‘mixed vespids’ venom immunotherapy shots every 6 weeks so that my body gets desensitized to the venom. Normally I get a big, itchy 3″ wide welt on each arm where I get the shot, and I take a Claritin pill the morning of the shots to help counteract that. However one day I had some strong nettles tea before my shots, along with the pill. No welt! No redness! No itchy! At first I didn’t realize it was the nettles, until another time when I’d forgotten to take the antihistamine pill and only had nettles tea, and same thing! No welt. Finally I realized it was the nettles tea, and the pill wasn’t even really necessary. So now I make sure to have nettles tea before my shot, and every day for at least about a week afterward. It’s quite magical. If you have seasonal allergies (mercifully, I don’t), you might try nettles tea!

My favorite nettles tea:

2-3 Tbsp dried nettles

~1/2 Tbsp dried mint

~1/2 Tbsp dried lemongrass

In a mug, pour 8-12 ounces boiling water over herbs, cover, and steep about 15 minutes.

So anyway, back to the fresh nettles. I couldn’t believe my luck with finding patch after patch of them, and while I often travel with an empty plastic bag (you never know what you’ll need it for!), I didn’t have one with me on the walk. However my mom had packed snacks in a bag, and thank goodness she had! Precious, precious bag. Without it, I wouldn’t have been able to collect any. Disappointing!

I had an empty little sandwich baggie which I used as a glove to pick them, though still got plenty of stings on my wrists. (The stinging compounds are easily neutralized once the nettles are either boiled or dried to a crisp.) I stuffed the bag full, and also took some plants with roots and have planted those in pots outside, hoping they’ll decide it’s a satisfactory location to grow. I’ve read that nettles are particular about where they grow; you might think you have the ideal location for them — but they have the last word.

Do you cultivate your own nettles? Have any growing tips?

***

As you can see, the living room was full of nettles for a while. I ended up getting about 3 gallons, dried.

*****

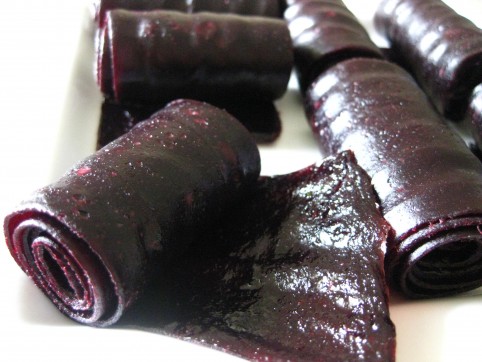
Homemade Concord Grape Fruit Leather

I wish I could give you all a piece of this fruit leather to eat right this minute! It has the best, truest grape flavor I think I’ve ever tasted. This leather is sugar free and made with nothing but ripe concord (or “wild”) grapes. And although the process is really easy — and you need nothing except the grapes themselves — it takes time. This is special stuff; the taste is so worth it, and when you take a bite and think about the process from start to finish, you’ll appreciate this fruit leather even more.

I find that it feels really good to deeply savor each morsel of food like this; so different from mindlessly feeding our faces, isn’t it. I bet if we were the ones responsible for the extensive work required to prepare everything we ate, we’d slow right down and savor every single bite!

*****

Concord Grape Fruit Leather

Concord grapes (that’s the only ingredient!)

***

1. Begin by making my Grape Freezer Jam with your concord grapes. But go ahead and leave it unfrozen…or, thaw it out if it’s already frozen.

2. Preheat oven to 200°F. (You could also use a dehydrator.)

3. Tear off a piece of parchment paper the size of your cookie sheet. You could also generously oil your cookie sheet, but parchment is a lot easier to peel the leather off of.

4. Using a spatula, spread your Freezer Jam onto the cookie sheet, taking the extra time to spread as thinly and evenly as possible; it takes a few minutes to get it just right. Spreading it as evenly as possible is important because otherwise some parts will be overdone and other parts will be underdone.

5. Put into the oven and let it dehydrate until the fruit leather is pliable…not wet, but not hard & brittle either. Mine usually takes about 2 1/2 hours.

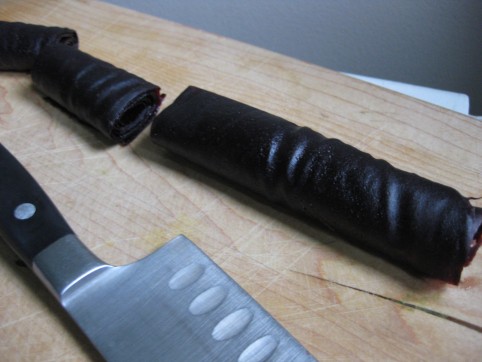
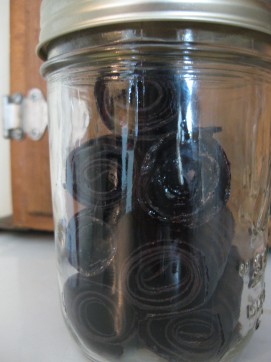
6. Remove from the oven, cool for a while, peel your fruit leather off the parchment, roll it up, and cut into strips! Store either at room temperature or in the fridge. I like to keep mine in a mason jar in the pantry.

*****

When I’m on the go and need a good snack, I’ll often pack a roll or two of this fruit leather, along with a bag of homemade kale chips. It’s perfect!

*****

Incredible Homemade Wild Grape Freezer Jam — Sugar-free & Pectin-free!

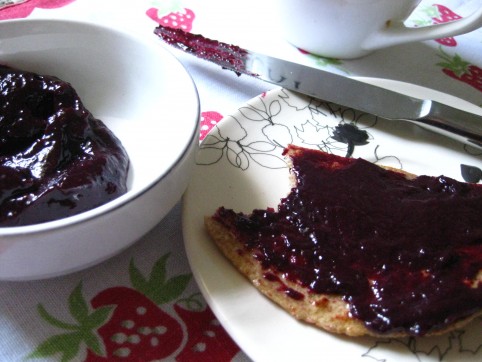
Finally, here’s my recipe for the best wild (or “Concord”) grape jam ever! The flavor really is incredible.

I’m not a big jam-maker normally. And maybe that’s because nobody ever told me that jam doesn’t have to be complicated, the way most publications make it seem. This is the easiest jam you’ll probably ever make…because I discovered by accident that you don’t need either sugar or pectin to make it!

And because it’s “freezer jam” (meaning you store it in the freezer), you won’t be sterilizing jars or canning anything. You’ll just be cooking the grapes way down, allowing the natural sugar and pectin that’s already in the fruit to do the job for you. (To give you an idea of how much jam you’ll get, 9 lbs of grapes yields about 1 quart of jam.) Then, you eat it! And if you’re going to keep it around for a while, just pop it into the freezer to extend its life.

This jam is also what I use to make my delicious Concord Grape Fruit Leather. Try it sometime!

*****

Wild Grape Freezer Jam

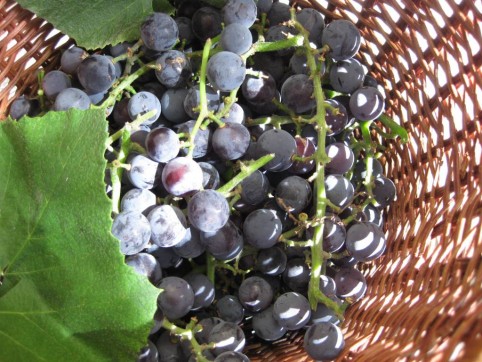
Wild, or “Concord,” grapes — nice and ripe. (That’s the only ingredient!)

***

1. De-stem & wash your grapes.

2. Put them into a large pot, and turn to medium-low heat. No need to add any water to the pot — they’ll provide plenty as they heat up and burst. Stir frequently to prevent burning at the bottom, and to get all the grapes heated up.

3. Cook, uncovered, stirring frequently, until most grapes have burst. The unripe ones won’t burst.

Cook the grapes until they burst…

4. Turn heat down to low, and simmer, uncovered, until the grapes have cooked down a bit. Turn off the heat and let the grape slurry cool off a bit until it’s handle-able.

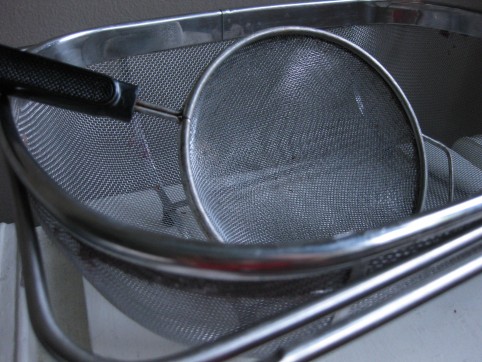
5. Strain your slurry through a mesh sieve with holes just small enough to prevent the seeds from going through. A food mill can also be used here; I bought a $30 Italian-made one from Crate & Barrel several years ago to use for this purpose. When it broke, I was actually sort of glad. I went right back to using the circular sieve pictured below, and this continues to be my tool of choice — it seems quicker and more direct, and the irritation of seeds jamming up the mill is not there. I prefer it.

This is the most labor-intensive part of the whole process because you’ll really want to stir a lot and press the pulp firmly against the sides of the sieve to separate all the liquid from the seeds and skins that will be left behind. Really scrape the pulp against the sieve so that you get some of the pulp pushed through the holes into the juice. This seems to help the jam thicken up. This is also a time when you could use a blender. Before pouring the grape slurry into your sieve, pulse it several times in your blender, then pour it into the sieve. You don’t want to blend up the seeds, but the blender does help break up the grapes and pulp, making it easier to strain.

After most of the juice is strained out of each batch of pulp in the sieve, I like to put the spoon down and get my hand in there to squeeze the rest of the juice out of the pulp-and-seeds.

Once this process is complete, you’ll have plenty of soupy liquid and the pile of seeds & skins will be surprisingly small.

Strain your grape slurry through a metal sieve. The large one is nice for big batches, but the small one is my favorite, and what I use even for large batches.

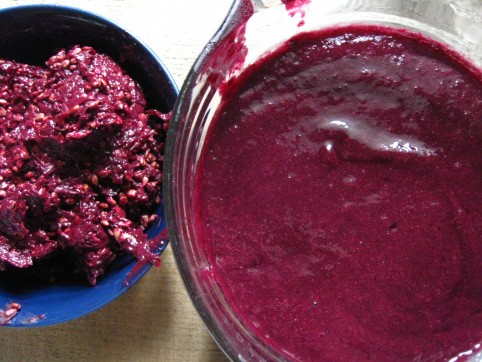
Strained liquid on the right, ready to cook down into jam. The skins & seeds are on the left, ready to be tossed.

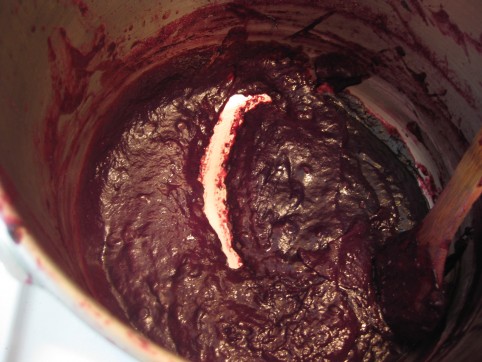
6. Now that you’ve got just the liquid, you’re ready to cook it down into jam. Pour it back into the pot and turn the burner back onto low heat. Simmer on low, uncovered, until it’s thick like…jam! This will probably take several hours especially for a big batch. Stir it fairly frequently, especially toward the end when it sticks to the bottom of the pot more readily. And turn the heat down lower when it starts to thicken; you really don’t want to burn this stuff, because of how much effort you’ve put into it. Keep it at low heat. You’ll know it’s done when you can drag your spoon through the middle of it and the track doesn’t fill back in. (EDIT 9/26/16: I have been taking it off heat even before I can see the bottom of the pan while dragging my spoon through it. It has set up well once cooled & refrigerated. So when it’s been cooking down for hours, and looking bubbly and sorta thick, and the volume has been reduced to maybe about 1/3 of the original volume of strained, soupy liquid, try cooling it and it may set up fine for you. I’m going to do more experimentation with this.)

You know it’s done when your spoon track doesn’t fill back in.

7. That’s it! Cool & store in the fridge (it’ll last a couple weeks before starting to go moldy), or in the freezer for long-term storage. You can also can this using the water bath canning method. I have been canning this grape jam for the past several years and it is my preferred storage method. It does, however, tend to crystallize for me (must be the sugars) when it’s canned. I don’t mind, but if you don’t want that, you may just want to keep it in the freezer.

*****

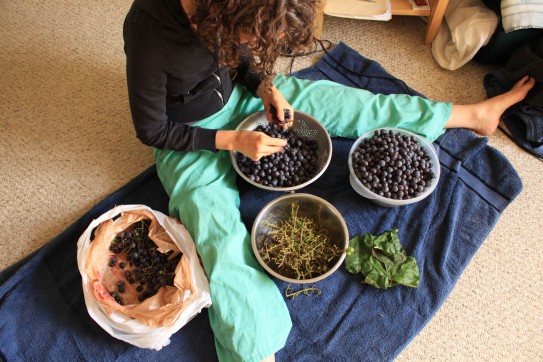
(Get your family to help you de-stem those grapes!)

 *****

« Older posts

© 2025 The Herbangardener

Theme by Anders NorenUp ↑