Kitchen / Garden / Sanctuary - Urban Homesteading to Nourish Body + Spirit

Tag: health (Page 11 of 12)

Random News Update

Geez…sorry for the lack of posts lately! Life has been insane. Work has been unusually stressful and soul-sucking for the past month, and I often just come home and collapse onto the floor in front of the space heater and veg out! Sometimes the last thing I feel like doing is staring at a computer screen for another couple hours, after an entire day of it! Thus, the lack of posts. When my life gets stressful, I’ve learned how important it is for me to pace myself, practice good self-care, and make sure I have plenty of relaxation & down time.  🙂

Anyway, in other news, a few areas of my site have been acting stupid lately and I finally tracked it down to some strange code issues with my “How To Make Your Own Cat Food” post. I deleted that post completely, and will re-post it for you soon! (UPDATE: I re-did the Cat Food post. Click here to view it.)

My hubby, F., and I have a lovely little road trip to New Mexico coming up pretty soon, which will be absolutely wonderful! I can’t wait. It will be a VERY much needed vacation! And then on February 23rd, I’m having more surgery — this time on the other foot. Bunionectomy with osteotomy. It will be another big, tiring ordeal, just like last time. I’m not looking forward to it, but at least I’m getting it over with so that I can stop dreading it. And I won’t be at work for at least a few weeks, which I’ll appreciate (oh that’s an understatement). Also, tangential to that, I realized that I never finished my Healing From Surgery Series! Good gracious. Since it will help me prepare myself for the next surgery, I would like to hopefully continue with that series soon. (Hopefully.)

Well, I think that’s about it for now!

How has life been for you lately??

We Survived H1N1!

Swine Flu kitchen floor crime scene

I think I'd be a good poster child for the H1N1 Swine Flu Pandemic.

We got the Swine Flu. Well, we’re pretty sure it was Swine Flu. The hubby brought it home from work, though didn’t even know he was sick at first! Totally unfair. I got it much worse than he did. It came on extremely fast with almost no warning, and will go down as possibly the biggest, baddest flu I’ve ever had. Definitely the sickest I’ve been in a long, long time. It was all the usual stuff — fever, chills, body aches, painful skin, sneezing, coughing, headache, stuffy nose, nausea, dehydration — but much worse and longer lasting than usual. It was the first time my fever’s ever reached nearly 104*!

So, to chronicle my participation in the Great Swine Flu Pandemic of 2009, hubby took a photo of what might look like a crime scene on our kitchen floor, but was actually me just not quite able to make it back to bed. Yep, that’s real…no posing, no acting.

And so I’m finally up out of bed this afternoon. Yes it feels great. And I did discover during my feverish week in bed that the small cluster of bleach spots on the bed sheets near my head bears a striking resemblance to the continents of the world. A little hint, perhaps, that the world will be united not by love or peace, but by Swine Flu. 😉

Make Your Own Bubbies Pickles

Have you ever had Bubbies? It’s the brand against which all other pickles are judged, at least in our house! My hubby is a huge fan. And if you like garlic, you’ll probably appreciate Bubbies, too. They’re not made with vinegar, but rather are made the old-fashioned way, though lacto-fermentation in brine. (I have a Bubbie’s Bread & Butter Chips pickle recipe too, which is made with vinegar.)

So for my very first attempt at homemade pickles, I turned the Bubbies jar upside down, identified which spices were in there, selected what looked like a good lacto-fermented pickle recipe, and hoped for the best as I sacrificed a couple of humongous garden cucumbers for the Great Pickle Experiment.

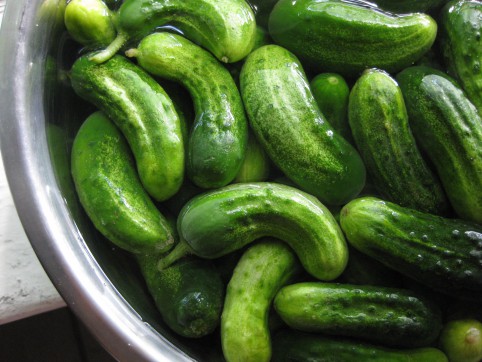
The results were shocking…in that I was shocked I had made something so tasty and convincing on the very first try. I certainly had expected the worst. In fact, I thought Hubby was being sarcastic when he tried the first one and told me they were awesome. He couldn’t stop talking about them! I was skeptical until I tried one, too. YO! Later, I did a taste test of my pickles compared to Bubbies; I actually liked mine even better! In the photo above, I used my large garden cucumbers, but to get the true Bubbies experience, go for the really small cukes; I find these at the farmer’s market, or at ethnic grocery stores. Go for organic if you can (which would be an upgrade from Bubbies, since theirs aren’t organic). Of course the really big cucumbers are fine to use, but because of their size, their insides won’t be quite as firm and crunchy as a smaller cucumber would be, and their skin will be a little tougher.

*****

Lindsey’s Bubbies Pickle Recipe:

1 gallon glass jar or ceramic crock

1/2 a gallon of warm water (tap water is fine)

A handful of fresh, clean grape leaves, oak leaves, or cherry leaves (optional — they supply tannins to keep the pickles crunchy) (UPDATE: raspberry & blackberry leaves work too, but have a stronger flavor than grape leaves)

3-4 lbs of cucumbers (small to medium is ideal, but if all you have is large, cut them into spears)

5-6 Tbsp non-iodized sea salt. I use Redmond RealSalt brand unrefined sea salt. (I usually prefer 6 Tbsp. Using 5 Tbsp of salt will yield a less salty pickle that my hubby prefers, however you may have to contend with more white film, or “kahm yeast,” on the surface of the brine during fermentation. More about kahm yeast in the instructions.)

2 – 3 heads of garlic, separated into cloves, peeled, & roughly chopped

3 Tbsp whole dill seed

2 Tbsp whole coriander seed

1 tsp whole mustard seed (brown or yellow, doesn’t matter)

1 tsp whole peppercorns

1 tsp fennel seed

1/2 tsp red pepper flakes

*****

Ingredients for Homemade Bubbie's Pickles

Ingredients for Homemade Bubbies Pickles. My homegrown garlic was a little small, so I used 4 heads.

*****

Directions:

Rinse the cucumbers, making sure the blossoms are removed. Soak them in very cold water for a couple hours (if they’re not straight off the vine).

In a separate clean jar (not the one you’ll be using for the pickles), dissolve the salt into the 1/2 gallon of warm water. Set aside — this brine will be one of the last things you’ll add.

Into the clean, gallon jar/crock you’ll be using for the pickles, drop in the garlic, dill, coriander, mustard, peppercorns, fennel, and red pepper flakes.

Then, put the cucumbers into the jar. If you’ve sliced large cucumbers into spears, pack the spears vertically into the jar.

Pour the salt water solution (a.k.a. the brine) over the cucumbers.

Now, place the cleaned grape/oak/cherry/raspberry/blackberry leaves into the jar. My jar has a somewhat narrow mouth, so the grape leaves form a nice plug at the top of the jar so the cucumbers (which will rise to the top after you pack them in) don’t go above the brine.

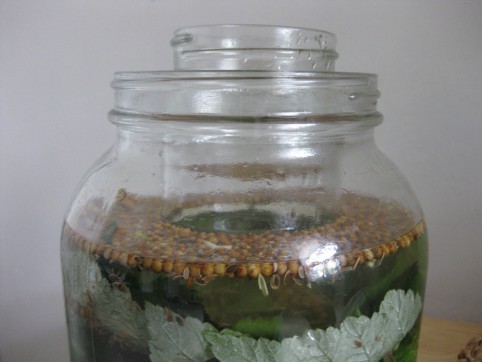
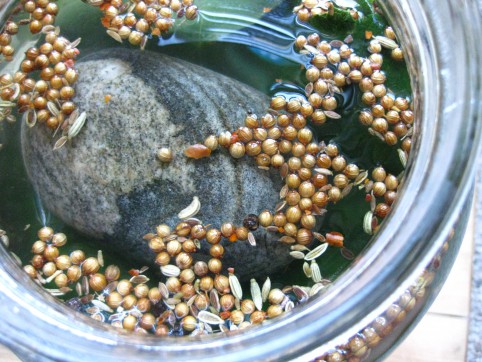
You want your cucumbers (and leaves) to be completely submerged in the brine at all times. If they’re sticking up above the brine, they’ll get moldy. If your jar has a wide mouth, you may need to use a couple of plates to keep everything submerged. Another idea is to nest a smaller glass jar into the opening of the larger jar to keep everything down. Or, use a scrubbed & sterilized rock.

Using nested jars to keep everything submerged.

Another idea: use a rock to keep everything submerged.

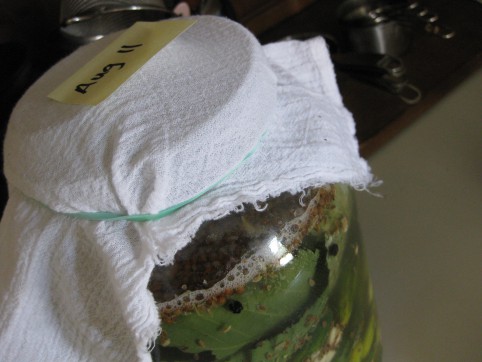
If the brine still doesn’t cover the cucumbers, make more brine solution using: 1 scant Tbsp sea salt to one cup of water. Cover your jar with its lid (loosely), or with a cloth to keep bugs & dust out. If you see a thin film of white scum growing on the surface of the water, just skim it off as often as you can, but don’t worry if you can’t get it all. This is “kahm yeast;” it won’t harm anything, but do try to keep up with it otherwise it can affect the flavor of your pickles.

Sometimes, during pickle making, some of your garlic cloves will turn blue. This is not a problem. The Colorado Extension Service website says this about blue garlic:

Blue, purple or blue-green garlic may result from immature garlic or garlic that is not fully dry, from copper pans, or from a high amount of copper in the water. Garlic contains anthocyanin, a water-soluble pigment that under acid conditions may turn blue or purple. A blue-green color also may develop in pickles made with stored red-skinned garlic. Except for blue-green color resulting from an abnormally high copper-sulfate concentration, such color changes do not indicate the presence of harmful substances.

Your pickles will be ready after 1-4 weeks — depending on the temperature in your house. Our pickles are usually ready after 10 days on the counter in our warm apartment (average of 80-85°F) in late summer. Every couple days, do a taste test of your pickles. They’re ready when they taste done to you! Once they taste done, transfer the jar into the fridge to slow fermentation. Once they’ve fermented and are in the fridge, you can remove the grape/oak/cherry/raspberry/blackberry leaves and you don’t need to worry as much about the pickles being completely submerged in the brine.

Enjoy! These will last months and months in your fridge. I once kept a batch around for 9 months and it was still good.

And the brine is good stuff too; I like to drink it straight. It’s full of beneficial bacteria and good for your digestion! Since it’s salty, it would be especially good after a workout.

*****

Healing From Surgery, Part 3: Topical Skin-Healing Remedies

Natural Skin-Healing Remedies

From left: Tea Tree Oil, Goldenseal extract, Homeopathic Bone Strengthener, Homeopathic Arnica Gel, Homemade Herbal Wound-Healing Oil, & Virgin Coconut Oil

Time for another installment in the series!

For an introduction to the series, and the pre-/post-surgery homeopathic regimen I created, visit Part 1: Homeopathy.

For instructions on how to make your own Antiseptic Herbal Wash and Herbal Wound-Healing Oil, visit Part 2: Herbal Wound Remedies.

Part 3: Topical Skin-Healing Remedies

After the bandage was removed, I didn’t really put anything onto the actual incision sites (except my Antiseptic Herbal Wash) until they were more healed (therefore, less risk of sealing in any infection).

I kept my incisions clean by washing them with gentle (castile) soap and water; the nurse I talked to urged me not to use either hydrogen peroxide or rubbing alcohol to clean or “sterilize” my wounds; they’re too caustic and harsh on the new tissue that’s forming.

If a wound looks like it’s getting infected (pain, heat, swelling, oozing/draining, and/or bright red color around incision), the essential oils of Tea Tree, Manuka, and/or Lavender can be used neat (full strength) right on the wound (or diluted, if you prefer). I used them a few times on my wounds just to help prevent infection. You can also use a thin layer of regular ol’ triple antibiotic ointment; in my experience, that stuff really does work. However, you don’t want to totally slather it on, because it might trap moisture inside the wound.

As a side note, I also exposed my wounds to direct sunshine when I could; MRSA (drug-resistant Staph) is killed by sunlight. You can read an article with similar implications here: CBS News: Blue Light Kills MRSA. (Though, the sunlight method isn’t totally foolproof since MRSA bacteria can cluster together and form a protective cover over itself called a biofilm, sheltering it from its environment.)

(Obviously, when in doubt, have your incision looked at by your doctor, since infections aren’t to be taken lightly.)

Goldenseal extract is another good topical remedy for infections. It has broad-spectrum antibacterial properties, but keep in mind that Goldenseal is not a systemic antibiotic. In other words, Goldenseal does not course its way through your blood, killing bacteria in its path. Rather, it acts as a contact disinfectant — killing bacteria, fungi, parasites, and protozoa that it comes into direct contact with in the mouth, GI tract, urinary tract, and on the skin.

Also, Goldenseal is one of the most over-harvested and endangered wild medicinal plants in North America. Even so, many (most!) of the Goldenseal that is sold is “wild harvested” or “wildcrafted.” While these terms sound enticing, do avoid them! Instead, only purchase Goldenseal that is “certified organic” or “cultivated.” Herb Pharm puts out a nice, certified organic Goldenseal extract that does not contribute to the demise of this precious healing plant.

Fortunately, Oregon Grape is a more abundant plant, with very similar properties. Oregon Grape root is a great replacement for Goldenseal root!

Anyway. Twice a day for a month or more after the bandage was removed, I put homeopathic arnica gel and virgin coconut oil (which is great for skin) all over my foot, avoiding the incision sites. The arnica gel definitely reduced the bruising discoloration, although my foot still felt bruised to the touch. The coconut oil was great for moisturizing. I noticed that since my foot was swollen, it would get very dry and itchy (like, scratch-it-with-a-steak-knife itchy) unless I was careful to keep it moisturized twice a day.

Once the incisions healed more, I began spraying my Homeopathic Bone Strengthener spray directly onto the skin over the bones that were healing. I also continued to take the spray under my tongue.

And lastly, I began using my homemade Herbal Wound-Healing Oil on the incision sites, and continue to use it daily. I also massage Vitamin E oil (from a punctured capsule) onto the scars.

All in all, my foot looks great! It’s not swelling too much, it’s not visibly bruised at all (though as I said above, it does still feel bruised to the touch…for me, arnica takes away the ugly color, but not the pain), and the scars are healing quite well. Of course, I’m not sure what my foot would have looked like without all these remedies. But since the incisions are healing so well, I definitely feel that they’ve helped.

Do you have a favorite natural skin-healing remedy? I’d love to know!

Healing From Surgery, Part 2: Herbal Wound Remedies

Calendula Petals for Herbal Wound-Healing Oil

Welcome back!

For an introduction to the series, and the pre-/post-surgery homeopathic regimen I created, visit Part 1: Homeopathy.

For Part 2 today, I’ll be showing you how to make Herbal Wound-Healing Oil and an Antiseptic Herbal Wash. You can make these and keep them on hand for cleansing and healing any type of wound.

One thing: Be careful when applying the Wound-Healing Oil to burns or infected areas, because they may heal over “too quickly,” sealing in heat and bacteria. For these situations, make sure the burn has completely cooled, or that the infection has first been treated with a good antimicrobial preparation.

For me…since the incisions were on my foot (where there’s a higher risk of post-surgical infection because of decreased circulation), I conservatively used only the Antiseptic Herbal Wash until the wounds had completely closed up and there was no sign of infection. At that point, I no longer needed to use the Antiseptic Herbal Wash…and began to then use the Wound-Healing Oil.

Herbal Wound-Healing Oil

Herbal Wound Healing Oil

Wound-Healing Oil infusing on a sunny windowsill

Making herbal oils is easy because you don’t really need any special ingredients or equipment. Herbal oils can be made by either hot infusion or cold infusion. For a hot infusion, equal amounts of herbs and oil (often olive oil) are simmered over low heat for a few hours.

Cold infusion is a much slower process whereby you pack a clear glass jar with herbs and oil and let it stand for several weeks, often in the sun. Sunlight encourages the herbs to release their active constituents into the oil. Cold infusion is the best method for fresh plant material, especially for more delicate parts such as flowers. Since my herbs were fresh, and I was using delicate calendula flower petals, I chose the cold infusion method. Olive oil is very good for cold infusion because of its resistance to turning rancid. The intensity of sunlight and the length of time the herbs are infused will affect the strength of the end product. For a stronger oil, strain out the first batch of herbs, add a new batch of fresh ones, and infuse again for another few weeks.

Cold Infusion Step 1: Gather your plant material — either dried or fresh, or a mix of both. I used all fresh plants this time (fresh is almost always better). Any medicinal plant will work, and you may use just one type, or a mix. For my Wound-Healing Oil, I chose a mix of antiseptic, skin-healing, and bone-healing plants:

Sage (leaves) – antiseptic

Yarrow (leaves) – antiseptic, heals wounds, anti-inflammatory

Thyme (leaves) – antiseptic (contains Thymol, a very potent germ killer)

Comfrey (leaves) – heals wounds, assists with bone fusion (it’s also known as “Knitbone”)

Calendula (flower petals) – antiseptic, heals wounds, anti-inflammatory

Step 2: Chop the herbs into little pieces. Stuff them into a clear glass jar that has a lid. Pour olive oil into the jar until it completely covers the herbs. You may need to poke around with a spoon to get the oil to seep down to the bottom of the jar. If there’s any plant material above the oil, it will probably mold, so try to pour enough oil in to cover everything. I had a little mold growing on the surface of the oil after a few weeks (probably on a plant piece that wasn’t submerged), but I just scooped it up and threw it away. No harm done.

Step 3: Screw on the lid, and place the jar in a spot where it’ll get plenty of sunshine, but where it won’t be disturbed. (Again, if any herb pieces are washed out of the oil and onto the side of the jar, they’ll get moldy. It’s not a big deal, but if they get moldy you should scoop them out.) Leave it there for at least 2 weeks, but preferably 4 weeks or longer.

Wound-Healing Oil. Twice infused, strained, and ready to use.

Wound-Healing Oil. Twice infused for a total of 6 weeks, strained, and ready to use.

Step 4: Set up a fine-mesh strainer over a bowl. Pour the contents of the jar into the strainer and squeeze the herbs tightly in your fist to get as much oil out as possible. It’s a messy job; don’t wear your Sunday best. Run the oil through the strainer again if any plant material accidentally got into the bowl. Discard the plant material.

Step 5: I like to puncture a Vitamin E capsule and squeeze it into the jar of finished oil. Vitamin E is a good preservative. Store the oil in the fridge for a longer shelf life.

Step 6 (optional): For an even stronger oil, chop up a new batch of fresh or dried plant material, and put it into the oil you’ve just strained. Place in the sunny spot for a second round of infusion. For my Wound-Healing Oil, I strained the oil after 3 weeks, and then added more fresh Calendula petals and Comfrey leaves (both fresh and dried), and left it to infuse for another 3 weeks.

Antiseptic Herbal Wash

Making the Antiseptic Herbal Wash

Making the Antiseptic Herbal Wash

Antiseptic Herbal Wash is what I applied to the surgical incisions until they were completely healed. After I made the Herbal Wash, I froze it into ice cube trays, and then stored the ice cubes in the freezer. Each night, I would take out a cube and let it thaw in the fridge. Then, both morning and evening the next day, I would pour the liquid over my foot, rubbing it into the wounds. It didn’t sting, but I tasted a little bit of it once, and it was very strong and very disgusting! Not something you want to drink, certainly! After the wounds had completely closed up and there was no sign of infection, I then stopped using the Wash and began using the Wound-Healing Oil.

Step 1: Gather your plant material — either dried or fresh, or a mix of both. I used all fresh plants this time (fresh is almost always better). For this Antiseptic Herbal Wash, I chose these medicinal plants:

Sage (leaves) – antiseptic

Yarrow (leaves) – antiseptic, heals wounds, anti-inflammatory

Thyme (leaves) – antiseptic (contains Thymol, a very potent germ killer)

Lavender (leaves) – antiseptic, soothing

Step 2: Chop up the plant material, and place into a large jar that has a lid. Pour enough boiling water over the plant material to cover it completely. Screw the lid on loosely. (If a lid is not used, the precious volatile oils will dissipate into the air.)

Step 3: Let the mixture steep until the water has cooled to room temperature…or longer. I let mine steep for the whole day. Pour the water through a strainer, squeezing the herbs tightly to get all the water out. Discard the herbs, and either refrigerate or freeze the herbal water. Again, I like to freeze mine into ice cubes that can be defrosted when needed.
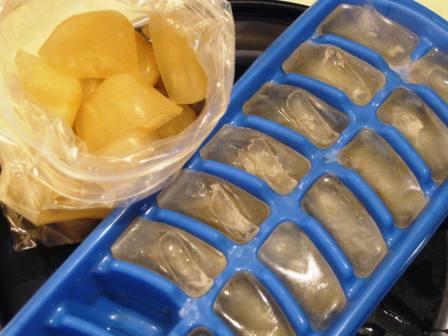
Antiseptic Herbal Wash frozen into ice cubes

Antiseptic Herbal Wash frozen into ice cubes
« Older posts Newer posts »

© 2024 The Herbangardener

Theme by Anders NorenUp ↑