Kitchen / Garden / Sanctuary - Urban Homesteading to Nourish Body + Spirit

Tag: real food (Page 14 of 20)

Quinoa Salad, Greek Style

This is a recipe that my best friend Sonja gave me a long time ago; it was one of our very favorite things to eat. I love it! It’s a light, refreshing dinner choice which is great for this time of the year because it doesn’t require use of the oven. Heck, you could even cook the quinoa in your solar oven (you have built one, right? ;-)) and you wouldn’t even need the stove, either! It would also be a great meal to take on a picnic.

Quinoa Salad, Greek Style

1 cup uncooked quinoa

2 tomatoes, chopped

1 cucumber, diced

3/4 cup chopped green onions

Scant 1/2 cup olive oil

6 Tbsp freshly-squeezed lemon juice

6 ounces feta cheese, crumbled

Black or Kalamata olives, chopped (as many as you like…I usually use between 1/2 and 1 cup)

Lettuce, torn into pieces (use as much as you like, though not too much — it’s not meant to be the main ingredient)

Salt + Pepper to taste

Cook the quinoa* and cool it to room temperature. If I’m in a hurry, I’ll put my hot quinoa into the freezer to cool it quickly.

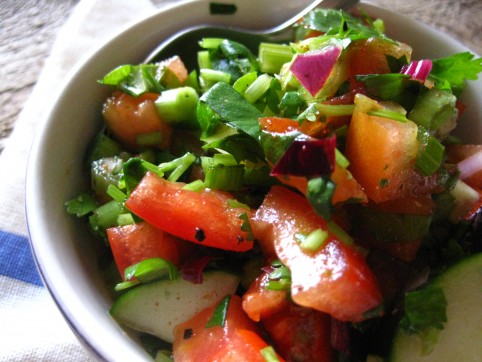
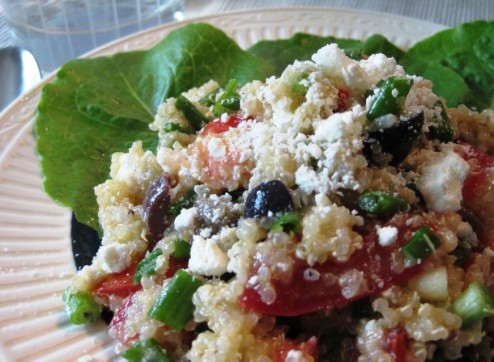
Then, gently stir everything else — except the lettuce — into the quinoa. I leave the lettuce out until I’m ready to serve the salad, and then I stir it in. That way, I can store the leftovers for a day or two and not have to worry about wilted, soggy lettuce. You could also leave the lettuce out altogether, and just serve the salad on a bed of lettuce leaves, as in the picture above.

This salad is best served on the day you make it. Enjoy!

***

*Cooking quinoa:

Be sure to rinse the quinoa well to remove bitter saponin residue. The quick way to cook it is to boil your water (ratio of 1 cup grain to scant 2 cups water), add some salt, add quinoa and cover, simmering until the water is absorbed, about 20 minutes.

However, if you’re able to plan ahead enough, it’s much better, healthwise, to soak your quinoa for at least 12 hours to make it more digestible — the way traditional cultures do. Soaking grains neutralizes phytic acid (which binds to essential minerals like calcium, magnesium, iron, and zinc, and blocks their absorption) as well as enzyme inhibitors in the grain. Soaking also breaks down difficult-to-digest proteins and encourages the production of beneficial enzymes which in turn increases the vitamin (especially B vitamin) content of the grain.

So…

To soak quinoa: Thoroughly rinse 1 cup of dry quinoa to remove bitter saponin residue. Put 2 Tbsp of lemon juice or vinegar into a measuring cup and fill to the 1 cup mark with warm water, then mix with the quinoa in a bowl. Cover and let sit at room temperature for at least 12 hours, or up to 24. When you’re ready to cook, rinse and drain the quinoa well. Place in a saucepan. Add a scant 1 cup of water, and a little salt. Bring to a boil and simmer, covered, until all the water is absorbed, about 20 minutes. Cool, and proceed with the recipe.

*****
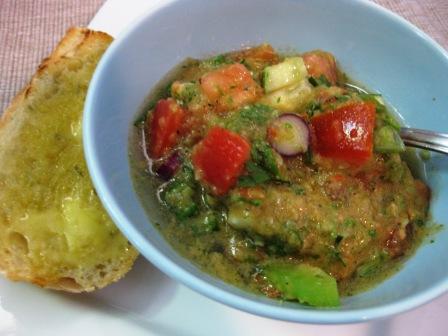
Summertime Gazpacho

Today I’d like to share with you one of my favorite summer recipes — gazpacho! This chilled, raw-vegetable soup is so refreshing on a hot summer evening. Pair it with buttered, rustic bread and a cold beer, and you’ve got yourself a fabulous quick summer meal that’s light and delicious.

I don’t actually measure my gazpacho ingredients anymore, and it’s a little different each time I make it. But this recipe is a favorite, and is a good place to start.

Summertime Gazpacho

2 lbs (approx.) ripe tomatoes, diced (3 – 4 large tomatoes)

2 scallions, chopped

1 red bell pepper, diced (optional – I usually leave it out if they’re too expensive or I can’t find organic)

2 celery stalks, chopped

1 – 2 garlic cloves, minced

2/3 cup lightly packed cilantro, chopped (or lots more if you like!)

1/2 – 1 jalapeno, diced with seeds removed (optional!)

Half a cucumber, diced

6 Tbsp olive oil

2 – 3 Tbsp red wine vinegar

3 – 4 Tbsp freshly squeezed lemon juice

Salt to taste (usually between 1/2 and 1 tsp)

1/2 to 1 tsp pepper

Couple dashes of Penzeys Smoked Paprika (optional, but adds incredible flavor…I am obsessed with this smoked paprika! It’s one of those “secret weapon” ingredients.)

*****

Mix everything together in a bowl. If you’d like, transfer half to a blender and blend until somewhat pureed but still a little bit course. Transfer back into main bowl. OR, feel free to skip that step! It’s up to you whether you like the texture smoother and soup-like, or chunkier and salsa-like.

Serve with homemade croutons, or toasted & buttered rustic bread.

Yum, I could eat this every day!

*****

Use Caution With Bee Pollen Supplements

Bee Pollen

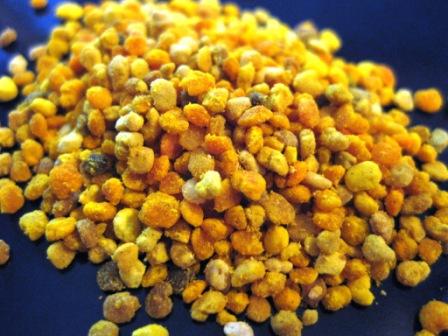
Unfortunately, this post is the result of quite an interesting week — I had 3 anaphylactic reactions in 48 hours, due to some bee pollen I ate! Bee pollen is considered to be a super food because it contains high-quality protein (meaning it has all the essential amino acids plus quite a few more), plus it’s rich in minerals and Vitamins A, C, E, as well as most of the B vitamins including folic acid, and it contains over 5,000 enzymes and thousands of phytonutrients. Bee pollen also contains plant nectar and bee saliva. It’s been used as a health food supplement in China for hundreds of years. But if you have – or even suspect you have – an allergy to bee stings, honey, royal jelly, or any other bee products, I want to pass on a word of caution about bee pollen supplements. While bee products are obviously not the same as a bee sting, they are related enough to cause cross reactions (Allergy. 1992 Feb;47(1):41-9). Also, if you have a severe allergy to pollen, I would also steer clear of bee pollen (Annals of Allergy. 1981 Sep;47(3):154-6).

This article states that “Bee pollen may actually set off allergies in those who are particularly sensitive, especially those allergic to bee venom and ragweed.”

Now, I’ve had quite a few bee stings in my life, with no evidence of an allergy until my most recent sting 3 years ago: Immediately after being stung, I almost passed out, and then got quite sick for about 24 hours. That wasn’t a normal reaction for me, and a coworker suggested that I may have developed a bee sting allergy. I later learned that a bee sting allergy can develop at any time, and the more times you’ve been stung, the higher your chance of becoming allergic.

But back to the bee pollen. Having read how nourishing it is, I recently bought some from the health food store. The label recommended eating just a few grains at first, in case of an allergic reaction, but mentioned nothing about avoiding the product if you have allergies to bee venom, other bee products, or to pollen. Perhaps the label could have been more specific…perhaps it was daft of me not to make the bee-sting/bee-pollen connection in my head. In any case, I ate a few grains with no problem. The next day I ate more of the pollen – probably between 1 and 2 Tbsp, and was fine. But the next day, within about 10 minutes of eating between 1 and 2 Tbsp of pollen, my entire face began to swell up — especially around my mouth — and I developed a burning red rash that quickly spread from my face to my neck, back, arms, and legs. I got lightheaded and my heart was racing and pounding. This was certainly something I’d never experienced before. Hubby and I decided I needed to get the pollen out of my body, so I did a…uhh…”barf induction.” Yuk. The reaction subsided, though I definitely didn’t feel very well.

The next morning I still felt weak, shaky, unwell, and strangely ‘out of it.’ Right as we were about to walk out the door for a bike ride, I started feeling really sick and lightheaded, like I was going to throw up and pass out. The rash immediately returned, starting on my face and spreading to the rest of my body. Evidently, anaphylaxis can be biphasic, meaning it can occur again within 72 hours, without any further exposure to the allergen. And then again the next day, I had a third reaction with the same quickly-spreading red rash, sick feeling, pounding heart, and lightheadedness as before; however, that time my throat swelled up, which was really scary, and I ended up in the ER. It was not a fun night.

A few days later, I then accidentally confirmed my bee pollen allergy by eating granola bars that I had made with Really Raw brand of honey, which contains small amounts of bee pollen. Before my three anaphylactic reactions, I had eaten the granola bars with no problem. But ever since the anaphylaxis, I’m no longer able to eat even the minute amounts of pollen contained in my granola bars without having a reaction.

The doctor said it sounds like I’m allergic to bee stings in addition to the bee pollen, so I now carry an Epi-Pen, prednisone, and benadryl with me at all times.

And so the moral of my story is: Bee pollen has been used as a natural, nourishing super food for centuries. However, if you have an allergy to bee stings or are highly sensitive to pollens, do approach bee pollen with caution. If you do decide to take it, I would highly recommend starting out with just a few grains at first and then increasing your dosage slowly!

How to Make Sauerkraut

Today I’m going to show you how to make your own old-fashioned, raw, lacto-fermented sauerkraut. The first time I made sauerkraut, I was sure I was doing something wrong because it was so easy!

Ingredients:

Cabbage – red or green (or a combo), organic

Sea salt – See my salting chart below, plus you may need more to mix up extra brine. (Any non-iodized salt will do, but unrefined sea salt is better for your body.)

*****

Here’s my salting chart. These are just guidelines — if you want, you can add a little more salt in the summer and a little less in the winter.

10 tsp salt per 5 lbs vegetables

5 tsp salt per 2 ½ lbs vegetables

2 tsp salt per 1 lb vegetables

1 tsp salt per ½ lb vegetables

½ tsp salt per ¼ lb vegetables

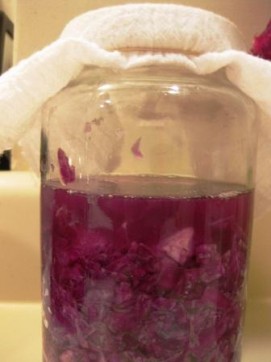
Cabbage becoming sauerkraut. (Little bits of cabbage clinging to the side of the jar --like in the picture-- should be scraped down into the brine, otherwise they'll get moldy.)

Chop, shred, or grate your cabbage — coarse or fine, however you like it. Sprinkle the salt onto the cabbage and mix it up. I let mine sit on the counter for several hours or overnight (this step is in place of pounding) so that the salt can begin to draw water out of the cabbage. The water contains nutrients, and these nutrients then become the substrate for the growth of the lactic acid bacteria which is what turns your cabbage into kraut. (Steinkraus, Handbook of Indigenous Fermented Foods, p.120.)

After the cabbage is wilted and some water has been drawn out, pack the cabbage WITH its water into a glass jar. You really want to pack it in there (use your fist or any kitchen tool), because this will help squeeze more water out. You can also use a specially-made ceramic sauerkraut crock, or a glass or ceramic bowl (anything except metal, since salt and acid can react with metal).

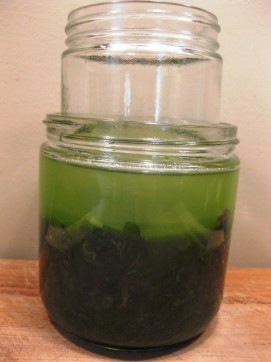
Keep your cabbage submerged under the brine by placing a smaller plate on top and weighing it down with something heavy (a jug of water, a boiled rock, etc.). Or, nest a smaller jar of water inside your larger glass jar. Or, wedge a whole cabbage leaf into the jar to keep everything submerged.

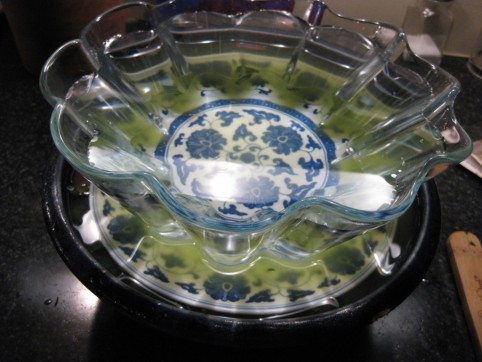
Sauerkraut fermenting in a ceramic bowl, weighed down with a plate & a water-filled bowl.

This is kale, not sauerkraut, but same idea. I particularly like this nesting-jars method for keeping everthing submerged in brine.

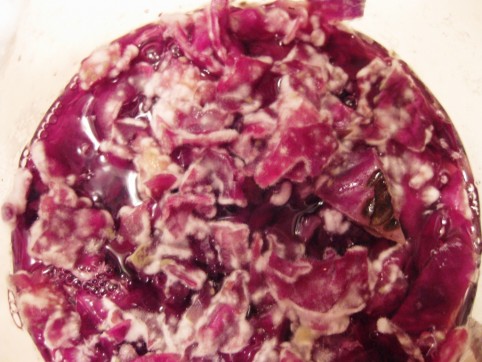
Whatever method you devise, just be sure that all traces of cabbage are completely submerged in the brine. Little bits sticking up above the water line will quickly lead to a moldy situation like the photo below (and if you do end up with mold like this, scrape off the entire top layer of cabbage, but the rest underneath should be fine! The kraut below the mold in this picture turned out great.)  So if you need to mix up some more brine (which is just a fancy name for salt water), use the ratio of 1 tsp salt to 1 cup of water.

This is what happens if your cabbage doesn't stay submerged in brine.

Cover the jar with either a lid (leave it loose to prevent pressure buildup) or a towel to keep bugs out.* Leave it to ferment at room temperature until you like the taste of your kraut. Let your tongue be your guide to done-ness. Taste it every few days, and transfer into the fridge when it tastes the way you like it. I like mine pretty sour, so I usually leave it out for 1-2 weeks or more, depending on how warm it is in the kitchen.

Once in the fridge, your sauerkraut will keep for many months. Don’t throw out the sauerkraut juice; it’s full of beneficial Lactobacillus (lactic acid bacteria) and is said to be a very good digestive tonic. And if you like, add a little of the juice to your next batch of sauerkraut as a starter.

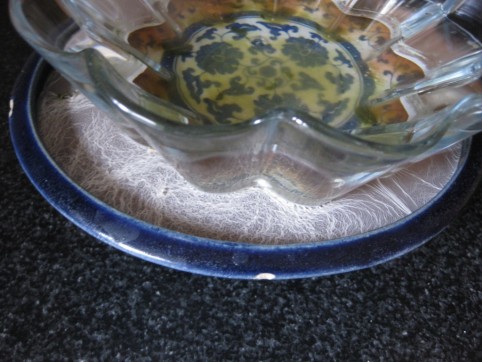
*If you see a white film (“kahm yeast”) develop on the surface of the brine, scrape off what you can each day until the kraut is done. Sometimes I don’t get any film. Sometimes I get a fair amount. There doesn’t seem to be any rhyme or reason. The kahm yeast won’t harm anything, but if you keep getting a lot of it day after day, it can sometimes (not always) impart an off taste to the brine. If that happens, I will actually dump out the brine and replace with new brine. How salty to make the replacement brine? Good question. I’m still experimenting with this. When I did this I used 1 tsp salt to 1 cup water, but then my kraut was almost done fermenting and ready to go into the fridge. In the summer — or if your kraut still has a ways to go — I might increase the ratio to 1 Tbsp salt per 1 cup water. Use your judgment and go for it; fermentation is an imprecise art!

Here you can see the white film (kahm yeast) that sometimes develops on the brine's surface (between the blue bowl and glass bowl).

Free Shipping Today Only (June 21) at Tropical Traditions!

Tropical Traditions is having another one of their Free Shipping days today only, Monday, June 21st until Midnight EDT on ground shipment orders. This is a great opportunity to try out some of the Tropical Traditions products if you’ve been meaning to. As I’ve said before, they’re one of my favorite companies — I love their products! (They’re not paying me to say that.)

If you want to take advantage of this deal (though they do have free shipping days every now and then), enter coupon code 21610 during checkout.

Free shipping will save about $10 to $15 off your order, or more, depending on what you order.

Click here to read about some of my favorite products that they sell.

Also, if you buy anything and you’re a new customer, you can get this Virgin Coconut Oil book for free (any time, not just today) by entering my User ID, which is 6032410. When you’re going through the checkout process and you’ve added your shipping address and phone number, you will see the question “How did you hear of us?” Just choose “Referred by a friend” and then a new “User ID” field will appear below that where you can enter my User ID. (screen shot below)

« Older posts Newer posts »

© 2025 The Herbangardener

Theme by Anders NorenUp ↑