Kitchen / Garden / Sanctuary - Urban Homesteading to Nourish Body + Spirit

Tag: recipes (Page 14 of 18)

From Trash to Treasure: Chocolate-Dipped Candied Orange Peel

Chocolate-Dipped Candied Orange Peel, (c) The Herbangardener

First of all, I have to say that since I made these chocolate-dipped candied orange peels over the weekend, I have NOT been able to stop eating them — they’re just the perfect combination of chocolate and orange, a flavor combination which I love. They are just SO GOOD!

And I can’t get over that they’re made with the orange peels that you’d normally toss into the trash or compost heap! Besides that, the fact that they’re dipped in chocolate means that you stretch your chocolate further, while still getting your chocolate fix! All in all, a delightful & unusual treat that can be made for not much money at all.

Chocolate-Dipped Candied Orange Peel, (c) The Herbangardener

Don't toss 'em...Eat 'em!

Start by saving your orange/mandarin orange/tangelo/clementine peels. I store mine in a sealed container in the fridge for a few days while collecting enough to use. You can store them in the freezer, but if they’re in there too long the texture suffers and the peels become mealy; I like to stick with the fridge.

Also, I use peels from organic mandarin oranges. I feel it’s important that the peels be organic, since the highest concentration of pesticides is present in the peels of conventionally grown fruit.

First you’ll cook your orange peel in boiling water for about 15 minutes. This seems to mellow out the bitterness. Then you’ll candy it with a honey-water solution (takes about an hour), let the orange peels cool (10 minutes), and then dip them into melted chocolate and refrigerate for about 10 minutes until set. Easy!

Here’s the recipe:

Chocolate-Dipped Candied Orange Peel

2 -3 cups of orange peels, cut into pieces (I used mandarin orange)

1/4 cup water

1/3 cup honey (or 1/2 cup regular sugar or rapadura)

About 2/3 to 3/4 cup chocolate chips (I used basic semisweet chocolate chips, but another idea is to chop up a special bar of chocolate)

First, put the orange peel into a pan and cover with cold water (you’ll use the 1/4 cup of water & honey a little later). Bring to a boil and boil gently until the peel is soft, about 15 minutes. Drain.

Now, bring the 1/4 cup of water and honey to a boil. Add the peel. Boil gently on low heat, uncovered, stirring occasionally. This takes about an hour. When the peel is sodden and the syrup is almost gone from the bottom of the pan, take the peels out and put them onto a cookie sheet to cool.

When the syrup is almost gone, the peel is done.

When the syrup is almost gone, the peel is done.

Transfer the wet peel onto a cookie sheet to cool.

Transfer the wet peel onto a cookie sheet to cool.

While the peels are cooling, put your chocolate into a double boiler to melt over hot water. (Don’t melt chocolate over direct heat because it tends to burn. I don’t have a double boiler, so instead I just use a metal bowl set over a small pan of simmering water.)

When the chocolate has melted, dip the lower half of each orange peel into the chocolate and set on a cookie sheet. (You can line the cookie sheet with wax paper, but I didn’t.)
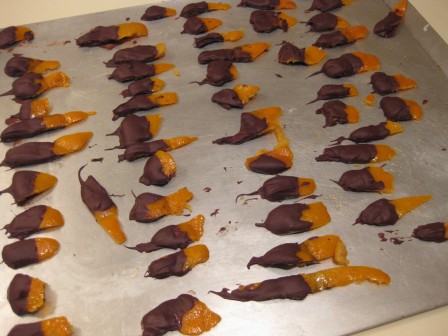
Chocolate-Dipped Candied Orange Peel, (c) The Herbangardener

Put the cookie sheet into the fridge for 10-15 minutes to allow the chocolate to set. After cooling in the fridge, the peels will come off just fine with a flexible metal spatula. Though, if you don’t have a flexible metal spatula, you may want to use the wax paper so that you can just peel them off. If they don’t come off very easily, allow the cookie sheet to sit at room temperature for several minutes; they should peel right off then.

I found that storing them at room temperature was just fine, as long as you don’t put a lid on the container; I noticed that they got a little soggy if I kept the lid on. But if having an open container of chocolate orange peels on your counter is just too tempting (uhh, yeah!), you can put them in a sealed container in the fridge — they don’t seem to get soggy then. You can also just as easily store them in the freezer (I have some in the freezer right now), and snack on them directly from there.

Since this recipe produces a large tray full of decadent treats made with what would otherwise be trash…I feel that it deserves a place in this week’s Pennywise Platter Carnival over at The Nourishing Gourmet.

Italian-Style Lamb Meatloaf

Italian-Style Lamb Meatloaf

Today’s recipe is for a traditional meatloaf, using ground lamb as the meat. Amazingly, I had never made a meatloaf before, so I read through quite a few different meatloaf recipes from my 1940s cookbooks before finally cobbling this one together. It turned out great and we absolutely snarfed it up!

And oh! Speaking of meatloaf, I must tell you a story. *Snicker.* 😉 When I was about 6 years old, I received a pet turtle as a gift from my sister. I guess turtles eat canned dogfood — or at least mine did — so we bought canned dogfood for Nutley and kept it in a Tupperware container in the fridge. One evening around this time, my mom made a meatloaf for dinner. After dinner, the leftovers were put into a Tupperware container, into the fridge. (Can you see where this is going?)

The next day, my dad ate his usual lunch of leftovers from the fridge. And later that same day, my mom and I went to the fridge to get out Nutley’s dogfood. Curiously, though, the dogfood was gone…but last night’s meatloaf was still there.

OH NO.

Um, dad? What did you have for lunch??

“Meatloaf.”

Are you sure????

Yes, he actually really did eat the dogfood for lunch, thinking the whole time that it was leftover meatloaf. That story has become something of a legend in our family; I’m afraid he’ll never live that one down! 😉

Anyway, here’s the recipe:

Italian-Style Lamb Meatloaf

1 ½ lbs (approx) ground lamb

1 medium onion, chopped

2 cloves garlic, minced

¼ cup chopped fresh parsley

1 egg, beaten

1 ½ tsp salt

½ tsp pepper

3 Tbsp parmesan cheese

8 oz spaghetti sauce

1 cup finely chopped bread (or dry breadcrumbs). (I use two slices of Ezekial 4:9 Sprouted Grain sandwich bread.)

1 ½ tsp Italian Seasoning

Mix all ingredients together, spread into a loaf pan, and bake at 350* for about 1 to 1 ½ hours, or until the top is nicely browned and/or the internal temperature measures about 160F.

Italian-Style Lamb Meatloaf

Since this delicious, hearty dish will feed a family for not much more than the cost of the ground lamb (I get mine in the freezer section of my health food store), it’s actually pretty frugal…and is therefore part of Pennywise Platter Thursday over at The Nourishing Gourmet.

Traditional Hot Mulled Apple Cider

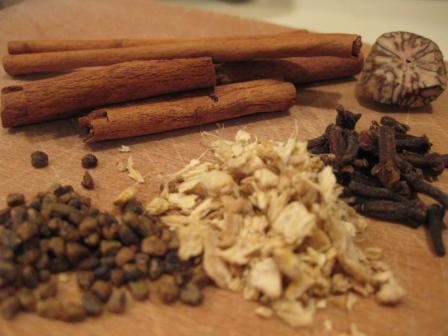
Hot Mulled Apple Cider, (c) The Herbangardener

(clockwise from top) Cinnamon Sticks, Nutmeg, whole Cloves, dried Ginger, Cardamom seeds

Yesterday, I made a fragrant, steaming pot of hot mulled apple cider (or, wassail, as it’s traditionally called). Lovely! And so Christmas-y. Earlier that day, I had found a can of frozen apple juice concentrate stuffed into the back of our freezer. What perfect timing! And further, I was impressed that I actually connected the discovery of the apple juice with the idea to make hot mulled cider. Yay!

Mulled cider is so easy to make; in fact, all you really need is apple juice, cinnamon sticks, and whole cloves. Any other ingredients are sort of unnecessary, though feel free to experiment. I made my cider with all the ingredients listed below, but could just as easily have left out the ones marked “optional.” This is a wonderful, warming drink to serve at holiday get-togethers, and can easily be made in a crock pot and left to simmer all evening. And it sure makes the house smell good!

Hot Mulled Apple Cider

2 qts apple juice

1-2 cinnamon sticks

1 Tbsp whole cloves

1 Tbsp dried ginger (optional)

1 tsp cardamom seeds (optional)

pinch of nutmeg powder (optional)

Pour apple juice and all spices into a pot on the stove. Bring to a boil, and then let simmer at low heat (it doesn’t need to continue to boil), covered, for at least 15 minutes, or until you’re ready to serve. The cider can be kept covered at very low heat on the stove for as long as you want. Enjoy! It’s like drinking Christmas!

(Healthier) Pecan Snowball Cookies

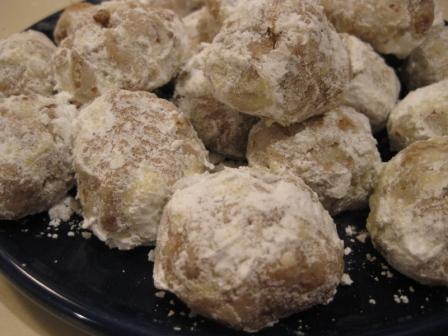
Buttery Snowball Cookies, (c) The Herbangardener

Pecan Snowball cookies (a.k.a. Buttery Fingers, Butter Nut Cookies, or Butter Snowballs) are traditional at Christmastime — rich and delicious and not overly sweet. They’re yummy!

I decided to make them this year, but I have a really hard time following recipes word-for-word, especially when they call for nutrient-free white flour and white sugar! 😉

So I altered the recipe a bit so that it’s a little more nutritious, yet just as delicious — replacing the white flour with whole wheat (although you could do half-white-half-whole-wheat), and using rapadura/sucanat (evaporated cane juice sugar) in place of white sugar. I also replaced 4 tablespoons of butter with water, and they’re still plenty rich (almost a little too rich for me!).

Here’s my recipe. Turn on the Christmas music, and bake these with love!

Lindsey’s (Healthier) Pecan Snowball Cookies

Makes about 40 small cookies

1 cup small pecan pieces

2 1/2 cups whole wheat flour

3/4 cup rapadura or sucanat (evaporated cane juice sugar)

12 Tbsp butter (1 1/2 sticks butter) (if you further reduce the butter, increase the water by an equal number of tablespoons)

4 Tbsp water

2 tsp vanilla extract

powdered sugar, about 1 cup (to roll cookies in)

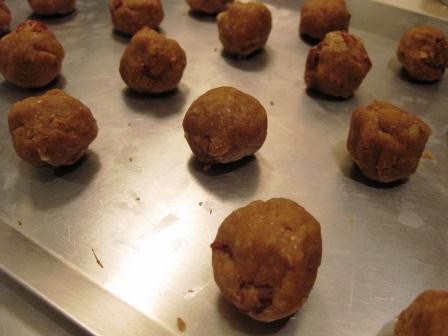
Preheat oven to 325 degrees. In a medium bowl, stir together the pecans, flours, and sugar. Then melt the butter over low heat in a small saucepan. Pour the butter into the flour mixture, and add the water and vanilla extract. Stir until well combined. Scoop up some of the dough and form it into a ball with your hands. The dough should form a ball that holds together easily. If the ball doesn’t hold together very well or seems a little dry, return the dough to the bowl and stir in a little more water.

Pecan Snowball Cookies, (c) The Herbangardener

The dough will look crumbly, but should hold together when formed into a ball.

Form the dough into small balls, and place them on a cookie sheet (no need to grease it). Since the cookies won’t expand, you can place them pretty close together. Bake for 20-30 minutes, depending on the size of your cookies. I made mine fairly small, and baked them for 20 minutes. Since the whole wheat flour and sucanat tint these cookies a light brown, it’s a little hard to tell when they’re done. Don’t let them go too long (better to undercook these than overcook them), and the bottoms shouldn’t get any darker than the rest of the cookie.

Take them out of the oven, and without delay, roll them in powdered sugar.

Pecan Snowball Cookies, (c) The Herbangardener

Jerusalem Artichoke Latkes for Hanukkah

Jerusalem Artichoke (Sunchoke) Latkes for Hanukkah

Today we’re making Latkes with a twist, just in time for Hanukkah (which begins this Friday night). I used my garden-grown Jerusalem Artichokes in place of the potatoes that would traditionally be used for latkes. I’m not Jewish, by the way, but I do like Jewish food, and I think it’s fun to get into the spirit of the holiday. 😉

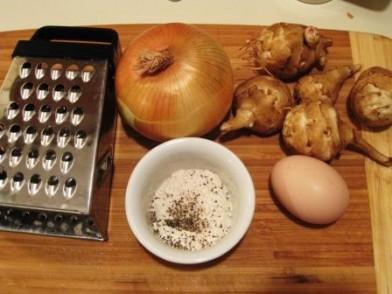
Jerusalem Artichokes (a.k.a. Sunchokes) are actually the edible tubers of a sunflower that’s native to North America. They’re kind of a lost vegetable, having been more popular in days gone by. Sunchokes are usually used in place of potatoes, but have a more pronounced, earthy flavor…and although they can be eaten raw, I prefer them cooked.

This year, I grew them in a small pot in the garden (though they do grow wild in fields). I’ve heard that once you plant them, it’s hard to get rid of them…so I just bought a small tuber from the Whole Foods produce section, broke it into pieces, and planted it. The sunflower grew very tall, and a few weeks after the first frost I dumped out the pot and harvested quite a few jerusalem artichokes. So easy! Anyway, that’s a post for another day. Onward with the recipe:

Jerusalem Artichoke (Sunchoke) Latkes

Jerusalem Artichoke (Sunchoke) Latkes

(Makes about 6 latkes / Ingredient measurements don’t have to be exact)

1/4 cup finely diced or grated onion

1 cup grated or shredded Jerusalem Artichoke, raw

1 large egg (or two small ones)

4 Tbsp flour (possibly more), divided — I used whole wheat

1/2 to 1 tsp salt, to your liking

1/4 to 1/2 tsp pepper, to your liking

Oil, to fry in

If you remember, go ahead and squeeze any extra liquid out of your shredded Jerusalem Artichokes. I forgot to do this and my latkes turned out fine, but I’ll try to remember to do it next time because extra liquid does make the oil splatter when the latke is placed in the pan.

Beat the egg(s) in a bowl, and mix in the Jerusalem Artichokes, onions, salt, and pepper. Mix in about 2 Tbsp of flour. You want to have enough flour in there so that the batter holds together after you form it into a little patty.

Pour enough oil (olive oil is traditional) into a frying pan so that it covers the bottom of the pan. Set the burner to medium, or a bit higher. To test the oil, drop a bit of batter in and if it sizzles, the oil is hot enough.

If the batter sizzles, the oil is hot enough.

If the batter sizzles, the oil is hot enough.

Form some of the batter into a little patty, and flatten slightly, like this:

Making a latke

If the latke batter holds together, it's ready to be cooked in the oil.

If the patty just falls apart in your hand, put it back in the bowl and add more flour to the mixture.You’ll notice that as the batter sits around, it will get more watery, so you will likely have to mix in another couple tablespoons of flour.

Slide the patty into the hot oil in the pan. Cook about 4-6 minutes, or until the bottom is golden. When you see the edges begin to brown, it’s time to check if the bottom is golden.

Cooking a Jerusalem Artichoke (Sunchoke) Latke

When the edges begin to brown, check to see if the bottom is golden.

If the latke isn’t browning, turn the heat up a little. If it’s browning too quickly, turn the heat down a little.

Turn the latke over when the bottom is golden brown.

Turn the latke over when the bottom is golden brown.

When the latke is done, place it on a plate lined with paper towels. Serve right away, or make the latkes earlier in the day and then warm them in the oven before serving.

Serve plain, or with sour cream, applesauce, or any other favorite condiment.

Happy Hanukkah!

This post is part of today’s Pennywise Platter Carnival over at The Nourishing Gourmet.
« Older posts Newer posts »

© 2024 The Herbangardener

Theme by Anders NorenUp ↑