Kitchen / Garden / Sanctuary - Urban Homesteading to Nourish Body + Spirit

Month: January 2010 (Page 1 of 2)

From Trash to Treasure: Chocolate-Dipped Candied Orange Peel

Chocolate-Dipped Candied Orange Peel, (c) The Herbangardener

First of all, I have to say that since I made these chocolate-dipped candied orange peels over the weekend, I have NOT been able to stop eating them — they’re just the perfect combination of chocolate and orange, a flavor combination which I love. They are just SO GOOD!

And I can’t get over that they’re made with the orange peels that you’d normally toss into the trash or compost heap! Besides that, the fact that they’re dipped in chocolate means that you stretch your chocolate further, while still getting your chocolate fix! All in all, a delightful & unusual treat that can be made for not much money at all.

Chocolate-Dipped Candied Orange Peel, (c) The Herbangardener

Don't toss 'em...Eat 'em!

Start by saving your orange/mandarin orange/tangelo/clementine peels. I store mine in a sealed container in the fridge for a few days while collecting enough to use. You can store them in the freezer, but if they’re in there too long the texture suffers and the peels become mealy; I like to stick with the fridge.

Also, I use peels from organic mandarin oranges. I feel it’s important that the peels be organic, since the highest concentration of pesticides is present in the peels of conventionally grown fruit.

First you’ll cook your orange peel in boiling water for about 15 minutes. This seems to mellow out the bitterness. Then you’ll candy it with a honey-water solution (takes about an hour), let the orange peels cool (10 minutes), and then dip them into melted chocolate and refrigerate for about 10 minutes until set. Easy!

Here’s the recipe:

Chocolate-Dipped Candied Orange Peel

2 -3 cups of orange peels, cut into pieces (I used mandarin orange)

1/4 cup water

1/3 cup honey (or 1/2 cup regular sugar or rapadura)

About 2/3 to 3/4 cup chocolate chips (I used basic semisweet chocolate chips, but another idea is to chop up a special bar of chocolate)

First, put the orange peel into a pan and cover with cold water (you’ll use the 1/4 cup of water & honey a little later). Bring to a boil and boil gently until the peel is soft, about 15 minutes. Drain.

Now, bring the 1/4 cup of water and honey to a boil. Add the peel. Boil gently on low heat, uncovered, stirring occasionally. This takes about an hour. When the peel is sodden and the syrup is almost gone from the bottom of the pan, take the peels out and put them onto a cookie sheet to cool.

When the syrup is almost gone, the peel is done.

When the syrup is almost gone, the peel is done.

Transfer the wet peel onto a cookie sheet to cool.

Transfer the wet peel onto a cookie sheet to cool.

While the peels are cooling, put your chocolate into a double boiler to melt over hot water. (Don’t melt chocolate over direct heat because it tends to burn. I don’t have a double boiler, so instead I just use a metal bowl set over a small pan of simmering water.)

When the chocolate has melted, dip the lower half of each orange peel into the chocolate and set on a cookie sheet. (You can line the cookie sheet with wax paper, but I didn’t.)
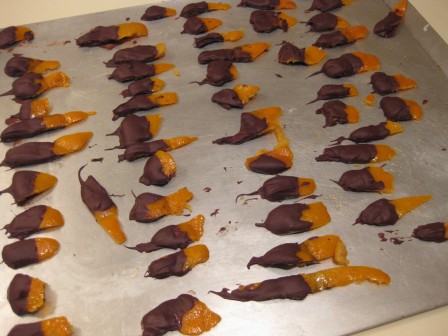
Chocolate-Dipped Candied Orange Peel, (c) The Herbangardener

Put the cookie sheet into the fridge for 10-15 minutes to allow the chocolate to set. After cooling in the fridge, the peels will come off just fine with a flexible metal spatula. Though, if you don’t have a flexible metal spatula, you may want to use the wax paper so that you can just peel them off. If they don’t come off very easily, allow the cookie sheet to sit at room temperature for several minutes; they should peel right off then.

I found that storing them at room temperature was just fine, as long as you don’t put a lid on the container; I noticed that they got a little soggy if I kept the lid on. But if having an open container of chocolate orange peels on your counter is just too tempting (uhh, yeah!), you can put them in a sealed container in the fridge — they don’t seem to get soggy then. You can also just as easily store them in the freezer (I have some in the freezer right now), and snack on them directly from there.

Since this recipe produces a large tray full of decadent treats made with what would otherwise be trash…I feel that it deserves a place in this week’s Pennywise Platter Carnival over at The Nourishing Gourmet.

The Sheer JOY of an Empty Countertop

Ridiculous amount of junk on my counter...

Note the ridiculous amount of junk on our counter.

If your countertop is anything like mine, it doubles as a storage surface for things like cutting boards, ripening fruit, fermenting kombucha, kefir, herbal tinctures, an overflow of yesterday’s dirty dishes, oatmeal being soaked for tomorrow’s breakfast, notes to myself, and other miscellaneous junk that I put there to remind me to deal with it. Our counter space is already severely limited due to the size of our kitchen, but thanks to both the dish drainer and my many ongoing kitchen “science projects” (see photo above), we often find ourselves squeezing all of our cooking and baking preparations into only about 1 or 2 feet of usable counter space. Ridiculous!

So yesterday Hubby cleaned off the counter completely. The cutting boards found a new home in a cabinet next to the stove…the fermenting kefir jar, kombucha bottles, tinctures, and soaking oatmeal now live on top of the refrigerator. I will need to find some other system for posting notes to myself…perhaps taping them to a cabinet until I can throw them away. Ripening fruit will just have to go elsewhere.

The new rule is…Nothing on the counter! No more “counter-as-pantry-annex.” And I’m totally loving it. It feels open and luxurious. It’s clean and uncluttered…restful to look at, and so much more conducive to efficient cooking. Heck, now that the counter is so clean, the entire house feels like it’s more under control. Sweet!

Wonderfully stark! (And yes, that is all the counter space we have!)

Wonderfully stark. (Yes, that's all the counter space we have -- can't waste it!)

Italian-Style Lamb Meatloaf

Italian-Style Lamb Meatloaf

Today’s recipe is for a traditional meatloaf, using ground lamb as the meat. Amazingly, I had never made a meatloaf before, so I read through quite a few different meatloaf recipes from my 1940s cookbooks before finally cobbling this one together. It turned out great and we absolutely snarfed it up!

And oh! Speaking of meatloaf, I must tell you a story. *Snicker.* 😉 When I was about 6 years old, I received a pet turtle as a gift from my sister. I guess turtles eat canned dogfood — or at least mine did — so we bought canned dogfood for Nutley and kept it in a Tupperware container in the fridge. One evening around this time, my mom made a meatloaf for dinner. After dinner, the leftovers were put into a Tupperware container, into the fridge. (Can you see where this is going?)

The next day, my dad ate his usual lunch of leftovers from the fridge. And later that same day, my mom and I went to the fridge to get out Nutley’s dogfood. Curiously, though, the dogfood was gone…but last night’s meatloaf was still there.

OH NO.

Um, dad? What did you have for lunch??

“Meatloaf.”

Are you sure????

Yes, he actually really did eat the dogfood for lunch, thinking the whole time that it was leftover meatloaf. That story has become something of a legend in our family; I’m afraid he’ll never live that one down! 😉

Anyway, here’s the recipe:

Italian-Style Lamb Meatloaf

1 ½ lbs (approx) ground lamb

1 medium onion, chopped

2 cloves garlic, minced

¼ cup chopped fresh parsley

1 egg, beaten

1 ½ tsp salt

½ tsp pepper

3 Tbsp parmesan cheese

8 oz spaghetti sauce

1 cup finely chopped bread (or dry breadcrumbs). (I use two slices of Ezekial 4:9 Sprouted Grain sandwich bread.)

1 ½ tsp Italian Seasoning

Mix all ingredients together, spread into a loaf pan, and bake at 350* for about 1 to 1 ½ hours, or until the top is nicely browned and/or the internal temperature measures about 160F.

Italian-Style Lamb Meatloaf

Since this delicious, hearty dish will feed a family for not much more than the cost of the ground lamb (I get mine in the freezer section of my health food store), it’s actually pretty frugal…and is therefore part of Pennywise Platter Thursday over at The Nourishing Gourmet.

Kitchen Tip: Best Tool for Removing Baked-On Food

Best Tool for Removing Baked-On Food, (c) The Herbangardener

Oh my goodness, I have discovered something! I made some Challah bread over the holidays and did an egg wash over the top of each braided loaf, and then baked them on cookie sheets. Do you have any idea how hard it is to scrub burnt egg off a cookie sheet?? I scrubbed and scrubbed with my scouring pads, which I swear took a layer of metal right off the cookie sheet, but didn’t touch the egg.  I rummaged around, trying to find something else to use. There was my little nylon pan scraper that had come free with the Pampered Chef Stoneware loaf pan I’d bought. It’s so small and simple that I figured it wouldn’t work. WELL. That pan scraper plowed through the burnt egg like it was butter. So you know when you bake cookies and can’t get the baked-on crud to come off? PAN SCRAPER. You will not believe how well it works; in fact it seems like magic. Pampered Chef isn’t paying me to say this, so I guess it’s free advertising for them! (Though I have to say, I’ve been more impressed with the little pan scraper than the actual stoneware pan!)

And we discovered tonight that the Pan Scraper makes very quick work of any charred food baked onto the floor of the oven. No harsh oven-cleaning chemicals needed. And no scouring, either!

Anyway, you can buy them by clicking here: Pampered Chef Nylon Pan Scrapers. Definitely my new favorite cleaning tool!

Best Tool for Removing Baked-On Food, (c) The Herbangardener

Philosophy Friday: Getting Inspiration From Your Favorite Store

Getting Inspiration From Your Favorite Store, (c) The Herbangardener

Today’s Philosophy Friday is about getting inspired simply by visiting one of your favorite shops!

How? Here’s a little story:

These past couple weeks have been brutal at work; I come home feeling like a corpse…feeling as if I’ve had all the life drained out of me. That’s not the real me, and it makes me sad when I feel that way because of my job. The real me is happy and chirpy and energetic! 🙂 Earlier this week, I decided to drop into a beautiful house & garden boutique on my way home from work. It’s a lovely store with fountains and plants and nice music and nature-inspired home décor. I went in just to experience the store’s beauty — not to buy anything. And I was amazed at how much my spirits were lifted by spending just 15 minutes there. The atmosphere of the store reminded me of who I really was — what I love, and what my passions are (which I pretty much totally forget when I am working!). I left feeling rejuvenated as the cares of the week just faded into the background.

Try this technique sometime! Here’s how:

Think of something you enjoy…a hobby, an interest, and then think of a store that’s dedicated to that interest…perhaps a garden center/greenhouse, yarn shop, bookstore, music store, cooking shop, clothing boutique, antique store, herbal apothecary, gourmet food shop, art gallery, art supply store, travel store, camping store, whatever. Just go there without any intent to buy anything (leave your purse at home!). Wander around, absorb the atmosphere, and allow yourself to be inspired by what you see. Get ideas from the creative displays. Being surrounded by a concentrated dose of things that pertain to your passions will connect you directly to who you really are at your core (which, on a day-to-day basis, might be deeply buried!). (Also, just because you go into a store does not mean you have to feel obligated to buy something. It’s perfectly okay to just look around!)

You might just be surprised at how much inspiration you can get from your favorite shop, without even buying anything. 🙂

« Older posts

© 2024 The Herbangardener

Theme by Anders NorenUp ↑