The Herbangardener") Kefir is a fermented milk drink from the Caucasus region of Eurasia, similar to yogurt, but with an enhanced probiotic profile. Traditionally, kefir is made by dropping “kefir grains” into milk (raw milk or pasteurized, but not ultra-pasteurized). The kefir grains ferment the milk, causing it to thicken and take on a yogurt-like tartness, although the consistency is thinner than yogurt. Kefir can be purchased in bottles at the store, however commercial kefir is produced using powdered kefir starter rather than the actual “grains,” and therefore doesn’t possess nearly the probiotic diversity of traditional kefir. The only way to obtain traditional kefir is to make it yourself with kefir grains. The good news is, it couldn’t be easier! I used to make yogurt a lot, which required heating milk to the scalding point, then cooling it to 110 degrees, stirring in the “starter” (plain yogurt), wrapping the jar in towels and placing it on a “reptile heat rock” where it would sit for 4-6 hours. While the process itself was very easy, it was labor intensive. Kefir is SO much easier, and again, has more probiotic benefits than yogurt.
Kefir is a fermented milk drink from the Caucasus region of Eurasia, similar to yogurt, but with an enhanced probiotic profile. Traditionally, kefir is made by dropping “kefir grains” into milk (raw milk or pasteurized, but not ultra-pasteurized). The kefir grains ferment the milk, causing it to thicken and take on a yogurt-like tartness, although the consistency is thinner than yogurt. Kefir can be purchased in bottles at the store, however commercial kefir is produced using powdered kefir starter rather than the actual “grains,” and therefore doesn’t possess nearly the probiotic diversity of traditional kefir. The only way to obtain traditional kefir is to make it yourself with kefir grains. The good news is, it couldn’t be easier! I used to make yogurt a lot, which required heating milk to the scalding point, then cooling it to 110 degrees, stirring in the “starter” (plain yogurt), wrapping the jar in towels and placing it on a “reptile heat rock” where it would sit for 4-6 hours. While the process itself was very easy, it was labor intensive. Kefir is SO much easier, and again, has more probiotic benefits than yogurt.
For those reasons, I probably won’t go back to regularly making yogurt; I’m definitely a kefir convert! 🙂
 The Herbangardener")
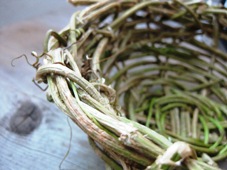
Kefir grains
To make kefir, you’ll first need to obtain kefir grains. This was the hardest step for me, for some reason. Silly, I know, since they’re widely available on the internet & through kefir grain exchanges. I think I must have been wary of these mysterious grains — they were a big unknown at first. I didn’t know how to use them, nobody I knew had even heard of them, and I thought surely I would either kill them or accidentally culture some kind of rogue bacteria that would kill me, and the whole thing would be a waste of money. Well, I’m here to tell you that they’re very easy to use, very hard to kill, and it’s highly unlikely you’ll culture something abominable (and if you did, you’d know it).
So now that we’ve gotten the fear out of the way, where do you get these grains? There are many websites out on the ‘net where people with too many grains will give them away for free — usually all you pay is postage. Kefir grains multiply, you see, so the more often you make kefir, the more grains you will have. I chose to buy my grains from an online company (Cultures For Health), wanting to be sure I was getting them from a good, reputable source. Now that I have confidence and experience with making kefir, though, I’d feel just fine getting mine from someone who was giving them away for free.
Some places to get kefir grains (there are many others, too!):
Cultures For Health – online company, for purchasing grains
Kefir Lady – online company, for purchasing grains
Project Kefir – worldwide sources for (sometimes) free kefir grains
Toronto Advisors – worldwide sources for (sometimes) free kefir grains
HOW TO MAKE KEFIR:

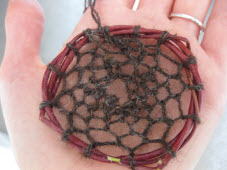
Kefir grains in muslin bag
Begin with 1 to 2 teaspoons of kefir grains per quart (4 cups) of milk (not ultra-pasteurized). You can either drop the grains into the milk and then strain them out later, but I find it easier to just put the grains into a clean muslin bag and drop the bag into the milk. I screw a lid onto the jar, because the lid will trap the CO2 that’s released, lending a slight effervescence to the kefir. If you don’t want the effervescence, just cover the kefir jar with a cloth & rubber band to keep out dust and bugs.
Leave the kefir at room temperature until it tastes the way you like it. I like to tilt the jar or stir the kefir now and then, though it’s not necessary. My kefir usually takes about 36 hours to thicken and get tart and effervescent, which is the way I like it. If your kefir separates into curds and whey, it’s definitely done! (More about this in the next section.) Strain out the kefir grains and enjoy! I love drinking kefir plain as well as using it in my smoothies.
To make another batch of kefir, simply transfer the grains into new milk. No need to rinse them first; in fact, rinsing slows their growth (Steinkraus, Keith, ed. Handbook of Indigenous Fermented Foods. 2nd ed. Pp. 306). Since I use a muslin bag to contain my grains, I just plop the bag into a new jar of milk without rinsing. No muss, no fuss.

I like to put my kefir grains into a muslin bag, which I transfer from one batch to another.

Perfect kefir - thickened, creamy, & effervescent. NOW is the time to take the grains out!
 The Herbangardener")
This kefir is "overdone" because it has separated into curds & whey. It's still usable (especially in smoothies!), but won't have the luscious, creamy texture.
Things I’ve learned about making kefir:
– Using your new kefir grains – Making kefir is very easy, though there may be an adjustment period while you learn how your grains work & while the grains get acquainted with the kind of milk you use. Your first couple batches of kefir might not come out how you like…the kefir may be too thin, too sour, too yeasty, too whatever. This is normal, so don’t worry; some grains need time to adjust, others don’t.
– What kind of milk to use? – You may use raw milk or pasteurized, but NOT ultra-pasteurized. (Ultra-pasteurized milk doesn’t culture! I learned this the hard way. Scary, yeah…) I try to get high-quality grassfed whole milk if possible because that’s what I like to drink, but any milk will work (again, just not ultra-pasteurized). Also, using cold milk straight out of the fridge is fine.
– It’s hard to kill kefir grains! – Kefir grains are resilient. In fact, I’ve left grains in the same milk in the back of the fridge for 7 months, and they survived. Many websites tell you not to let the grains touch metal. However, I’ve observed how resilient these things are, and therefore I highly doubt that touching metal will suddenly kill them. In fact, mine have touched metal and they’re not dead yet.
– What’s the secret to making good kefir? – Making good kefir is all about getting the right milk-to-grains ratio relative to the ambient temperature. It’ll require some experimentation, and you may not get consistent results every time unless you get scientific about it and measure out the same amount of kefir grains each time (necessary, since they multiply), put them into the same amount of milk, and culture at the same temperature. Temperature is the tricky part, because kefir will culture more quickly in warmer temperatures. (So, right about the time you’ve nailed down wintertime kefir-making, the season changes and you have to reinvent the wheel! :)) One way to control the temperature is to culture your kefir in a cooler with some ice. The easiest way, though, is just to decrease the amount of kefir grains you use in warmer temperatures (or increase the amount of milk) so that your kefir will culture more slowly.
– Help! My kefir is separating too quickly – My biggest frustration was when my kefir would separate too quickly into curds and whey. It would be fine, and then two hours later it would be completely separated. What’s happening in this situation is that there are too many kefir grains for the amount of milk you’re using. Either decrease the amount of grains, or increase the amount of milk.
(The science: The more kefir grains you have in your milk, the faster they’ll use up their food source (lactose, or milk sugar). When they consume lactose, they produce lactic acid, and too much lactic acid will cause the kefir to separate into curds and whey…because that’s just what acids do, so congratulations, you’ve made cheese!)
– Is separated kefir still good? – When kefir separates into curds and whey, it’s definitely still usable! It won’t have the creamy texture, so it’s not as lovely to drink. Instead, just use it in your smoothies, or else drain off/reserve the whey and eat the curds like a thick yogurt or let them drain further to make a thick, tangy “kefir cheese” spread. Yum!
– Storage of kefir grains – If you’re not ready to make more kefir right away, put your grains in the fridge, either in a bit of fresh milk or in some kefir. Often, I just store my grains in the jar of kefir I’ve just made, in the fridge. Ideally, though, store them in a cup of fresh milk and change it every week or two; this way, you’re giving them plenty of food (lactose) which will keep them happy and multiplying. For long-term storage, I’ve heard that you can also freeze them, or dry them out completely and store them, and then re-hydrate in milk when you’re ready to use them again. I haven’t tried this yet, but it’s on my list!
– Getting your grains to multiply – The best way to get your grains to multiply quickly is to make kefir every day, and to not store your grains in the fridge. We don’t go through enough kefir to make it every day, so my grains are often kept in the fridge. If kept in the fridge a lot, they will multiply much more slowly. If you have too many grains, give some away to friends, freeze some for “insurance”, or just eat them for a super probiotic boost!
– What ARE kefir grains, really? – Kefir grains are conglomerates of lactic acid bacteria and yeasts held together by a polysaccharide gum called kefiran produced by the predominating bacterial species. (Steinkraus, Keith, ed. Handbook of Indigenous Fermented Foods. 2nd ed. Pp. 306) The bacteria and yeasts have a symbiotic relationship, as the predominant bacteria is unable to grow in milk without the yeast’s presence. This conglomerate that makes up the kefir grain behaves as a single organism; efforts to produce new grains by growing the component organisms separately and then recombining them have not been successful.
– My kefir looks/smells/tastes bad – Kefir can occasionally taste yeasty, particularly if it’s “overdone” and separated into curds & whey. Yeasty is OK, but just use common sense and don’t drink it if it otherwise looks, smells, and/or tastes bad. However, culturing something rogue is not really a huge concern; both the acidity of the kefir and the culturing organisms do a good job of keeping away any little nasties.
From the Handbook of Indigenous Fermented Foods:
“Some inhibition of pathogens in fermented milks is due to acid production. Recent work has shown that the effect of acidity is relatively small compared to specific substances of antibiotic nature formed by the fermenting organisms (Lucca, 1975). In addition to lactic acid, metabolites such as lactocidin, nisin, and acidophiline produced by starter organisms during fermentation also exhibit antibacterial properties. Singh and Laxminarayan (1973) reported that many lactobacilli exhibited antibacterial action against pathogenic strains of staphylococci and E. coli. They also observed that antibacterial action was a function of pH; the culture filtrate lost antibacterial activity when pH was raised to 5.0 or above.”
 The Herbangardener")
 The Herbangardener")
 The Herbangardener")