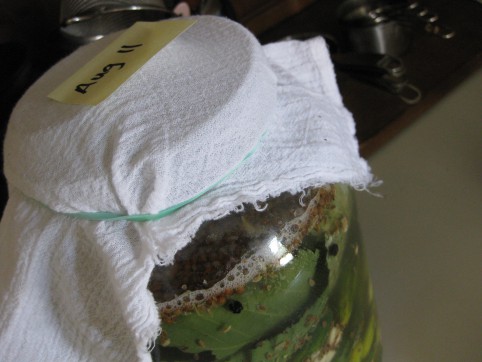
Kitchen / Garden / Sanctuary - Urban Homesteading to Nourish Body + Spirit

Tag: lacto-fermentation (Page 2 of 3)

How to Make Sauerkraut

Today I’m going to show you how to make your own old-fashioned, raw, lacto-fermented sauerkraut. The first time I made sauerkraut, I was sure I was doing something wrong because it was so easy!

Ingredients:

Cabbage – red or green (or a combo), organic

Sea salt – See my salting chart below, plus you may need more to mix up extra brine. (Any non-iodized salt will do, but unrefined sea salt is better for your body.)

*****

Here’s my salting chart. These are just guidelines — if you want, you can add a little more salt in the summer and a little less in the winter.

10 tsp salt per 5 lbs vegetables

5 tsp salt per 2 ½ lbs vegetables

2 tsp salt per 1 lb vegetables

1 tsp salt per ½ lb vegetables

½ tsp salt per ¼ lb vegetables

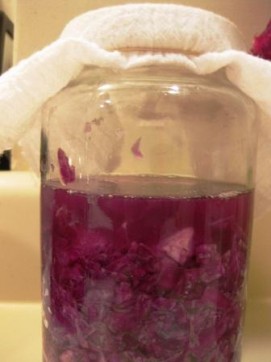
Cabbage becoming sauerkraut. (Little bits of cabbage clinging to the side of the jar --like in the picture-- should be scraped down into the brine, otherwise they'll get moldy.)

Chop, shred, or grate your cabbage — coarse or fine, however you like it. Sprinkle the salt onto the cabbage and mix it up. I let mine sit on the counter for several hours or overnight (this step is in place of pounding) so that the salt can begin to draw water out of the cabbage. The water contains nutrients, and these nutrients then become the substrate for the growth of the lactic acid bacteria which is what turns your cabbage into kraut. (Steinkraus, Handbook of Indigenous Fermented Foods, p.120.)

After the cabbage is wilted and some water has been drawn out, pack the cabbage WITH its water into a glass jar. You really want to pack it in there (use your fist or any kitchen tool), because this will help squeeze more water out. You can also use a specially-made ceramic sauerkraut crock, or a glass or ceramic bowl (anything except metal, since salt and acid can react with metal).

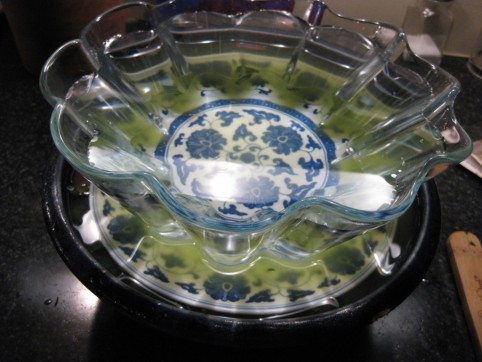
Keep your cabbage submerged under the brine by placing a smaller plate on top and weighing it down with something heavy (a jug of water, a boiled rock, etc.). Or, nest a smaller jar of water inside your larger glass jar. Or, wedge a whole cabbage leaf into the jar to keep everything submerged.

Sauerkraut fermenting in a ceramic bowl, weighed down with a plate & a water-filled bowl.

This is kale, not sauerkraut, but same idea. I particularly like this nesting-jars method for keeping everthing submerged in brine.

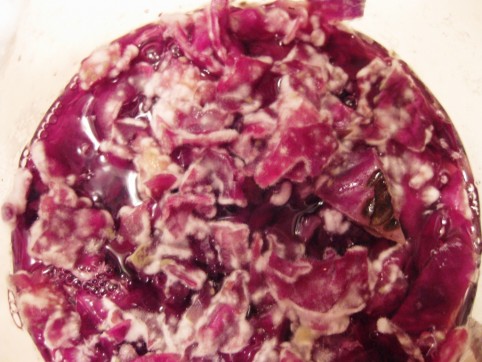
Whatever method you devise, just be sure that all traces of cabbage are completely submerged in the brine. Little bits sticking up above the water line will quickly lead to a moldy situation like the photo below (and if you do end up with mold like this, scrape off the entire top layer of cabbage, but the rest underneath should be fine! The kraut below the mold in this picture turned out great.)  So if you need to mix up some more brine (which is just a fancy name for salt water), use the ratio of 1 tsp salt to 1 cup of water.

This is what happens if your cabbage doesn't stay submerged in brine.

Cover the jar with either a lid (leave it loose to prevent pressure buildup) or a towel to keep bugs out.* Leave it to ferment at room temperature until you like the taste of your kraut. Let your tongue be your guide to done-ness. Taste it every few days, and transfer into the fridge when it tastes the way you like it. I like mine pretty sour, so I usually leave it out for 1-2 weeks or more, depending on how warm it is in the kitchen.

Once in the fridge, your sauerkraut will keep for many months. Don’t throw out the sauerkraut juice; it’s full of beneficial Lactobacillus (lactic acid bacteria) and is said to be a very good digestive tonic. And if you like, add a little of the juice to your next batch of sauerkraut as a starter.

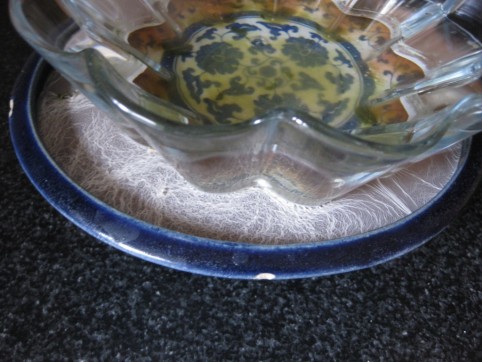
*If you see a white film (“kahm yeast”) develop on the surface of the brine, scrape off what you can each day until the kraut is done. Sometimes I don’t get any film. Sometimes I get a fair amount. There doesn’t seem to be any rhyme or reason. The kahm yeast won’t harm anything, but if you keep getting a lot of it day after day, it can sometimes (not always) impart an off taste to the brine. If that happens, I will actually dump out the brine and replace with new brine. How salty to make the replacement brine? Good question. I’m still experimenting with this. When I did this I used 1 tsp salt to 1 cup water, but then my kraut was almost done fermenting and ready to go into the fridge. In the summer — or if your kraut still has a ways to go — I might increase the ratio to 1 Tbsp salt per 1 cup water. Use your judgment and go for it; fermentation is an imprecise art!

Here you can see the white film (kahm yeast) that sometimes develops on the brine's surface (between the blue bowl and glass bowl).

Are Bubbies Products Raw?

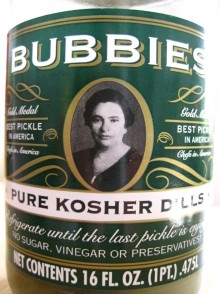
For a while now, I’ve wondered if Bubbies products are raw (ie., not heated or pasteurized). If you’re not familiar with Bubbies, they produce — among other things — excellent, old-fashioned, lacto-fermented pickles. In fact the only pickles Hubby will eat are Bubbies (or my own homemade Bubbies knock-offs).

So I sent an email to them, and if you’re a Bubbies fan too, you might be interested in reading their answer:

“Bubbies Bread & Butter Chips are vinegar brined and are a pasteurized food product, so there are no live cultures in that particular item.  Our Pure Kosher Dills, Dill Relish, Pickled Green Tomatoes and Sauerkraut are all naturally fermented and cured in salt water brine using a lacto-fermentation process. These products contain live cultures and the enzymes that form from a natural fermentation.

The Pure Kosher Dills, Dill Relish and Pickled Green Tomatoes are 100% raw; the Sauerkraut in the jars has been flash heated but not pasteurized.  This means that the Kraut is neither pasteurized nor raw.  Bubbies Bread & Butter Chips are vinegar brined and pasteurized and are shelf stable.

We were forced to begin heating our jarred Sauerkraut to calm the cultures inside because they were causing the kraut to continue to ferment too much in turn causing a buildup of gas that then results in brine leaking all over our distributor’s and retailer’s equipment and shelving.

When we heat our jarred Sauerkraut, it is quickly raised to about 135-140 degrees and then sealed in the jars.  The goal here is not to eliminate all the beneficial cultures, but rather to stifle them so they won’t cause the jars to leak.  When our Bread and Butter Chips are pasteurized the pickle chips and brine are heated to a boil and then allowed to simmer, to 212 degrees.  This process is designed at eliminating any potential cultures and is the style of preparation for that variety of pickle. While the heating we do for our Sauerkraut is only intended to calm the gas producing nature of the product with the specific goal in mind not to eliminate the beneficial cultures.  We do not claim that this product is raw for these reasons, but it still does have live bacteria.  From our testing, it is above 140 degrees that you really begin to eliminate the cultures present in our products on a massive scale.

It is important to note that our Sauerkraut is very crisp.  It is crunchier and able to maintain its crunch for far longer than other brands.  This is because there are still vegetable fibers left intact in the cabbage which are the complex carbohydrates that break down into the simpler food that the lacto bacillus cultures feed on during the fermentation process.

Hopefully this information will help in your continued enjoyment of our products and make it easier for you to remain a loyal customer.

Wishing you the very best in Food and Health!”

How To Make Traditional Kefir

Kefir is a fermented milk drink from the Caucasus region of Eurasia, similar to yogurt, but with an enhanced probiotic profile. Traditionally, kefir is made by dropping “kefir grains” into milk (raw milk or pasteurized, but not ultra-pasteurized). The kefir grains ferment the milk, causing it to thicken and take on a yogurt-like tartness, although the consistency is thinner than yogurt. Kefir can be purchased in bottles at the store, however commercial kefir is produced using powdered kefir starter rather than the actual “grains,” and therefore doesn’t possess nearly the probiotic diversity of traditional kefir. The only way to obtain traditional kefir is to make it yourself with kefir grains. The good news is, it couldn’t be easier! I used to make yogurt a lot, which required heating milk to the scalding point, then cooling it to 110 degrees, stirring in the “starter” (plain yogurt), wrapping the jar in towels and placing it on a “reptile heat rock” where it would sit for 4-6 hours. While the process itself was very easy, it was labor intensive. Kefir is SO much easier, and again, has more probiotic benefits than yogurt.

For those reasons, I probably won’t go back to regularly making yogurt; I’m definitely a kefir convert! 🙂
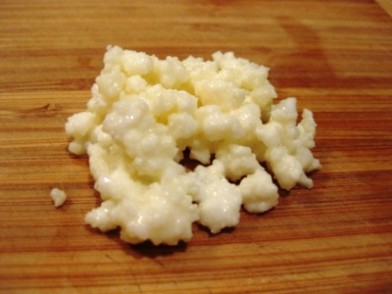
Kefir grains

To make kefir, you’ll first need to obtain kefir grains. This was the hardest step for me, for some reason. Silly, I know, since they’re widely available on the internet & through kefir grain exchanges. I think I must have been wary of these mysterious grains — they were a big unknown at first. I didn’t know how to use them, nobody I knew had even heard of them, and I thought surely I would either kill them or accidentally culture some kind of rogue bacteria that would kill me, and the whole thing would be a waste of money. Well, I’m here to tell you that they’re very easy to use, very hard to kill, and it’s highly unlikely you’ll culture something abominable (and if you did, you’d know it).

So now that we’ve gotten the fear out of the way, where do you get these grains? There are many websites out on the ‘net where people with too many grains will give them away for free — usually all you pay is postage. Kefir grains multiply, you see, so the more often you make kefir, the more grains you will have. I chose to buy my grains from an online company (Cultures For Health), wanting to be sure I was getting them from a good, reputable source. Now that I have confidence and experience with making kefir, though, I’d feel just fine getting mine from someone who was giving them away for free.

Some places to get kefir grains (there are many others, too!):

Cultures For Health – online company, for purchasing grains

Kefir Lady – online company, for purchasing grains

Project Kefir – worldwide sources for (sometimes) free kefir grains

Toronto Advisors – worldwide sources for (sometimes) free kefir grains

HOW TO MAKE KEFIR:
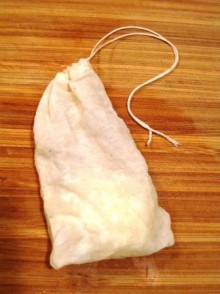
Kefir grains in muslin bag

Begin with 1 to 2 teaspoons of kefir grains per quart (4 cups) of milk (not ultra-pasteurized). You can either drop the grains into the milk and then strain them out later, but I find it easier to just put the grains into a clean muslin bag and drop the bag into the milk. I screw a lid onto the jar, because the lid will trap the CO2 that’s released, lending a slight effervescence to the kefir. If you don’t want the effervescence, just cover the kefir jar with a cloth & rubber band to keep out dust and bugs.

Leave the kefir at room temperature until it tastes the way you like it. I like to tilt the jar or stir the kefir now and then, though it’s not necessary. My kefir usually takes about 36 hours to thicken and get tart and effervescent, which is the way I like it. If your kefir separates into curds and whey, it’s definitely done! (More about this in the next section.) Strain out the kefir grains and enjoy! I love drinking kefir plain as well as using it in my smoothies.

To make another batch of kefir, simply transfer the grains into new milk. No need to rinse them first; in fact, rinsing slows their growth (Steinkraus, Keith, ed. Handbook of Indigenous Fermented Foods. 2nd ed. Pp. 306). Since I use a muslin bag to contain my grains, I just plop the bag into a new jar of milk without rinsing. No muss, no fuss.
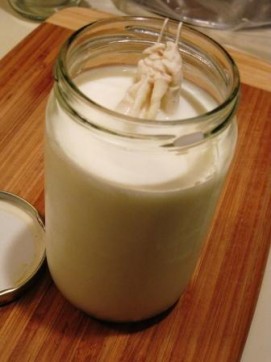
I like to put my kefir grains into a muslin bag, which I transfer from one batch to another.
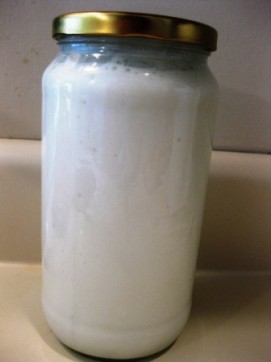
Perfect kefir - thickened, creamy, & effervescent. NOW is the time to take the grains out!
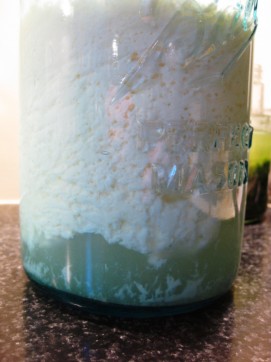
This kefir is "overdone" because it has separated into curds & whey. It's still usable (especially in smoothies!), but won't have the luscious, creamy texture.

Things I’ve learned about making kefir:

Using your new kefir grains – Making kefir is very easy, though there may be an adjustment period while you learn how your grains work & while the grains get acquainted with the kind of milk you use. Your first couple batches of kefir might not come out how you like…the kefir may be too thin, too sour, too yeasty, too whatever. This is normal, so don’t worry; some grains need time to adjust, others don’t.

What kind of milk to use? – You may use raw milk or pasteurized, but NOT ultra-pasteurized. (Ultra-pasteurized milk doesn’t culture! I learned this the hard way. Scary, yeah…) I try to get high-quality grassfed whole milk if possible because that’s what I like to drink, but any milk will work (again, just not ultra-pasteurized). Also, using cold milk straight out of the fridge is fine.

It’s hard to kill kefir grains! – Kefir grains are resilient. In fact, I’ve left grains in the same milk in the back of the fridge for 7 months, and they survived. Many websites tell you not to let the grains touch metal. However, I’ve observed how resilient these things are, and therefore I highly doubt that touching metal will suddenly kill them. In fact, mine have touched metal and they’re not dead yet.

What’s the secret to making good kefir? – Making good kefir is all about getting the right milk-to-grains ratio relative to the ambient temperature. It’ll require some experimentation, and you may not get consistent results every time unless you get scientific about it and measure out the same amount of kefir grains each time (necessary, since they multiply), put them into the same amount of milk, and culture at the same temperature. Temperature is the tricky part, because kefir will culture more quickly in warmer temperatures. (So, right about the time you’ve nailed down wintertime kefir-making, the season changes and you have to reinvent the wheel! :)) One way to control the temperature is to culture your kefir in a cooler with some ice. The easiest way, though, is just to decrease the amount of kefir grains you use in warmer temperatures (or increase the amount of milk) so that your kefir will culture more slowly.

Help! My kefir is separating too quickly – My biggest frustration was when my kefir would separate too quickly into curds and whey. It would be fine, and then two hours later it would be completely separated. What’s happening in this situation is that there are too many kefir grains for the amount of milk you’re using. Either decrease the amount of grains, or increase the amount of milk.

(The science: The more kefir grains you have in your milk, the faster they’ll use up their food source (lactose, or milk sugar). When they consume lactose, they produce lactic acid, and too much lactic acid will cause the kefir to separate into curds and whey…because that’s just what acids do, so congratulations, you’ve made cheese!)

Is separated kefir still good? – When kefir separates into curds and whey, it’s definitely still usable! It won’t have the creamy texture, so it’s not as lovely to drink. Instead, just use it in your smoothies, or else drain off/reserve the whey and eat the curds like a thick yogurt or let them drain further to make a thick, tangy “kefir cheese” spread. Yum!

Storage of kefir grains – If you’re not ready to make more kefir right away, put your grains in the fridge, either in a bit of fresh milk or in some kefir. Often, I just store my grains in the jar of kefir I’ve just made, in the fridge. Ideally, though, store them in a cup of fresh milk and change it every week or two; this way, you’re giving them plenty of food (lactose) which will keep them happy and multiplying. For long-term storage, I’ve heard that you can also freeze them, or dry them out completely and store them, and then re-hydrate in milk when you’re ready to use them again. I haven’t tried this yet, but it’s on my list!

Getting your grains to multiply – The best way to get your grains to multiply quickly is to make kefir every day, and to not store your grains in the fridge. We don’t go through enough kefir to make it every day, so my grains are often kept in the fridge. If kept in the fridge a lot, they will multiply much more slowly. If you have too many grains, give some away to friends, freeze some for “insurance”, or just eat them for a super probiotic boost!

What ARE kefir grains, really? – Kefir grains are conglomerates of lactic acid bacteria and yeasts held together by a polysaccharide gum called kefiran produced by the predominating bacterial species. (Steinkraus, Keith, ed. Handbook of Indigenous Fermented Foods. 2nd ed. Pp. 306) The bacteria and yeasts have a symbiotic relationship, as the predominant bacteria is unable to grow in milk without the yeast’s presence. This conglomerate that makes up the kefir grain behaves as a single organism; efforts to produce new grains by growing the component organisms separately and then recombining them have not been successful.

– My kefir looks/smells/tastes bad – Kefir can occasionally taste yeasty, particularly if it’s “overdone” and separated into curds & whey. Yeasty is OK, but just use common sense and don’t drink it if it otherwise looks, smells, and/or tastes bad. However, culturing something rogue is not really a huge concern; both the acidity of the kefir and the culturing organisms do a good job of keeping away any little nasties.

From the Handbook of Indigenous Fermented Foods:

“Some inhibition of pathogens in fermented milks is due to acid production. Recent work has shown that the effect of acidity is relatively small compared to specific substances of antibiotic nature formed by the fermenting organisms (Lucca, 1975). In addition to lactic acid, metabolites such as lactocidin, nisin, and acidophiline produced by starter organisms during fermentation also exhibit antibacterial properties. Singh and Laxminarayan (1973) reported that many lactobacilli exhibited antibacterial action against pathogenic strains of staphylococci and E. coli. They also observed that antibacterial action was a function of pH; the culture filtrate lost antibacterial activity when pH was raised to 5.0 or above.”
What Makes a Healthy Diet?

Ahh, the hotly debated question! There’s such an overabundance of conflicting information that it’s hard to know what to believe. Nowadays when I think about what a healthy diet is, these things come to mind: traditional foods, whole foods, unadulterated foods; foods that haven’t been canned or bottled or packaged or pasteurized. And oh my goodness, what a mighty feat it is to eat a diet that fits all that criteria, especially in an urban city environment! My diet definitely isn’t perfect, but I feel that I’m moving in the right direction because I’m focused on eating much more of a traditional, whole-foods diet than ever before.

It wasn’t always that way, though!

For 10 years, I was a vegetarian (and I still love meatless dishes!). I absorbed what the mainstream media said about fat, cholesterol, and saturated fat. They said fat was bad, so I drank 1% milk, ate reduced-fat cheese, and used butter very sparingly. They told us to eat lots of soy, so I ate tofu and drank soymilk. Instead of meat, I ate processed “meat-replacement” products. Looking back, I’m sort of appalled that I was so easily led! But now I feel like I’m on a much better track with what I eat, and I wanted to share a little bit about that.

I started reading about Weston Price, a dentist who traveled the world in the 1920s and studied indigenous cultures and their traditional diets. He also observed, first hand, the increase in disease in those who began incorporating modern, western foods (white flour, white sugar, refined vegetable oils, canned & processed foods, etc.) into their diet.

It was fascinating stuff, and I really resonated with the advice to eat traditional foods in their unadulterated forms.

Admittedly, though, the first time I picked up a copy of Nourishing Traditions (a cookbook by Sally Fallon which is based on the findings of Dr. Price) from the library, I returned it right back to the library in disgust! The advice goes squarely against mostly all of the mainstream information about what’s good for our health, and it’s quite an adjustment for one’s brain to make at first, after a lifetime of hearing and believing the exact opposite.

But then I read two books that completely changed my perspective on what health food is: Real Food by Nina Planck, and In Defense of Food by Michael Pollan. (I highly recommend these books!)

After that, I went back to the library to get Nourishing Traditions again, this time reading it nearly cover to cover!

Based on the findings of Weston Price, the following are the characteristics of traditional diets that Sally Fallon has compiled. I use this list as a guide for what to include in my own diet. (Of course everyone will differ in their perspective on diet, but I really resonate with the list below.)

  1. The diets of healthy, nonindustrialized peoples contain no refined or denatured foods such as refined sugar or corn syrup; white flour; canned foods; pasteurized, homogenized, skim or lowfat milk; refined or hydrogenated vegetable oils; protein powders; artificial vitamins; or toxic additives or colorings.
  2. All traditional cultures consume some sort of animal food, such as fish and other seafood; land and water fowl; land and sea mammals; eggs; milk and milk products; reptiles; and insects. The whole animal is consumed — muscle meat, organs, bones, and fat.
  3. The diets of healthy, nonindustrialized peoples contain at least four times the minerals and water-soluble vitamins, and TEN times the fat-soluble vitamins found in animal fat (Vitamin A, Vitamin D, and Activator X (Vitamin K2)) as the average American diet.
  4. All traditional cultures cooked some of their food, but all consumed a portion of their animal foods raw.
  5. Primitive and traditional diets have a high food enzyme content from raw dairy products, raw meat and fish; raw honey; tropical fruits; cold-pressed oils; wine and unpasteurized beer; and naturally preserved, lacto-fermented vegetables, fruits, beverages, dairy products, meats, and condiments.
  6. Seeds, grains, and nuts are soaked, sprouted, fermented, or naturally leavened to neutralize naturally occurring anti-nutrients such as enzyme inhibitors, tannins, and phytic acid.
  7. Total fat content of traditional diets varies from 30% to 80% of calories but only about 4% of calories come from polyunsaturated oils naturally occurring in grains, legumes, nuts, fish, animal fats, and vegetables. The balance of fat calories is in the form of saturated and monounsaturated fatty acids.
  8. Traditional diets contain nearly equal amounts of omega-6 and omega-3 essential fatty acids.
  9. All traditional diets contain some salt.
  10. All traditional cultures make use of animal bones, usually in the form of gelatin-rich bone broths.
  11. Traditional cultures make provisions for the health of future generations by providing special nutrient-rich animal foods for parents-to-be, pregnant women, and growing children; by proper spacing of children; and by teaching the principles of right diet to the young.

For more information about the findings of Dr. Weston Price, read his fascinating book, Nutrition & Physical Degeneration. The pictures alone are convincing enough. Since the book was written in 1939, it’s now in the public domain in many countries and can be read online for free at this website:

http://www.journeytoforever.org/farm_library/price/pricetoc.html

For further fascinating information and lots of good articles and resources, visit the Weston A. Price foundation website.

Again, the following books are an excellent place to start:

Real Food, by Nina Planck

In Defense of Food, by Michael Pollan

I do also recommend Sally Fallon’s cookbook, mentioned earlier, called Nourishing Traditions: The Cookbook that Challenges Politically Correct Nutrition and the Diet Dictocrats. In addition to lots of recipes, it contains a wealth of nutrition information.

And for nutritional advice on nurturing your reproductive health and the overall health of your little ones, I highly recommend these books:

The Garden of Fertility, by Katie Singer

Real Food for Mother and Baby, by Nina Planck

I now strive to eat a diet of whole & unprocessed foods, using the unique food preparation methods of our ancestors in order to maximize nutrient availability. Stay tuned for more on the topic of traditional food preparation methods!

Make Your Own Bubbies Pickles

Have you ever had Bubbies? It’s the brand against which all other pickles are judged, at least in our house! My hubby is a huge fan. And if you like garlic, you’ll probably appreciate Bubbies, too. They’re not made with vinegar, but rather are made the old-fashioned way, though lacto-fermentation in brine. (I have a Bubbie’s Bread & Butter Chips pickle recipe too, which is made with vinegar.)

So for my very first attempt at homemade pickles, I turned the Bubbies jar upside down, identified which spices were in there, selected what looked like a good lacto-fermented pickle recipe, and hoped for the best as I sacrificed a couple of humongous garden cucumbers for the Great Pickle Experiment.

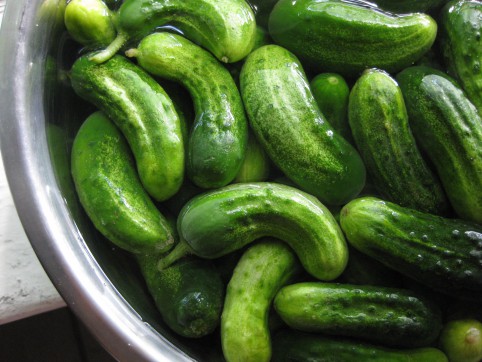
The results were shocking…in that I was shocked I had made something so tasty and convincing on the very first try. I certainly had expected the worst. In fact, I thought Hubby was being sarcastic when he tried the first one and told me they were awesome. He couldn’t stop talking about them! I was skeptical until I tried one, too. YO! Later, I did a taste test of my pickles compared to Bubbies; I actually liked mine even better! In the photo above, I used my large garden cucumbers, but to get the true Bubbies experience, go for the really small cukes; I find these at the farmer’s market, or at ethnic grocery stores. Go for organic if you can (which would be an upgrade from Bubbies, since theirs aren’t organic). Of course the really big cucumbers are fine to use, but because of their size, their insides won’t be quite as firm and crunchy as a smaller cucumber would be, and their skin will be a little tougher.

*****

Lindsey’s Bubbies Pickle Recipe:

1 gallon glass jar or ceramic crock

1/2 a gallon of warm water (tap water is fine)

A handful of fresh, clean grape leaves, oak leaves, or cherry leaves (optional — they supply tannins to keep the pickles crunchy) (UPDATE: raspberry & blackberry leaves work too, but have a stronger flavor than grape leaves)

3-4 lbs of cucumbers (small to medium is ideal, but if all you have is large, cut them into spears)

5-6 Tbsp non-iodized sea salt. I use Redmond RealSalt brand unrefined sea salt. (I usually prefer 6 Tbsp. Using 5 Tbsp of salt will yield a less salty pickle that my hubby prefers, however you may have to contend with more white film, or “kahm yeast,” on the surface of the brine during fermentation. More about kahm yeast in the instructions.)

2 – 3 heads of garlic, separated into cloves, peeled, & roughly chopped

3 Tbsp whole dill seed

2 Tbsp whole coriander seed

1 tsp whole mustard seed (brown or yellow, doesn’t matter)

1 tsp whole peppercorns

1 tsp fennel seed

1/2 tsp red pepper flakes

*****

Ingredients for Homemade Bubbie's Pickles

Ingredients for Homemade Bubbies Pickles. My homegrown garlic was a little small, so I used 4 heads.

*****

Directions:

Rinse the cucumbers, making sure the blossoms are removed. Soak them in very cold water for a couple hours (if they’re not straight off the vine).

In a separate clean jar (not the one you’ll be using for the pickles), dissolve the salt into the 1/2 gallon of warm water. Set aside — this brine will be one of the last things you’ll add.

Into the clean, gallon jar/crock you’ll be using for the pickles, drop in the garlic, dill, coriander, mustard, peppercorns, fennel, and red pepper flakes.

Then, put the cucumbers into the jar. If you’ve sliced large cucumbers into spears, pack the spears vertically into the jar.

Pour the salt water solution (a.k.a. the brine) over the cucumbers.

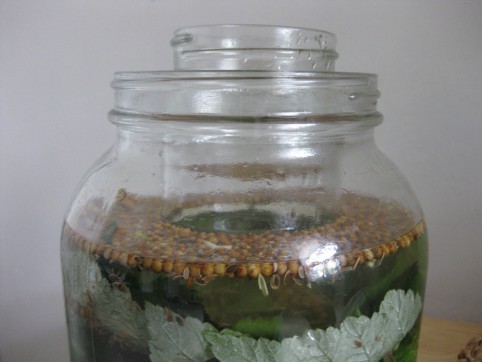
Now, place the cleaned grape/oak/cherry/raspberry/blackberry leaves into the jar. My jar has a somewhat narrow mouth, so the grape leaves form a nice plug at the top of the jar so the cucumbers (which will rise to the top after you pack them in) don’t go above the brine.

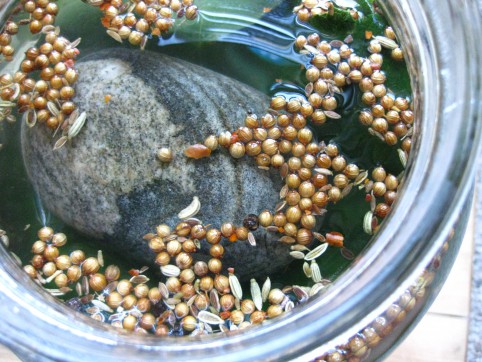
You want your cucumbers (and leaves) to be completely submerged in the brine at all times. If they’re sticking up above the brine, they’ll get moldy. If your jar has a wide mouth, you may need to use a couple of plates to keep everything submerged. Another idea is to nest a smaller glass jar into the opening of the larger jar to keep everything down. Or, use a scrubbed & sterilized rock.

Using nested jars to keep everything submerged.

Another idea: use a rock to keep everything submerged.

If the brine still doesn’t cover the cucumbers, make more brine solution using: 1 scant Tbsp sea salt to one cup of water. Cover your jar with its lid (loosely), or with a cloth to keep bugs & dust out. If you see a thin film of white scum growing on the surface of the water, just skim it off as often as you can, but don’t worry if you can’t get it all. This is “kahm yeast;” it won’t harm anything, but do try to keep up with it otherwise it can affect the flavor of your pickles.

Sometimes, during pickle making, some of your garlic cloves will turn blue. This is not a problem. The Colorado Extension Service website says this about blue garlic:

Blue, purple or blue-green garlic may result from immature garlic or garlic that is not fully dry, from copper pans, or from a high amount of copper in the water. Garlic contains anthocyanin, a water-soluble pigment that under acid conditions may turn blue or purple. A blue-green color also may develop in pickles made with stored red-skinned garlic. Except for blue-green color resulting from an abnormally high copper-sulfate concentration, such color changes do not indicate the presence of harmful substances.

Your pickles will be ready after 1-4 weeks — depending on the temperature in your house. Our pickles are usually ready after 10 days on the counter in our warm apartment (average of 80-85°F) in late summer. Every couple days, do a taste test of your pickles. They’re ready when they taste done to you! Once they taste done, transfer the jar into the fridge to slow fermentation. Once they’ve fermented and are in the fridge, you can remove the grape/oak/cherry/raspberry/blackberry leaves and you don’t need to worry as much about the pickles being completely submerged in the brine.

Enjoy! These will last months and months in your fridge. I once kept a batch around for 9 months and it was still good.

And the brine is good stuff too; I like to drink it straight. It’s full of beneficial bacteria and good for your digestion! Since it’s salty, it would be especially good after a workout.

*****

« Older posts Newer posts »

© 2024 The Herbangardener

Theme by Anders NorenUp ↑