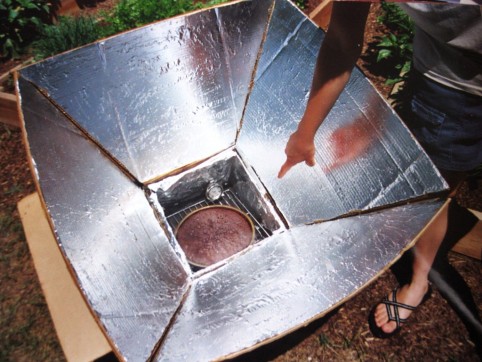
Baking a chocolate cake in the solar oven
I finally wrote up instructions on how to build a solar oven!
It’s the most magical toy! I love cooking things off the grid, using only the power of the sun. And solar ovens are fantastic for summer cooking when you want to cook (or bake!) without heating up your kitchen.
This design produces a powerful solar cooker — 350° or more. It can be made for only a few dollars, using ordinary household materials and tools, and is also a great project for older children.
Although my solar cooker is based on Joe Radabaugh’s original “Heaven’s Flame” (a.k.a. “SunStar”) design, I’ve simplified and made some modifications, which are reflected in my instructions below.
*********
Materials:
– Small Box. This is the inner part of the oven, where you put the food. Ideally square in shape, and measuring about 9-12” wide and deep. (Square makes a more powerful oven, but rectangular would work.)
– Large Box. This is the outer box, and needs to be 2-3” larger (or more) in all directions than the Small Box.
– Insulation cardboard. Gather lots of boxes of any size, since you’ll be cutting them up to stuff in between the Small Box and Large Box. Try the liquor store or grocery store for boxes.
– Cardboard for Collectors (4 pieces). Find four large, flat pieces of regular (not double strength) cardboard. Each piece should measure about 2’ x 3’. Appliance stores or bike shops usually have big boxes you can cut up.
– White Elmer’s Glue. (1 part glue to 2 parts water so that it’s more easily spreadable)
– Aluminum Foil, one roll. Any type will work, but an extra-wide roll of heavy duty foil is ideal.
– Glass. About ½” larger than both the length & width of the Small Box. Double strength glass will insulate better than single strength. It’ll only cost a couple dollars at a hardware store, and they can cut to size. Be sure to sand down the sharp edges of the glass with sandpaper or a rock.
– Duct tape
– 5 Pipe cleaners, or some twine
Making the Oven:
1. With a mat knife, begin cutting up your insulation boxes to fit into the bottom of the Large Box. Build up the cardboard layers so that when you place the Small Box inside, its top edge rests one inch below the top edge of the Large Box.
2. If your Large Box still has its flaps attached, leave two opposite flaps sticking out, and fold in the other two so that they’re inside the box. For the Small Box, bend all 4 flaps all the way back and tuck in between the Small and Large Box, or else just cut them off altogether. If you cut them off, take care to leave a smooth edge around the top rim.
3. Cut up the rest of the insulation boxes and stuff them into the space between the side walls of the Small Box and Large Box. Try not to leave big gaps in the insulation, and use enough insulation so that the Small Box is wedged tightly inside.
Solar Oven Cross Section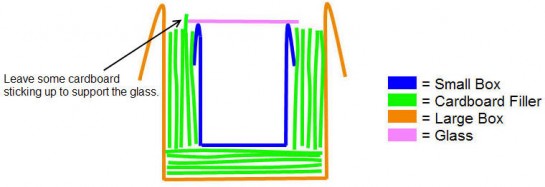
4. When your solar oven is in use, it’ll be tipped toward the sun. Therefore, you’ll need to leave a piece of insulation cardboard sticking up a bit to keep the glass in position. If you have a rectangular oven, it should be tipped on its wider side for stability. Therefore, the cardboard should stick up on one of the two wider sides.
Also, when you rest the glass on top of the Small Box, be sure there are no gaps between the box rim and the glass where hot air can escape.
5. Line the inside of the Small Box with aluminum foil, shiny side out. Glue it down if you want. (10/3/2012, Edited to add: Instructions for many solar ovens will tell you to paint the inside of your oven black. In fact, underneath the foil in my own oven is black paint! I use foil because I discovered that it makes for a hotter oven — hotter by about 25° to 50°. This is actually fairly significant especially if you’re baking things in your oven. Although that’s reason enough for me, another advantage to foil is that the black paint will off-gas when it’s heated in direct sun. Even after 8 years, when I took the foil off to re-test my conclusion, I could smell the black paint. And also, foil is more likely to be found in a typical household cupboard than black paint is.)
Making the Collectors:
6. On your four flat pieces of cardboard, draw the collectors according to the pattern below. Note that if your Small Box is rectangular, your collectors will be two different sizes (based on the length & width of your glass), and if it’s square, the collectors will all be the same size. The 67 degree angle can be found by using a protractor, or by folding paper as shown in the second diagram (don’t worry about the 67.5 degrees — it’s close enough to 67 degrees, and pinpoint accuracy is not crucial here).
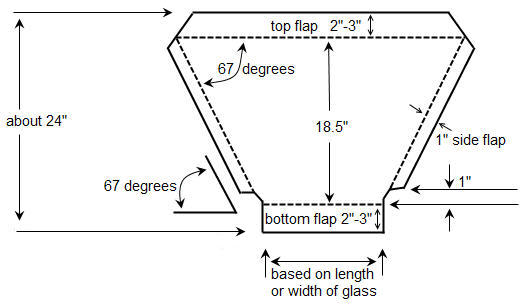

7. Cut out all four collectors with your mat knife. With a blunt-pointed tool, draw a crease along the dotted lines, and then fold the cardboard along the crease lines.
8. On three of the four collectors, bend the top and bottom flaps all the way over and tape them down with duct tape. On the fourth collector (which should be one of the wide collectors if your oven is rectangular), bend and tape the top flap, but don’t bend or tape the bottom flap because you’ll be attaching the Slip-In Piece to that bottom flap later.
9. Now, flip all four collectors over so that the taped flaps are underneath. You will now cover the smooth surface of your collectors with aluminum foil. With the shiny side up, roll the foil out over the collectors and cut so that it almost reaches the creased edges of the cardboard. (Don’t cover the side flaps with foil.) Thinly spread some of the Elmer’s Glue mixture onto the collectors and lay the foil in place (again, shiny side up), smoothing it outward with a clean cloth to minimize wrinkles.
Making the Slip-In Piece
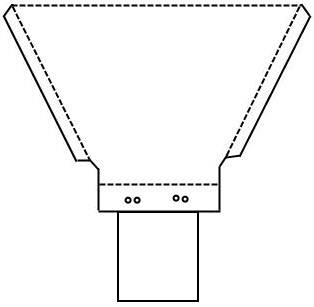 10. The Slip-In Piece is a piece of cardboard that attaches to the bottom flap from Step 8 that you didn’t tape down. It slips in amongst the pieces of insulation cardboard, allowing easy attachment of the collectors to the solar oven base. To make the Slip-In Piece, cut a piece of cardboard that’s roughly equal in dimension to (or a little smaller than) the height and width of your Small Box. Punch two sets of two small holes along the narrow end of the Slip-In Piece (as in the diagram on the right), and then punch corresponding holes into the bottom flap of your collector. Attach them with one of the pipe cleaners which has been cut in half (or, use twine).
Connecting the Collectors
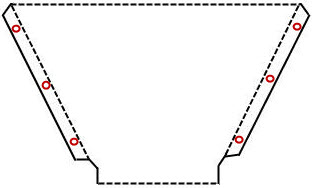 11. Punch three small, evenly-spaced holes into the side flaps of each collector, as in the diagram on the right. Place the holes in the exact same spot on all of the collectors’ side flaps so that they’ll line up when you’re ready to connect the collectors. And try to punch the holes as close to the crease in the cardboard as you can.
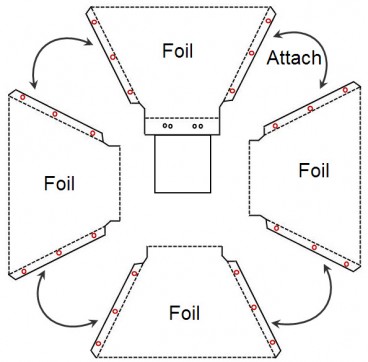
12. If you’re using pipe cleaners, cut four pipe cleaners into three pieces each. If you’re using twine, cut twelve 4-inch-length pieces. You’ll attach the collectors so that the foil-covered surfaces are facing each other, as in the diagram below. Thread the pipe cleaners or twine through the holes in the side flaps, and tie tightly.
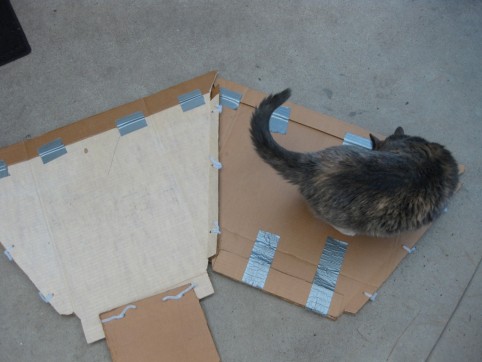
If possible, get a cat to inspect your handiwork.
Setting Up & Cooking In Your Solar Oven
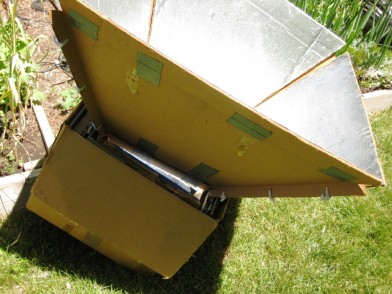
Tipped toward the sun, resting on the edge of the raised garden bed.
13. Take your solar oven to a spot in your yard that receives unobstructed sunshine. Attach the collectors to the oven by sliding the Slip-In Piece in between pieces of cardboard insulation at the top of the oven. Tilt your solar oven so that it’s pointed at the sun, and support it using bricks, rocks, overturned clay pots, or other sturdy things. Wearing sunglasses, fine-tune your oven’s position by observing the shadows inside the Small Box. Place your food inside the Small Box and set the glass into place. Again, there shouldn’t be any gaps between the glass and the top rim of the Small Box, and the glass should be supported by the piece of cardboard insulation that you left sticking up in Step 4.
– For best results, you’ll want to reposition your oven approx. every 30 minutes to keep it aligned with the sun. However, you can also cook while you’re away by pointing the oven toward where the sun will be at mid-day; you’ll then return home to hot food!
– My oven reaches a maximum of 350°. If I used double strength glass, it would probably be higher. For a lower temperature, keep the oven slightly misaligned with the sun.
– Your solar oven can be used to cook anything: rice, beans, grains, vegetables, meat, eggs, bread, cakes, cookies, pies, fruit cobbler, etc. I’ve noticed, though, that food doesn’t tend to brown in the same way that it would in a normal oven, so it may not look done when it actually is.
– I do most of my cooking in a large, wide-mouth glass jar with the lid screwed on very loosely. You can also cook (or bake!) in normal pans if you rig up a flat cooking rack.
– Don’t put anything into your solar oven that you wouldn’t put into your regular oven (plastics, etc.). Use an oven mitt or tea towel to lift off the glass — it gets very hot! Also, don’t forget to wear sunglasses when working around your solar oven (try without and you’ll see why!).
– It’s fun to keep an oven thermometer inside your solar oven to gauge the temperature.
– On a windy day, poke holes in both flaps that were left sticking out of the Large Box, and then poke some holes into the collectors. Tie the collectors to the Large Box flaps with twine.
– After using your oven a few times, the insulation cardboard might shrink a little. Add more cardboard so that it’s packed snugly.
– To keep your food warm after cooking, cover your oven with its collector panels.
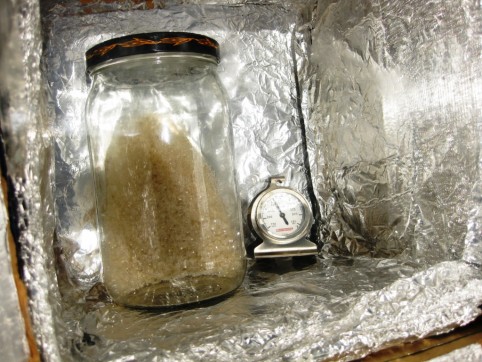
Cooking brown rice
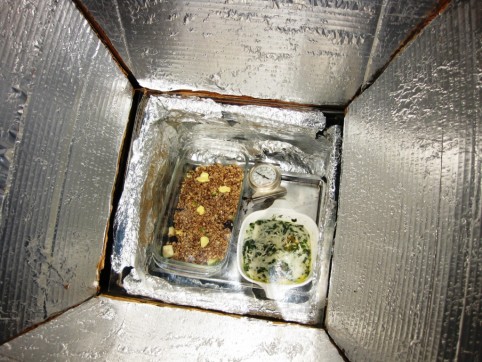
Solar Baking: Herbed Eggs & Apple-Blueberry Crisp




 10. The Slip-In Piece is a piece of cardboard that attaches to the bottom flap from Step 8 that you didn’t tape down. It slips in amongst the pieces of insulation cardboard, allowing easy attachment of the collectors to the solar oven base. To make the Slip-In Piece, cut a piece of cardboard that’s roughly equal in dimension to (or a little smaller than) the height and width of your Small Box. Punch two sets of two small holes along the narrow end of the Slip-In Piece (as in the diagram on the right), and then punch corresponding holes into the bottom flap of your collector. Attach them with one of the pipe cleaners which has been cut in half (or, use twine).
 11. Punch three small, evenly-spaced holes into the side flaps of each collector, as in the diagram on the right. Place the holes in the exact same spot on all of the collectors’ side flaps so that they’ll line up when you’re ready to connect the collectors. And try to punch the holes as close to the crease in the cardboard as you can.


